How to Paint Mountains With Watercolor – Watercolor Landscapes Tutorial
This post may contain affiliate links. We may earn a small commission from purchases made through them, at no additional cost to you.
Learning how to paint mountains with watercolor is a fantastic way to get acquainted with this type of medium. The watercolor medium has the ability to produce some amazing effects which can be extremely useful when painting watercolor mountains. This lesson focuses on teaching how to paint mountains for beginners in a rather easy yet wonderful manner. Mountain watercolor painting may not be as difficult as one would assume and can be accomplished using a variety of application techniques. Painting mountains is also an excellent technique for watercolor landscapes overall, and it is well worth adding to one’s watercolor skill set.
Our Guide on How to Paint Mountains for Beginners
This guide will show you how to paint mountains for beginners. This signifies we will need to go through a sequence of processes that will easily explain the steps of creating a mountain watercolor painting. Mountains in watercolor landscapes are a broad group that can be approached in a variety of ways. Nevertheless, we will discover in this guide that creating watercolor landscapes with watercolor mountains is not so difficult after all. When we start painting mountains, we’ll discover that it’s merely a case of layering our various colors from light to dark. Now that we have covered that, let us get started on our lesson on how to paint mountains in watercolor.
Step-by-Step Instructions on How to Paint Watercolor Mountains
Acknowledging the layering properties of watercolor is essential when learning how to paint mountains with watercolor. Realizing how watercolor works is necessary for attempting to learn how to paint mountains for beginners. Due to it being a water-soluble medium, it will invariably have a transparent characteristic, making the color appear quite a bit lighter when it has dried than when it is still wet. As we create these watercolor landscapes, we’ll notice that we will need to wait for different layers to fully dry before progressing.
Now it is time to go over the necessary stages for creating our mountain watercolor paintings.
Step 1: Creating the Sky
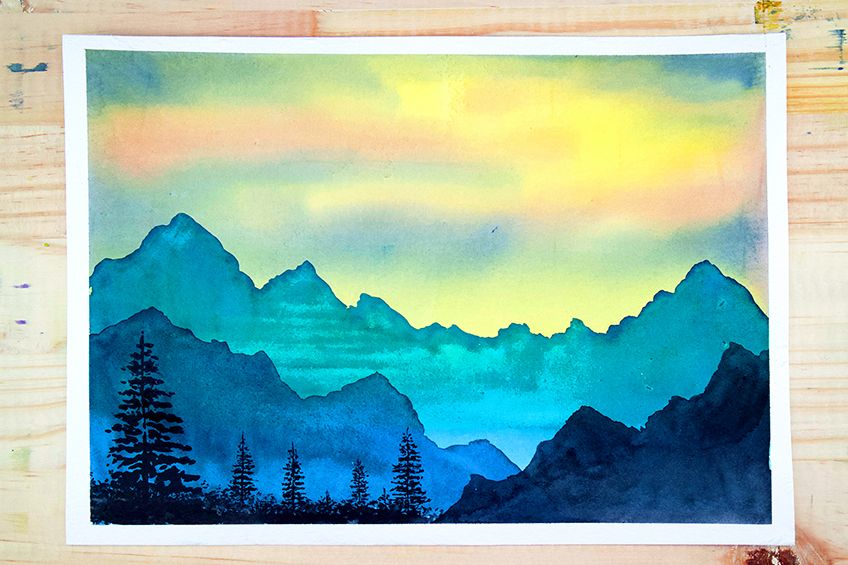
We start with the background of our mountains in watercolor. This means we’ll start with the sky and work our way down as the sun sets behind our mountainous region. The sky is always the best backdrop for painting mountains. We can start by applying a thin layer of water to the surface of our canvases. We will start with the lightest colors and work our way up.

A good rule of thumb is to only ever start with yellow and then add darker colors while the paint is still slightly damp. Red is a good color to add to our skies. Placing some red thrusts in the sky can help to define the sky and hint at clouds in the sky. Maybe even some blue strokes could be added to the sky as well.
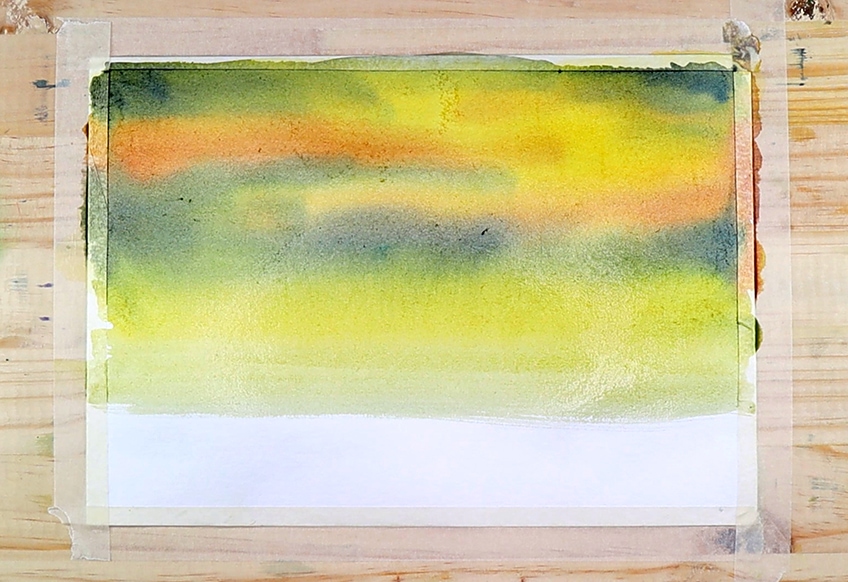
The addition of blue thrusts within the sky denotes the attributes of the sky that would have started to fade over the course of the day. The goal here is to produce a sunset-like sky that gradually fades behind the mountain. Now that we are pleased with our progress, we should then let our skies fully dry so that all of the colors blend together seamlessly.
This creates a more natural-looking sky that appears warmer behind the cooler colors of our mountain ranges.
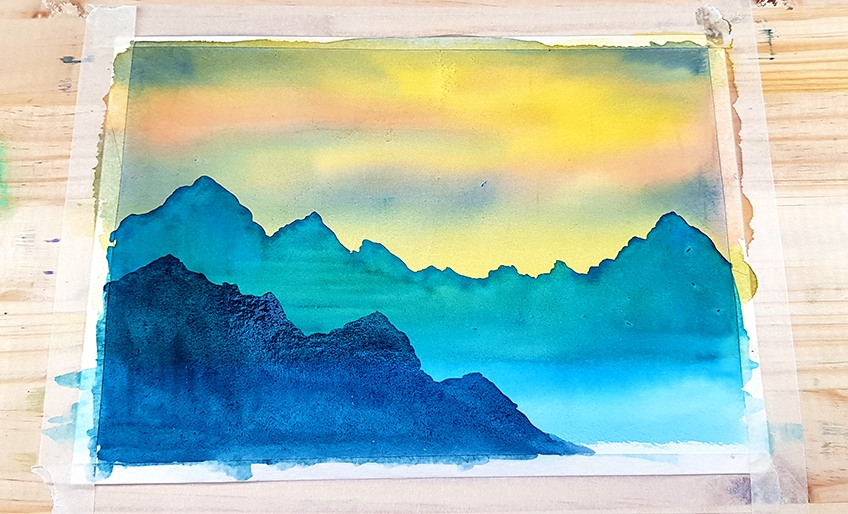
Step 2: Creating Our First Mountain Range
We’ll now start painting the assorted mountain ranges. We accomplish this by constructing each layer of the mountain with a different shade of a particular color. Since we have a brighter and warmer sky, let us begin to portray the mountains in cooler hues such as blue. We start by painting a lighter blue mountain ridge through our canvases.
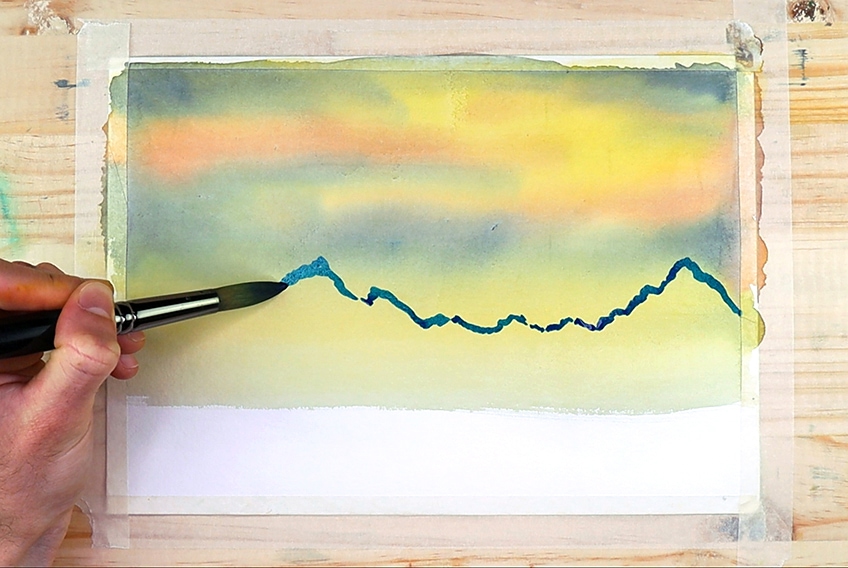
Now we will color our mountain ranges by completely filling in the area of the canvas that can be found beneath the ridge of the mountain that we have depicted. We do not need to bring that paint all the way to the bottom of the page, but we do want to cover the majority of it. Try to keep the first mountain range in your mix as light as possible. As each mountain range gets painted, the lighter-toned mountains should trail the darker-toned mountains.
We accomplish this by beginning with a lighter blue tone for the very first mountain range. The goal is to keep our paint wet throughout the entire painting of the mountain. The obvious reason for this is that we would like the mountains to have a more streamlined color configuration without any peculiar gradients of color or distinguishable lines once the paint has dried. As you color toward the edges of the artwork, ensure that you color toward the corners of the masking tape. We want to ensure we do this so that the mountains appear to stretch beyond the image’s frame.
Allow the first mountain range to fully dry after you’ve finished it.
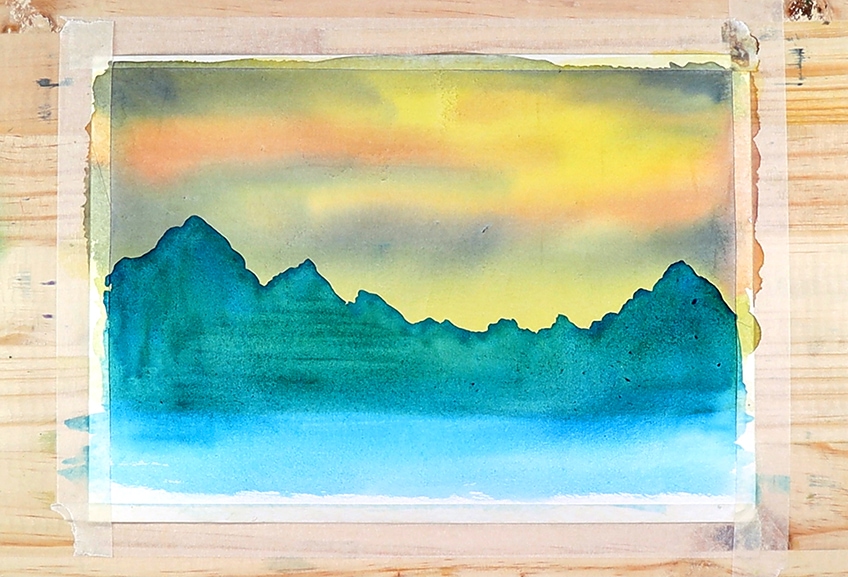
Step 3: Creating the Next Mountain Range
After our first mountain range has dried fully, we can start darkening our existing blue or mixing a new blue mix that is noticeably darker than the one we used in our first mountain ranges. Once we have done this, we can start drawing a line through our pages to indicate the next mountain range’s ridge.
Try to keep this next mountainous region a little underneath your first mountain range. Another good idea is to avoid painting it all the way across the page. Begin on one side of the canvas and make your way to the middle of the bottom section. We develop a feeling of height in our watercolor landscape by doing so, enabling the perspective to be illustrated from a higher vantage point. After we’ve outlined the mountain ridgeline on our canvases, we will then color our mountain with our darker blue color, just like we did in the previous step.
Make sure your paint reaches the bottom of the canvas this time. We want the mountain to appear to broaden beyond the painting’s frame. The perspective of the mountains now has a more pleasurable and believable aesthetic. Finally, keep the pint wet all through the technique of filling in the entire mountain with our darker blue. This is done so that when the paint has properly dried, it has a more seamless appearance with no odd areas that appear to be distinctive in color tone.
After that, enable it to fully dry before proceeding.
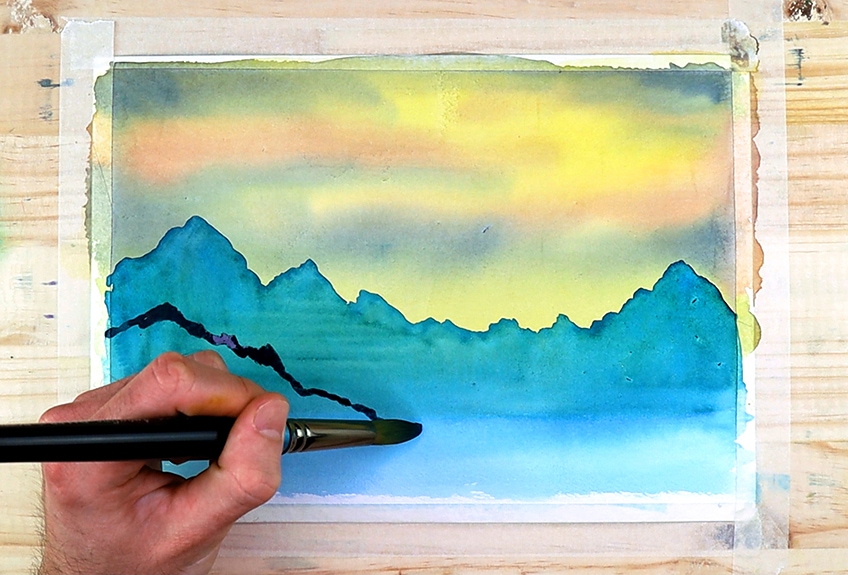
Step 4: Creating Our Final Mountain Range
We will now repeat the process for the last mountain range, beginning by making our blue darker one last time. It should be the darkest blue because each mountainous region should be slightly darker than the one before it. We can start by creating a smaller mountainous region on the reverse side of the page as the previous mountainous region.
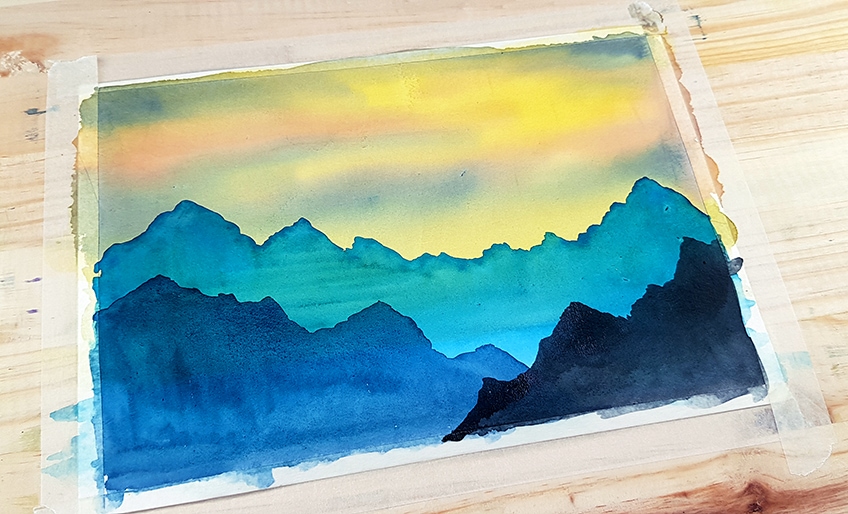
Strive to create this last mountain range as small as possible so that we can create a nice perception of the distance between the closest and farthest mountains. Watercolor mountains look best when they are layered in both color and size variants; this creates a more pleasurable composition. Finally, make sure you use an even dispersion of color to fill in the entire mountain.
We need to do this with all of the mountains, coloring the paint wet onto the canvas and letting it dry uniformly.
Step 5: Creating Trees in the Foreground
After all of our mountainous regions have dried fully, it is then time to start contextualizing the scenery with some foliage in the canvas’s foreground. It is rather simple to portray trees in the foreground. We begin by dabbing black paint into one of the lower corners of our artwork to instill a perception of vegetation.

To make a more non-wet mark, try using a dry brush and some black paint. We would like to use black because the plants will be in the foreground of the picture at this juncture, and the nearer the objects are, the darker they ought to be. This gives the image a good illusion of distance. To start, draw a downward stroke for the tree.
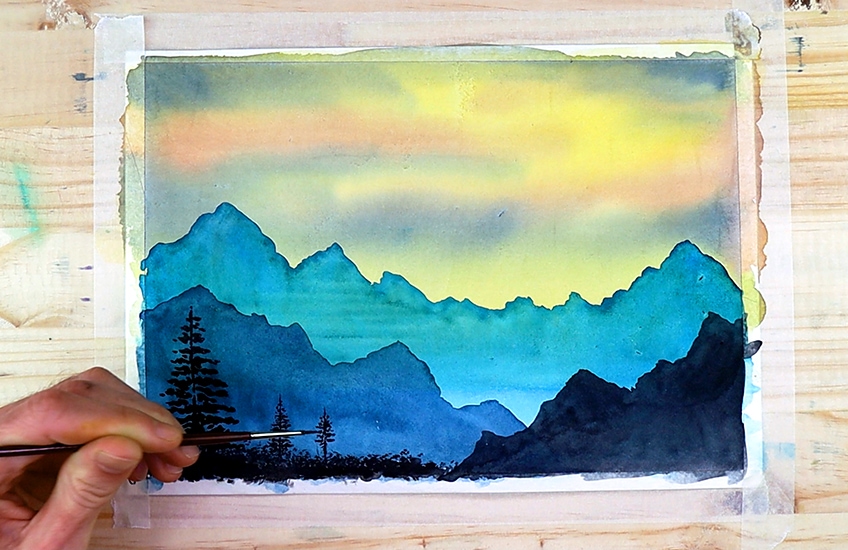
Continue to dab around that vertical line, but try to make a set of marks that characterize an arrow-head shape that gives the illusion of a pine tree. Pine trees perform well in mountainous watercolor landscapes because they add a forest quality to the landscape. Continue by painting one or two more trees to add variety. A good idea would be to paint the trees in various sizes to give a feeling of the various distances between them.
This also contributes to the picture’s depth, making the landscape appear more spacious.
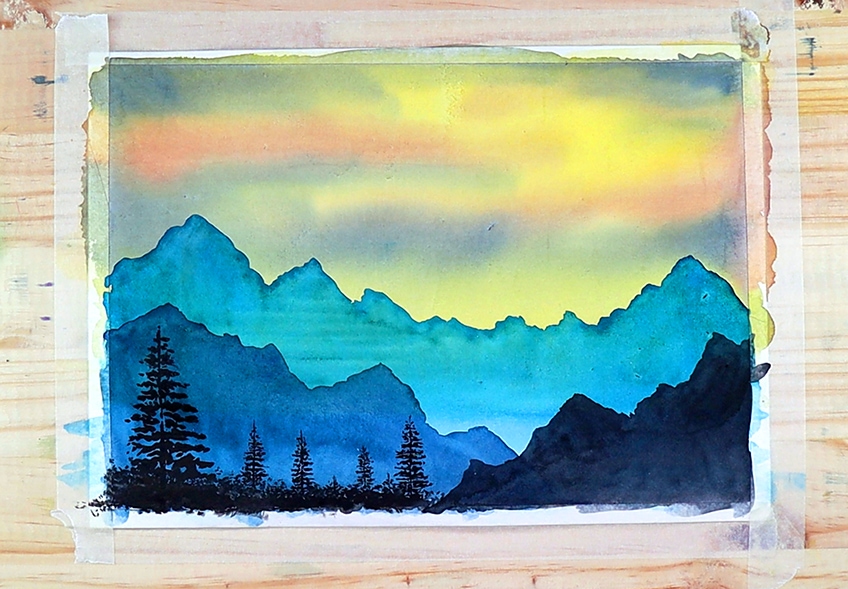
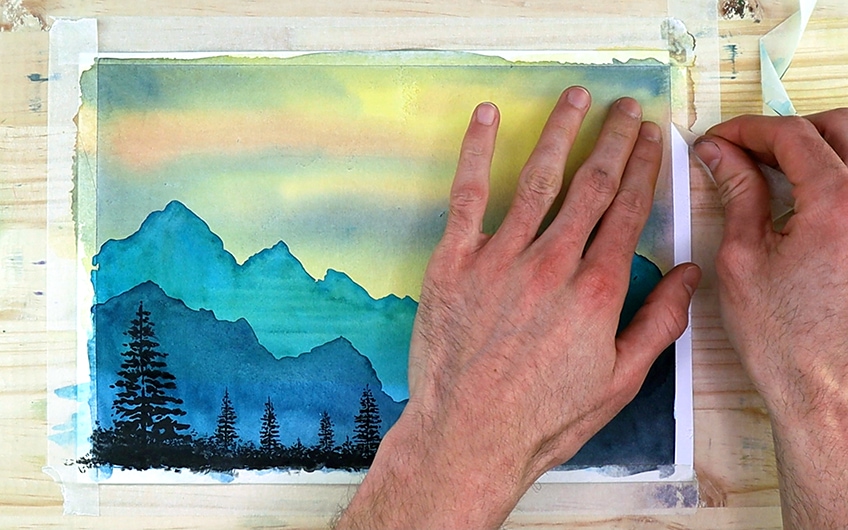
Step 6: Taking the Tape Off
When your artwork has fully dried, remove the tape from your picture. You would not want to destroy your paper if you do this too quickly. Only ever tear from the page outwards. That’s it for the watercolor mountains. This is an excellent and simple method for learning how watercolor mountains are painted. Painting mountains is a breeze if you’re patient and do not try to rush every step. This guide teaches beginners how to paint mountains in an easy way, and the result should be a lovely mountain watercolor painting.
Tips and Tricks to Keep in Mind
Painting watercolor mountains is a lot of fun and can be done in a variety of ways. We have discovered how to paint watercolor mountains by gradually building layer upon layer until we reach the darkest and concluding details of our watercolor landscapes. Now we will share a few more useful tips:
- When working with watercolors, always keep two jars of water on hand. One jar will be used for the first rinse after using your paints, and the other one will be used for a second wash to ensure that the brush has been properly cleaned.
- When painting with watercolors, always tape your paper down. This way, our paper will be planted firmly on our surface, giving us greater control.

- Watercolor requires quickness at times because some moments in the painting must be attended to while the paint is still wet. However, this is not always the case, as demonstrated in this tutorial.
- Painting mountains is merely a matter of laying shapes and colors on top of one another. It is necessary to proceed from darker to lighter colors.
When painting mountains, we must be patient and allow each layer to dry before applying the next layer of paint. Painting our mountains lighter further back and darker in the foreground mimics the natural influence of objects beginning to fade in the distance. As a result, it’s a vital technique to have on hand for future watercolor landscapes.
Frequently Asked Questions
How Does One Create Mountains in the Distance?
This technique of coloring mountains in the distance is frequently achieved by varying the opacity of the paint as well as the scale of the mountain on the canvas. One technique for painting distant mountains in watercolor is to make them smaller on the landscape that you’re painting. This frequently means that they will be on the horizontal line, but they will also be tiny on the canvas in comparison to larger foreground objects, such as foliage. Larger mountains in the distance are frequently painted with very light washes that resemble faded objects. This simulates the way things dissolve into the distance and works well with mountains.
What Is the Simplest Method for Painting Mountains?
We’d like to learn about the general framework of a mountain ridge. After that, we’ll create that ridge across the canvas, gradually filling it in with a light color all the way down the canvas. As we add new mountains to the artwork, we repeat the process with darker colors overlaid over each color. Each layer should become darker, creating an atmosphere of depth until you reach the foreground of your mountain painting, where you can add your final and darkest features.
What Methods Do I Use to Paint Mountains?
We start with the lightest layer, the sky, and paint it from top to bottom, almost filling the entire page. After that has dried, gradually start to paint mountain ranges in a light color. After allowing the first mountain to dry, you start creating another mountain range with a darker color. You then let that mountain dry before repeating the process until you’re happy with the mountain range in your artwork.

Matthew Matthysen is a multidisciplinary artist. He completed his fine art degree, majoring in History of Art and Contemporary Drawing Practice at the University of Witwatersrand, South Africa. Before joining acrylgiessen In 2020, Matthew worked part-time as an art teacher at Reddford Blue Hills High school. Matthew creates drawing and painting tutorials for acrylgiessen and captures them not only photographically and in written form. He also records the creation of his works in his own creative studio as in video format, from which later with a voiceover and a video editor also drawing tutorials for the Youtube channel of acrylgiessen are created.
Learn more about Matthew Matthysen and about acrylgiessen.