How to Stabilize Wood with Resin? – Guide for Stabilized Wood
This post may contain affiliate links. We may earn a small commission from purchases made through them, at no additional cost to you.
Wood is a raw material that is rather versatile and can be adaptable to various objects such as pens and knives. Wood can also be used to craft furniture and kitchen shelves that we use daily. We need wood, and thus wish to make it last longer. Wood unfortunately, like most materials, tends to age- eventually rotting as well. Sometimes extreme weather conditions also cause wood to expand and change size resulting in undesirably shaped wooden objects. As a skilled craftsman, you would have the skills to make wood more durable yourself. As you would term it – you have the ability to stabilize the wood. If you are new to working with wood and are looking for ways to ensure wooden items remain more durable, let the word, “wood stabilization,” slip off your tongue. Knowing how to stabilize wood will allow you to preserve more than just the wood’s outer surface area making the previously softer wood easier to work with and harder. Wood stabilization is the process for ensuring the longevity of wood. This is your guide to getting to grips with the ins and outs of the stabilization process.
What can we understand from the Term, ‘Stabilizing Wood’?
Wood is stabilized when resin or wood hardener is injected into a piece of soft or rotted wood, causing the wood to harden. Other substances can also be used to stabilize the wood such as resin epoxy, thermosetting resin, and a vacuum chamber. Hardwood can in turn be converted into objects that we use daily without being damaged in the manufacturing process.
If you think about it, flaky wood or wood that is overly soft is too difficult to work with. The softwood may break when you use certain tools on them. That is why we stabilize the wood to make it more manageable to work with.
Why does Wood need to be stabilized?
Any craftsman will assert that hardened wood is best to work with. When we set out to use wood that is hard, we can create almost anything effortlessly. The objects that we create from this hardened wood will look good, and the quality of the wood is clear from the end result of the product we created.
While we prefer harder wood, sometimes our luck gives us softer wood to work with. It is quite easy to want to throw in the towel when working with softer or rotten wood. Wood that is too soft ends up being damaged when we create new objects from it. You will note that objects created from softer wood may look good initially but will still lose their shape, value, and appearance over time.

That is why we inject the resin-to counteract the natural aging process of the softwood. While resin and epoxy will suffice for softwood, rotten wood can also be redeemed and reused to make new products. For rotten wood, we would ideally use a vacuum chamber to create overpressure within the wood. Thereafter we will add the material of Plexiglas (low –viscosity MMA) which will also act as a coloring agent for the wood. The vacuum chamber works to extract air, in turn creating an empty space in the wood’s pores.
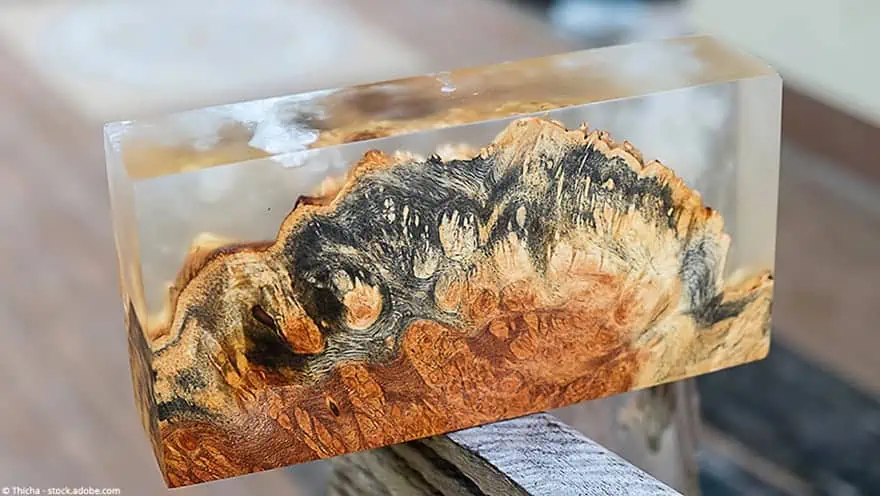
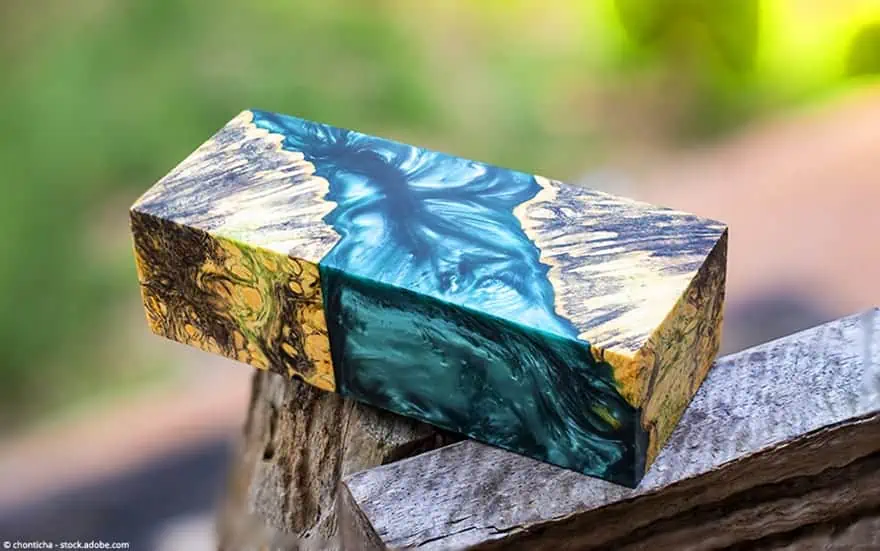
The idea is to extract all the possible moisture from within the wood blanks so that the stabilizing medium can seep throughout the piece of wood. Any moisture retained in the wood during the suction process will lead to insufficient stabilization, and do no wonders at all for the wood. The stabilized product exhibits the characteristics of both the Plexiglas and wood. Hence the stabilization process can be seen as the process of creating a hybrid. The new hardened wood product is far more durable, being able to withstand weather damage and any chemical harm. The sun’s harmful UV rays also do not in any way affect the stabilized wood.
The stabilization of wood is a non-toxic process causing no direct harm to humans or animals. The liquefied Plexiglas used for stabilization is considerably safer than hardening resin found in substances like cactus juice. The only precaution is not to use very high temperatures when working with the stabilized wood.
Applying heat over 120 degrees Celsius can cause the wood to smear and may have a harmful effect on the eyes if goggles are not worn. All precautions must be taken during the stabilization process so as to prevent any personal harm.
The reason people choose to stabilize wood themselves is that the process is normally known to be safe enough to conduct both indoors and outside. Provided all safety measures are put in place and all instructions correctly adhered to, you can stabilize wood yourself too.
What can be created from Stabilized Wood?
Why do craftsmen go through this entire wood stabilization process? Surely stabilized wood means that better products can be produced. Stabilized wood can be used to make everything we would generally craft from good quality wood. This includes bowls, pen handles, knife handles, dishes, and all wooden necessities that we need daily.
Wood created through the stabilization process has a strong grain and seems to be highly attractive. The idea is that selling products manufactured from stabilized wood can be sold at a higher price. The reason for the higher prices could be attributed to the fact that going through the stabilization process is a time consuming one. Needless to say, stabilizing wood requires lots of effort on your part but is well worth the effort.
What Type of Wood can be Stabilized?
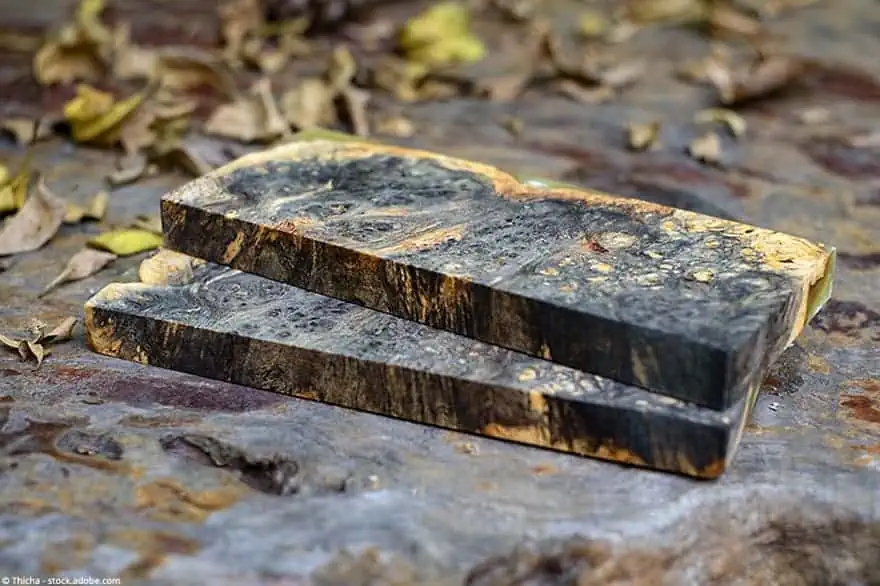
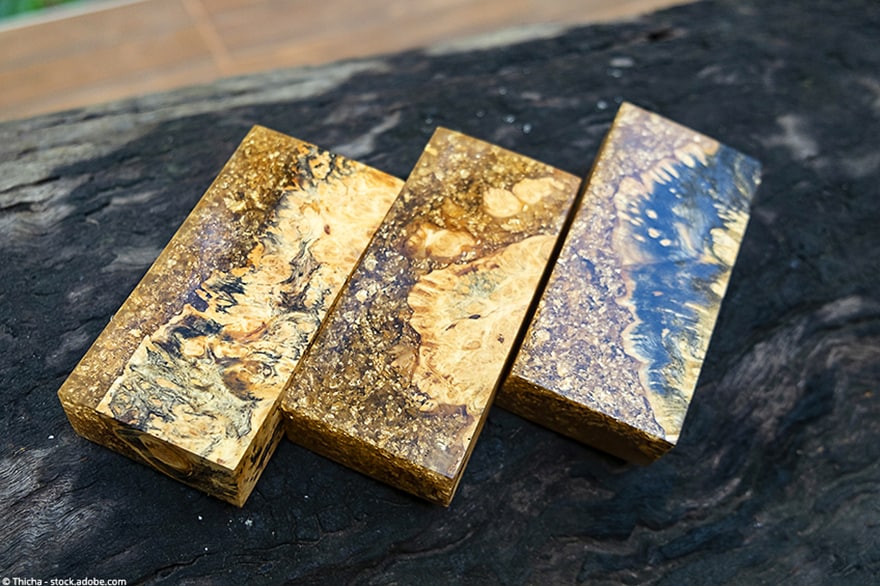
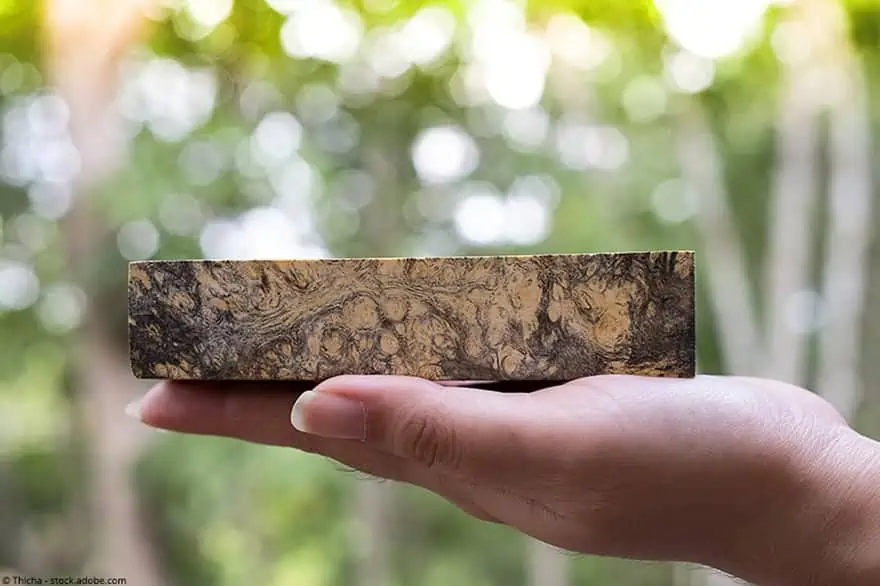
The truth is not all types of wood can be stabilized or they do not stabilize well. The best type of wood to be stabilized is the wood with large pores and a low density. The reason why wood with large pores can be stabilized rather easily is that the large pores allow the wood to absorb most of the stabilizing medium. The stabilizing medium is ultimately that which makes the wood more solid. Wood that looks well polished after the stabilization process includes:
- Birch
- Polar
- Beech
Birch, Polar and Beech are types of felled woodcuts that can be stabilized into great finished products. They all have excessively large pores to soak up much of the stabilization resin. The finished product maintains a good structure and looks even more refined after a good polish.
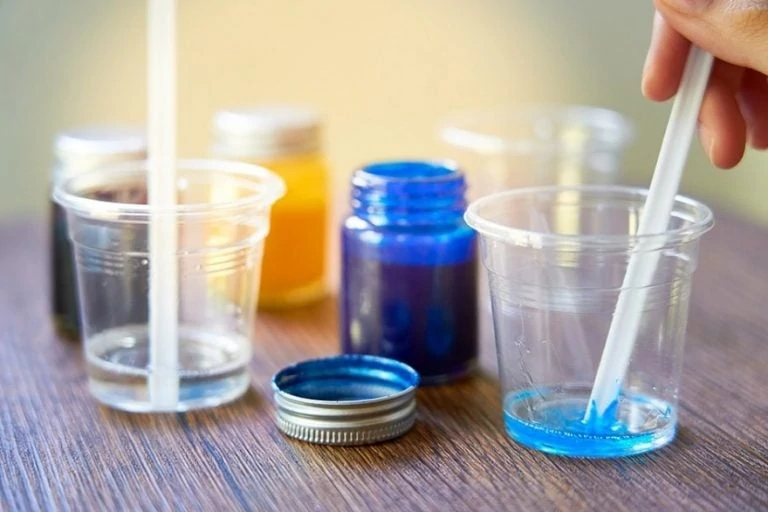
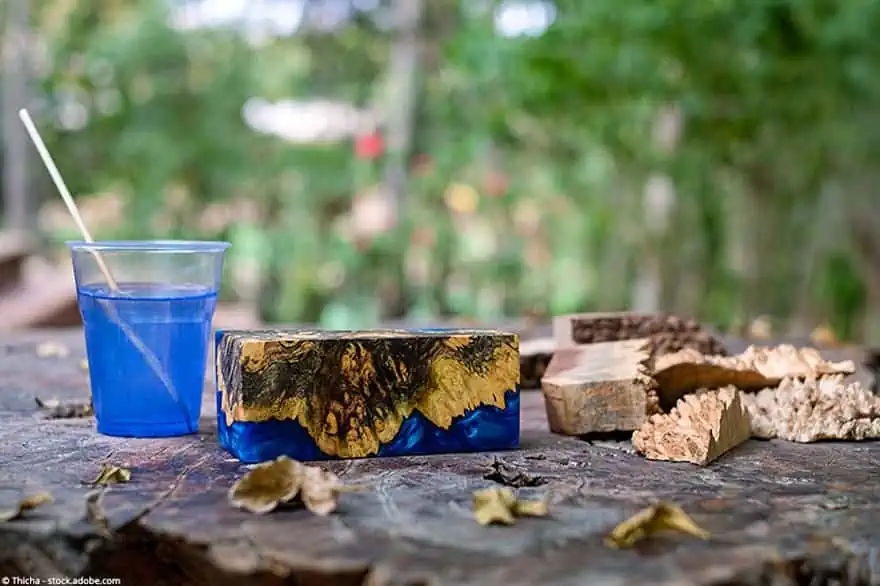
Dye can also, be added to the abovementioned wood types to make it look exceptional when it is converted into a finished product. MMA can further be used to color the wood. It is a great suggestion to purchase the MMA and resin from the same supplier. The supplier may also help you decide which color mediums are best for coloring the wood.
Certain wood types, however, are not suitable for the process. In fact, the stabilization process may not work at all on these wood types. Certain types of wood have much smaller pores and are rather oily. The reason that these wood types do not take well to the stabilization process is that the stabilization agent does not completely saturate the wood. The small pores do not soak up enough resin. Wood with a large amount of tanning agent does not stabilize easily either. Wood that is not easily stabilized includes:
- Rosemary
- Olive
- Ebony
- softwood
The Stabilization Process
Stabilizing Softwood with a Thermal Hardening Resin
To stabilize softwood, the thermosetting resin can be used. The reason we use resin is to penetrate the softwood completely. In fact, thermosetting resin penetrates the wood not only on the surface, but the heat soaks into the wood impregnating the wood as well. The resin-impregnated wood need not mean that you need not worry about the moisture in the wood. There should be the lowest amount of moisture within the wood. The word thermosetting already suggests that heat is employed for the process. In that way, the oven needs to be used to provide the heat for this process.
Cactus juice is a type of thermosetting resin that can be used for stabilizing wood. The cactus juice is not used in its basic form but mixed to reach its final hardness when baked in the oven. The idea behind the stabilization process is not to allow any humidity to get into the wood, drying out all the heat is essential. To prevent your wood from being overly humid, dry it in an oven for a full day at 104 degrees Celsius. The cactus juice that is used for stabilizing must never be stored in too humid a place either. Storing the cactus juice at 29 degrees Celsius could affect the properties of the resin.
A little bit of soap water can be used in order to clean stabilization equipment after the stabilization process. Get the stabilization equipment cleaned immediately after the process is complete.
Stabilizing Softwood with Epoxy Resin
The type of resin employed for softwood is epoxy resin. The epoxy resin is an amalgamation of resin and the hardener and works best when processed at 15 to 25 degrees Celsius. The way epoxy resin works is that it stabilizes the surface of the wood. It, however, does not seep deep into the wood to harden it entirely.
While you can try to stabilize wood with epoxy resin yourself, sometimes you may need to rope in an engineer to check your wood to see if it is fully stabilized. The idea when stabilizing with epoxy resin is not to allow any dirt to seep through during the stabilization process. Any flaky or broken pieces of wood must be removed from the wood first. This needs to be done to prevent dirt from interrupting the stabilization process. The wood must also be cleaned so as to be certain no dirt makes its way to the wood stabilization process.
Since epoxy resin struggles to penetrate the wood fully, a thinner can be added to the resin. The thinner will ensure that the resin becomes more penetrative when it is injected into the wood. Again safety is important and gloves must be worn when working with this type of resin. Also, ensure the area is kept well-ventilated throughout the stabilization process.
Wood Hardener can be used to stabilize the Wood
For damaged wood, craftsmen also use wood hardener to stabilize the wood. The wood hardener is translucent. By using wood hardener, there is no chance of a change in wood color. Using wood hardener is easy so can be done by almost everyone. The reason why craftsmen use wood hardener is that it is easy to work with and best for do-it-yourself jobs. The only thing about wood hardener is that like epoxy resin, it does not penetrate deep into the surface of the wood. So while wood hardener is good for stabilizing the wood, it may not be the best option for the purpose you choose to achieve.
Vacuum Chamber Stabilization for Rotten Wood
This method of stabilization involves using a vacuum chamber. If a vacuum chamber is not something you have, you may need to invest in one instantly. The type of vacuum chamber you decide to purchase is an important consideration. The stainless steel BACOENG vacuum chamber is a good purchase if you are seriously considering buying one. The BACOENG vacuum cleaner is available in different capacities and is priced well.
Pros
- The liquid filled display can be read easily
- The BACOENG vacuum chamber not only extracts moisture from the wood but also degasses the epoxy, and removes essential oils from organic material.
- It has a silicone mat that can be used over and over again without signs of wear and tear
- A great quality vacuum chamber which is highly visible
- Buying the BACOENG means getting everything you want without being incited to purchase additional products
Cons
- The only disadvantage is the container appears to swell inwards while in use
The BACOENG vacuum chamber comes well recommended as it is affordable. If the container seems to swell inwards, customer service can easily remedy the container. The wood stabilization process can effortlessly be produced with this chamber.
How to stabilize Wood with Thermosetting Resin
Thermosetting resin means an oven is used to cure the resin. 95 degrees Celsius is the oven temperature required. Drying wood at 104 degrees Celsius can be left to dry in the oven for 24 hours before the stabilization process.
Materials that you need include:
- Dry wood
- Vacuum chamber
- Vacuum pump
- Aluminum foil from the kitchen pantry
- A baking oven that reaches 95 degrees Celsius
- Coloring agent
- Protective equipment
- Hardened resin
- thermometer
How to ensure that you are ready for the Stabilization Process?
The first step for the stabilization process is actually preparing for the process.
- It is always a requirement to ensure you have all the necessary material for the process at your disposal.
- The equipment that is going to be used for the stabilization process needs to be checked. The equipment must be checked for damages and dirt, as any dirt on the stabilization equipment can hinder the process in its entirety.
- If you are using a vacuum chamber, it has to be checked for damages. The vacuum chamber has to be free from damages as this is of the utmost importance when stabilizing the wood as damages can affect the process.
- When working with substances such as resin, always ensure that you wear your protective gloves, aprons, and goggles.
- The resin needs to be rinsed off immediately if it comes into contact with your skin.
- All tools should be kept in an easy to access area so as to ensure the stabilization process occurs smoothly.
Once all this has been done, the actual stabilization process can occur.
Getting everything into the Vacuum Chamber
- The initial step to using a vacuum chamber is to lay the wood blanks that need to be stabilized in the vacuum chamber. During this process, the wood blanks may float away. It is vital to ensure that the blanks do not float off. An anti-float mat is one alternative that can be used to keep the blanks down.
- The resin must be filled in the vacuum chamber in such a way that it covers the blanks entirely. Once the resin is filled to about 15mm high, the chamber is closed. While 15 mm of resin in the chamber is the required amount, it is essential to fill the chamber with about 30mm of resin.
- The deeper the wooden blanks are soaked in the resin, the more long-lasting and durable the wood will become.
- Once the chamber is closed, the air extraction process occurs. Any air within the wood pieces is extracted.
- The stabilizing medium or resin will begin to boil. One of the main things during this process is to ensure that the resin doesn’t foam too much. It is better to slowly extract the air from the wood, then to start quickly and have over foaming resin.
- The process is only seen as being completed once the air is extracted entirely and the wood has soaked up all the resin. The entire process is believed to take an hour.
- After the completed process, the wood should still be left in the vacuum chamber for a while longer.
- Be cautious with the vacuum chamber, never open it too hastily.
Baking or Curing
The thing about vacuum chamber stabilization is that the process is not over when the vacuum chamber is opened.
- The wood blanks must be allowed to have some time to dry fully on a piece of paper towel.
- The resin that remains in the vacuum chamber can be poured directly into an airtight container. This wood stabilizing resin can be stored for a long time even after use. The resin can always be reused during the next stabilization process.
- All equipment used must be washed in foamy, soapy water until purely cleaned.
- The wood pieces need to carefully be wrapped in aluminum foil. The shiny side of the aluminum foil must cling as closely as possible to the wood pieces. The matt finish aluminum foil side should be facing you once the wood blanks have been wrapped.
- The oven should always be preheated to a minimum of 71 degrees Celsius. Setting the correct oven temperature is an essential step in the baking process, and the temperature should be checked to ensure that it is 71 degrees Celsius or more. Some of the resin may disappear from the wooden blanks during the baking process. You will know that the wooden blank was not properly dried before the baking process if too much resin escapes during the baking process.
- These foiled wooden blanks need to placed in the oven for between an hour to an hour and a half.
- The completion of an hour or more in the oven means the foiled blanks can be removed. Gloves must be worn when removing the heated blanks. The foil can be removed but it may not always come off so easily from the blank after the baking process. A knife or any other sharp object can be used to effectively remove the foil from the wooden blanks.
- The wood that comes out from baking in the oven is much harder than the wood you inserted in the oven.
Hardened wood is what you want. However, you must always consider how hard the wood is. This means that whenever you create certain products you must always consider the quality of the wood. A pen made from wood that is very hard can become overly heavy and impossible to use. Very hard wood must be used only for products that require extremely hardwood. The end of the baking or curing process signifies rotten wood that has been restored.
Tips for the best Stabilization
Stabilization, like any other DIY project, works if you keep these tips and tricks in mind.
- Firstly, you need to try and evacuate air from the wood’s pores at 30mmHg. The deeper that you evacuate; the deeper the resin will be able to penetrate the pores of the wood. Resin does tend to seep out of the wood during the baking process but the wood tends to retain most of the resin.
- Since the vacuum chamber allows you to save and store excess resin, make sure that you build your own cavity to store the resin. Saving the resin after the stabilization process means that you do not have to get rid of excess resin after the process.
- Stabilization is set to create harder wood. While harder wood is what you seek to achieve, you may get quite hardwood. Hardwood that is too solid can be worrying especially if the hardwood does not suit the object you decide to make. Use wood of the correct hardness to create the exact objects that you want to. A pen made from too thick a pen wood blank would be annoying to use at a later stage.
With these handy tips and tricks, you can enjoy the stabilization process too.
Questions frequently asked
How long does Wood Stabilization take?
The stabilization process takes anything from 4 hours to 24 hours. The time limit for the completion of the process is solely dependent on the type of wood you are working with. It usually takes 4-6 hours for wood on the low end. Wood on the high end takes about 24 hours to stabilize. For high-end wood, the reason as to why the process takes a day is because all the air must be fully evacuated from the wood in order for the stabilization process to be successful.
Can Stabilized Wood be waterproof?
No, stabilized wood will swell in water as it soaks in moisture via capillary action.
What other Substance can stabilize softer Wood?
Thinned out PVA glue can be used for stabilizing soft wood. Add water to thin it and allow the soft wood to soak overnight.

In 2005, Charlene completed her wellness degrees in therapeutic aromatherapy and reflexology at the International School of Reflexology and Meridian Therapy. She worked for a company offering corporate wellness programs for several years before opening her own therapy practice. In 2015, she was asked by a digital marketer friend to join her company as a content creator, and it was here that she discovered her enthusiasm for writing. Since entering the world of content creation, she has gained a lot of experience over the years writing about various topics such as beauty, health, wellness, travel, crafting, and much more. Due to various circumstances, she had to give up her therapy practice and now works as a freelance writer. Since she is a very creative person and as a balance to writing likes to be active in various areas of art and crafts, the activity at acrylgiessen.com is perfect for her to contribute their knowledge and experience in various creative topics.
Learn more about Charlene Lewis and about us.