Foreshortening – The Art of Depth and Perspective
This post may contain affiliate links. We may earn a small commission from purchases made through them, at no additional cost to you.
Drawing and painting involves representing our three-dimensional world on a two-dimensional canvas. Many artists use foreshortening to give their works a sense of depth and dimension, so if you are struggling with this in your own art, experimenting with the technique could be helpful. If you want a closer look at a foreshortening definition, as well as how to use the foreshortening perspective in your drawings and paintings, then join us as we explore the technique below!
What Is Foreshortening?
When we talk about a foreshortening definition, we are talking about a technique that influences how we perceive objects as they recede in space. With foreshortening, this objects’ form “shortens” as it tilts away from the viewer’s sight, however, its width remains largely unchanged. While this may sound complicated, it is actually a very easy concept to understand and one we encounter every day. A road or river are the easiest examples of explaining perspective foreshortening. When you look at a river traveling horizontally across a painting or drawing, you can see its true scale and length is in proportion. This is known as limited foreshortening.
On the other hand, when a river is depicted straight on, flowing from the foreground to the background of the painting, it appears smaller to be getting smaller and eventually disappears as it recedes into the background. This is what is known as extreme foreshortening.
With extreme foreshortening, each edge of the river appears to move towards each other as they extend into the distance. Additionally, the river looks shorter at the same time. While we may not always notice less extreme foreshortened drawings, there will always be some form of foreshortening when you are portraying a three-dimensional object on a two-dimensional surface. Foreshortening art mostly comprises still life and figure drawings and paintings as these tend to have more extreme examples, however, landscape and architectural works employ it as well.
Why Understanding Foreshortening Is Important
Not only is foreshortening an important skill for creating volume and dimension in your drawings and paintings, but it is also vital for conveying distance. Foreshortening helps place your subject within its environment and sets it within the scene. Through foreshortening, instead of just a flat image, the full dimension of the scene is conveyed as a three-dimensional place to the viewer. Aside from the proportion and dimension added to your works, foreshortening also adds a sense of realism to your art. By changing the objects in your work from two-dimensional into three-dimensional depictions, the shading, weight, and proportions are more accurately translated and there is an added sense of naturalism to landscapes.
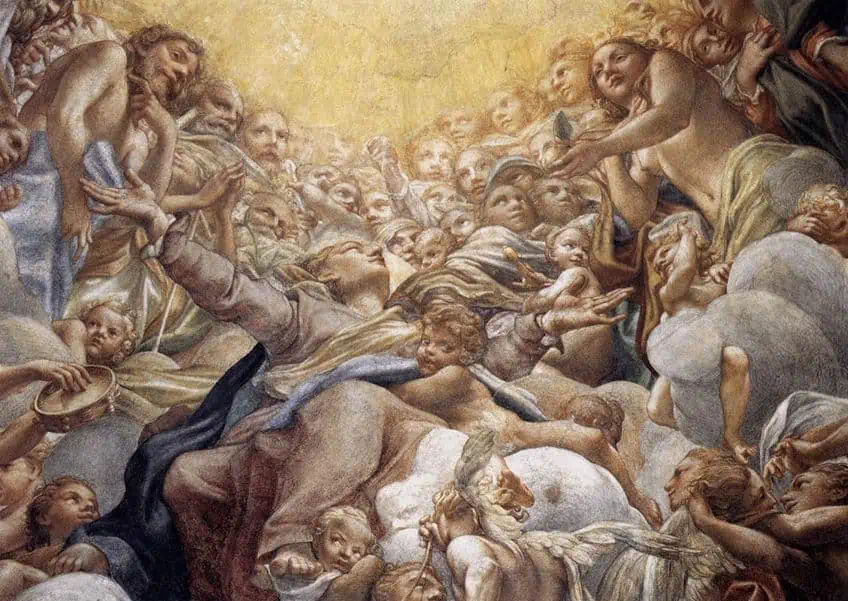 A detail of Corregio’s Assumption of the Virgin (1526-30); Antonio da Correggio, Public domain, via Wikimedia Commons
The History of Foreshortening
Although the foreshortening technique has been used in art throughout history, it became especially popular during the 15th century of the Renaissance period. Fillipo Brunelleschi, an Italian architect and sculptor, was the first reported artist to use foreshortening perspective techniques in his drawings back in 1415. Not much later Andrea Mantegna became one of the greatest proponents of the technique, which can most famously be seen in his painting The Lamentation over the Dead Christ (1490). In this painting, foreshortening is used to create depth by shortening Christ’s legs and chest. Mantegna’s frescoes paintings in the Camera degli Sposi (1465-1474) are also brilliant examples of the artist’s mastery of the technique.
Over the years foreshortening continued to be used by artists such as Michelangelo, Andrea Pozzo, and Giambattista Tiepolo. Today it forms an essential part of any artists’ repertoire.
Use of Foreshortening in Art
Many different foreshortening examples are found throughout history and mediums. One of the most striking cases of foreshortening is the Allegory of Force and Knowledge (1770) by Giambattista Tiepolo. This painting depicts two angels reclining backwards, and you can clearly see the foreshortening of the head and torso of the pair compared to their legs, which are in the foreground.
Foreshortening in Ceiling Frescos
Ceiling frescos provide some of the most spectacular foreshortening examples. In these architectural works, foreshortening art is used to create the illusion of the entire ceiling being much higher than it actually is as the painting appears to recede into the sky. Foreshortening is used to give the viewer the impression of three-dimensional depth on the flat two-dimensional ceiling surface and can create truly impressive effects. Separation of Light from Darkness (1512) by Michelangelo in the Sistine Chapel frescoes uses foreshortening to give the viewer the illusion of God rising above them on its flat ceiling canvas through strategic shortening of his form.
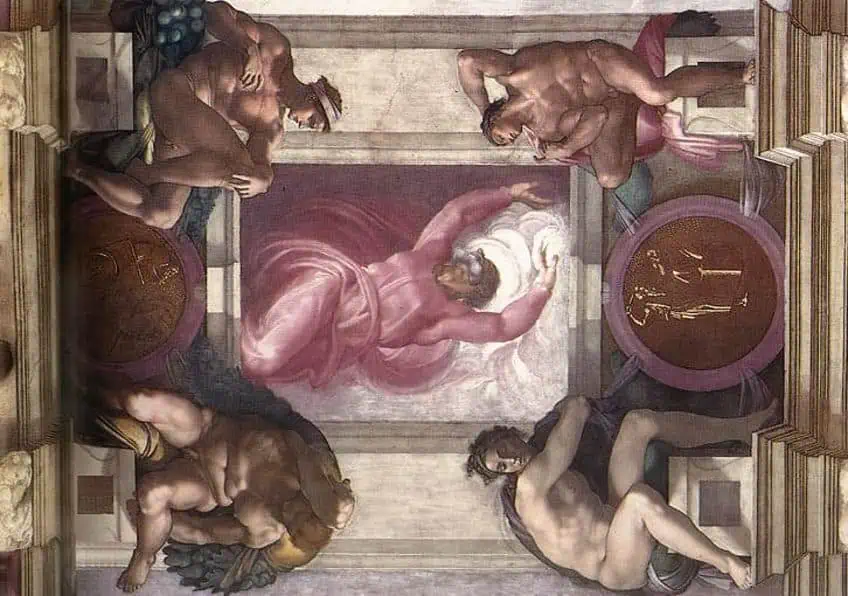 Sistine Chapel ceiling: bay 1: Separation of Light from Darkness (1512) by Michelangelo; Michelangelo, Public domain, via Wikimedia Commons
Foreshortening in Landscapes
The Oxbow Painting (1836) by Thomas Cole features a river that appears to narrow as it moves into the distance and almost disappears, through this we can see how the size of the object remains constant if it is the same distance from the viewer. Isaac Levitan’s Quiet Abode (1890) also features a river; however, it is the bridge that crosses over it that undergoes foreshortening. Using this technique, the artist conveys to the viewer that the vertical bridge has a distance comparable to the horizontal far shoreline, which has not been foreshortened.
It is through the interplay of different levels of foreshortening that the dimensions of the landscape are established to the viewer.
Wheatfield with Crows (1890) by Vincent van Gogh is another landscape painting that uses foreshortening. The technique is most noticeable with the trail that runs through the wheatfield and vanishes out of view as it moves off into the distance. The wheat throughout the piece also undergoes foreshortening however, as the stalks at front of the painting are not only more defined but also made with longer strokes compared to the shorter strokes of the background wheat. This gradual decrease in size actually creates the illusion of the wheat being the same height as it recedes into the background.
Foreshortening Art vs. Photographic Foreshortening
Although foreshortening works to create a sense of realism in your paintings and drawings, it is different from purely replicating the proportions seen in a photograph. While photographs are true reflections of reality, many artists alter the dimensions of objects or soften the foreshortening effect to make their work more harmonious or highlight certain aspects. A well-known example of this is the aforementioned The Lamentation over the Dead Christ. In this painting, the relative size of the feet has been reduced by the artist to allow the viewer to see more of the body and face. If this were a photograph taken from the same angle, the feet would have been big enough to obscure much of the legs and torso. Foreshortening can be a technique of proper angles and mathematical calculations, however, that is not the role of artists whose work is used to convey and portray rather than replicate a photographic view.
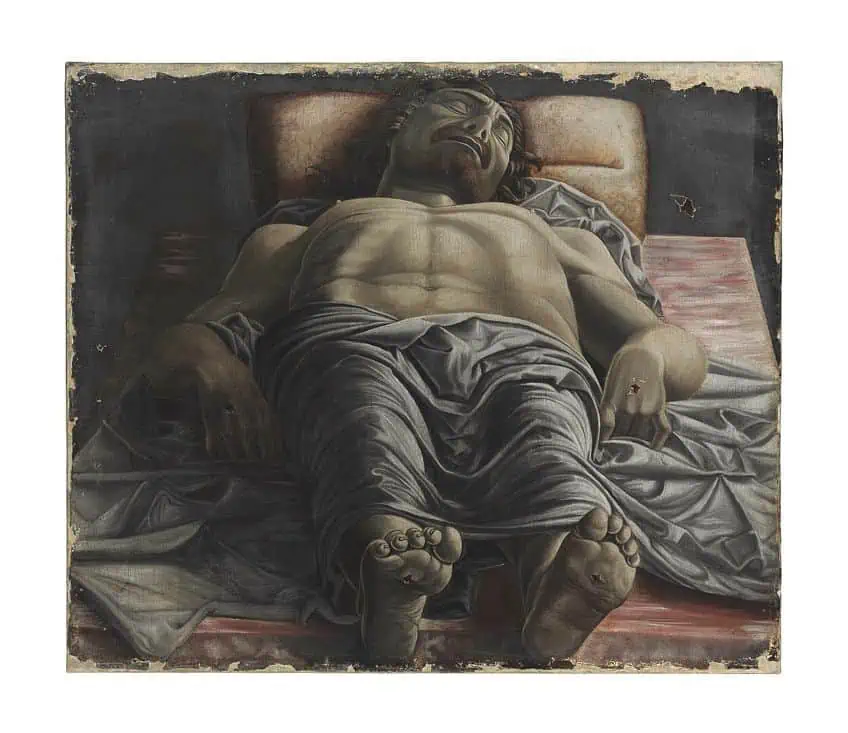 Lamentation of Christ (1480) by Andrea Mantegna; Andrea Mantegna, CC BY-SA 4.0, via Wikimedia Commons
Characteristics of Foreshortened Drawings
Painting or drawing foreshortening techniques all share certain characteristics that are used to achieve the illusion. We have covered most of these characteristics already, but it is important to know the reason behind why they are used and how they work together.
Objects Appear to Get Smaller As They Get Further Away
The main characteristic of foreshortened drawings is that as an object recedes into the background, it will appear to get smaller. As an example, if you were to draw a person from the perspective of them laying down with their head closer to you, their feet would appear much smaller than their head that is further away. This is because, in real life, closer objects appear larger than objects further away.
The illusion of foreshortening uses this knowledge and transfers it to your painting, by purposely drawing objects that are intended to be perceived as further from the viewer smaller to give an illusion of depth and distance.
When working with very long objects, the shape might even get small enough to become a single point or disappear entirely, as is often the case when drawing rivers and roads. This point is known as the vanishing point and is frequently used to show large distances.
Objects Further Away Appear to Be Shorter Than They Actually Are
As mentioned earlier, objects not only become smaller but also appear shorter or more compressed as they move further away. Again, this technique is used to mimic how your eyes perceive the real world as we see less of the length of an object when it is angled away from us. If you were to apply this to your drawing, the legs and torso of your figure would appear more compressed. It is important to note that the width of objects are generally unaffected by foreshortening, meaning that the torso of your figure will not become proportionally thinner, only shorter.
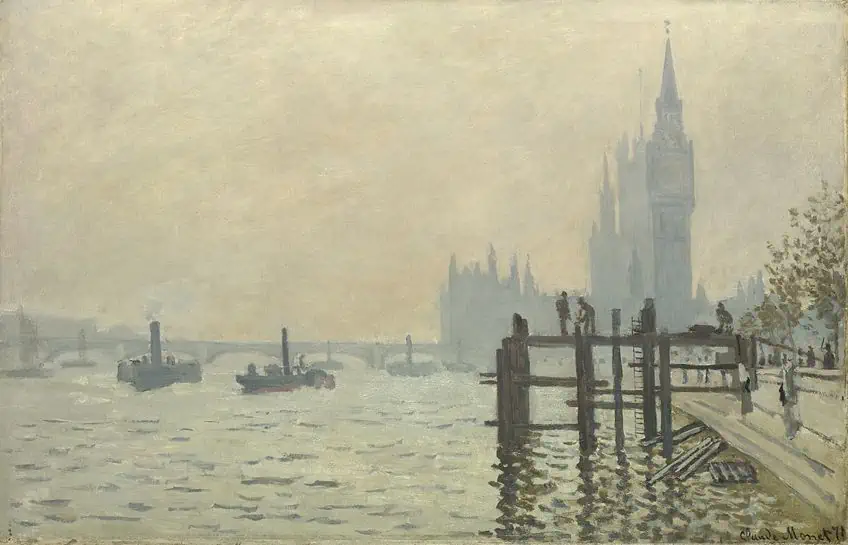 The Thames below Westminster (1871) by Claude Monet; Claude Monet, Public domain, via Wikimedia Commons
Objects in Front Will Overlap Objects Behind Them
The last characteristic of foreshortening is that objects that are nearer to the viewer will overlap or cover objects that are behind them. This characteristic is very intuitive to implement in your drawings and paintings as we see it every day. If you place one object in front of another then the object behind it will be hidden.
In your figure drawing, the head is the closest object, so it will block part of the neck, torso, and even the legs and feet depending on the angle of perspective you choose.
How to Draw Using Foreshortening
If you are a beginner artist trying to learn foreshortening techniques, there are a few steps that can be useful to help you visualize your subject in space. You can apply these steps to all your drawings, whether they are still life, portraits, or landscapes.
Step One: Map Out Your Space
Before you even begin drawing, you should first map out your space. Many beginner artists start drawing the head of their subject, only to find that they need another four inches of page to fit the legs and feet. By mapping out the boundaries of your subject, you ensure that your subject fits comfortably on your drawing surface and prevent your proportions from becoming distorted as you attempt to squeeze the figure into the remaining space. Accurately mapping your piece is the first step in creating realism in both your figures and landscapes and is continuously built upon. Because of this, if you discover that you have not accurately mapped out your piece later on in the process, it is much better to start over than it is to try and correct it.

Step Two: Add Your Guidelines
Once you are sure that your subject will fit within the boundaries of your drawing surface, it is time to add some guidelines or construction lines. The basic guidelines that you should include are a vertical line, also known as a plumb line, and a horizontal line. A vertical line is a line that runs from the top of your drawing to the bottom and acts as a reference line in your drawing. It helps you to easily compare the relative distance and size of objects that are further away and allows you to create accurate proportions and placements.
Your horizontal line also serves as a reference line within your drawing; however, it is also helpful for establishing the eye level of your piece.
The horizontal line can be very helpful when working with extreme foreshortening in particular, as it gives you a better idea of how your subject angles away from and towards the viewer. All the horizontal lines in objects above the eye level will angle away from the viewer and down towards the vanishing point, while the horizontal lines below the eye level will angle towards the viewer and up towards the vanishing point. These guidelines should be drawn lightly to make them easy to erase and amend as you work on your piece. Aside from these basic lines, there are many different techniques that artists use to create guidelines, so you should play around and find one that works for your needs.
Step Three: Draw What You See
This may sound simple, but it is arguably the hardest part about working with foreshortening perspective drawings. Because of the compression that happens with foreshortening, the regular proportions of your subject will be greatly altered. When working with a reference, it is important to draw what you see and not the preconceived notions of how you think the subject should look. The best way to counteract this tendency is to measure your subjects and how the size of each object relates to others around it. Continuously use your hand, brush, or pencil to measure each aspect of your piece, and trust your measurements over how you think the different parts should fit together.

Step Four: Block in the Large Shapes
Once you have all your guidelines and space planned out, it is time to roughly block in the large shapes that make up your subject. Looking at the subject in its entirety can feel like a daunting experience, so it can be very helpful to break it down into smaller individual parts. Do not focus on any of the details yet, rather use your pencil to draw in the main shapes of your subject. It is helpful to use your vertical and horizontal lines to divide the space into sections and then draw all the large shapes in each section.
This step is important to establish how each part of your subject interacts with others, such as what parts are hidden by closer objects, how different sections of your piece are angled from the horizontal, and how the dimensions of the subject changes as it recedes into the background.
If you are struggling to visualize how different parts overlap, try drawing through the objects as though they are transparent and then erase any lines that you would not see later. As with your guidelines, you should keep your blocking light and easy to erase and change without much effort. Remember to keep measuring every part of the subject and how it relates to other parts around it.
Step Five: Refine Your Drawing
Now that you are happy with the size and proportions of your piece, it is time to add all the details and really bring it all together. Remember that foreshortening distorts objects, so while the head of your subject might be twice as large as their feet it should appear to be all in scale before you continue.
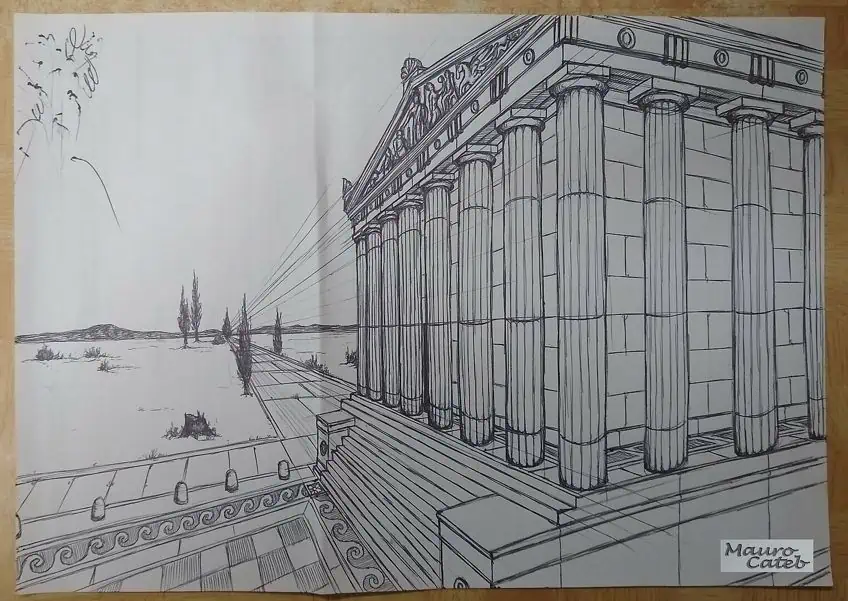 A perspective ballpoint-pen sketch by Mauro Cateb; Mauro Cateb, CC BY-SA 4.0, via Wikimedia Commons
When refining the shapes and adding details to your painting or drawing, it can help to think of it as a sculpture or three-dimensional object. Think of how objects lie on top of each other and how different materials interact. Add details by moving from the foreground to the background, remembering to remove any unnecessary construction lines as you go. As with any piece, be conscious of where the light and movement in your piece is coming from, and be sure to be consistent with any highlights and shading.
Different Foreshortening Techniques
The steps above show how you can go about incorporating foreshortening into your art. Many artists use one of two broad techniques to make blocking in their foreshortened pieces easier and more accurate. While these techniques are very popular, it is important to find ones that work best for you and your art style. If you understand the underlying concepts and characteristics of foreshortening, do not be afraid to experiment with different techniques for creating accurate proportions.
The two different techniques commonly used are called the geometry technique and the spiral technique.
Geometry Foreshortening Technique
This technique involves breaking down the larger subject into geometric shapes. Every object, no matter how complex it may seem, is made up of simple shapes such as cylinders, cubes, and cones. Being able to recognize these shapes in your subject will make it easier to recreate it with its depth and dimensions. For example, the human figure can be broken down into shapes such as a sphere for the head, cubes for the torso, and tapering cylinders for the limbs. If you know how to change the perspective of these simple shapes, then changing the perspective of the more complex human shape will become much easier.

Another advantage of this method is that it helps you to more easily visualize how the different parts of the subject fit together. It is much simpler to understand how a cylinder connects to a diamond than it is to understand how the forearm attaches to the hand. Once you have blocked out your subject using geometric shapes, they can easily be molded and refined into the true object they represent.
Spiral Foreshortening Technique
The spiral technique, also known as the coil technique, also uses a simpler shape to block your subject. This technique is all about capturing the dimensions and movement of the subject by drawing it using small concentric spirals. These spirals follow the contours of the subject and angle toward the vanishing point. This creates spirals that appear closer to simple lines when they are aligned with the horizontal or vertical line, but gradually open as the angle changes. This technique helps you visualize the different contours of overlapping objects, establishing the form of your subject, and is great for figure drawings that have a lot of movement.
This technique does create a lot of excess lines in your piece, so you should work very lightly with a harder pencil to make erasing them and cleaning up your blocking easier.
Tips for Using Foreshortening in Your Art
Now that we have covered the fundamental steps and techniques involved in creating foreshortening in your art, there are also a few tips and tricks that you can do to make perfecting this practice easier.
Get Experience With Your Subject
An integral part of painting or drawing a subject is understanding its form and how it is constructed. Familiarizing yourself with your subject goes a long way in accurately portraying it from various angles. Smaller objects in particular can be observed and moved around, allowing you to see in detail how different perspectives and lighting interact with the object and its dimensions. Examining an object can also help you break it down more accurately into simple shapes, which will make applying foreshortening to it much easier. While some objects are easy to get a hold of, you can also use technical diagrams and reference photos from different angles for larger objects or those with more complex anatomy.
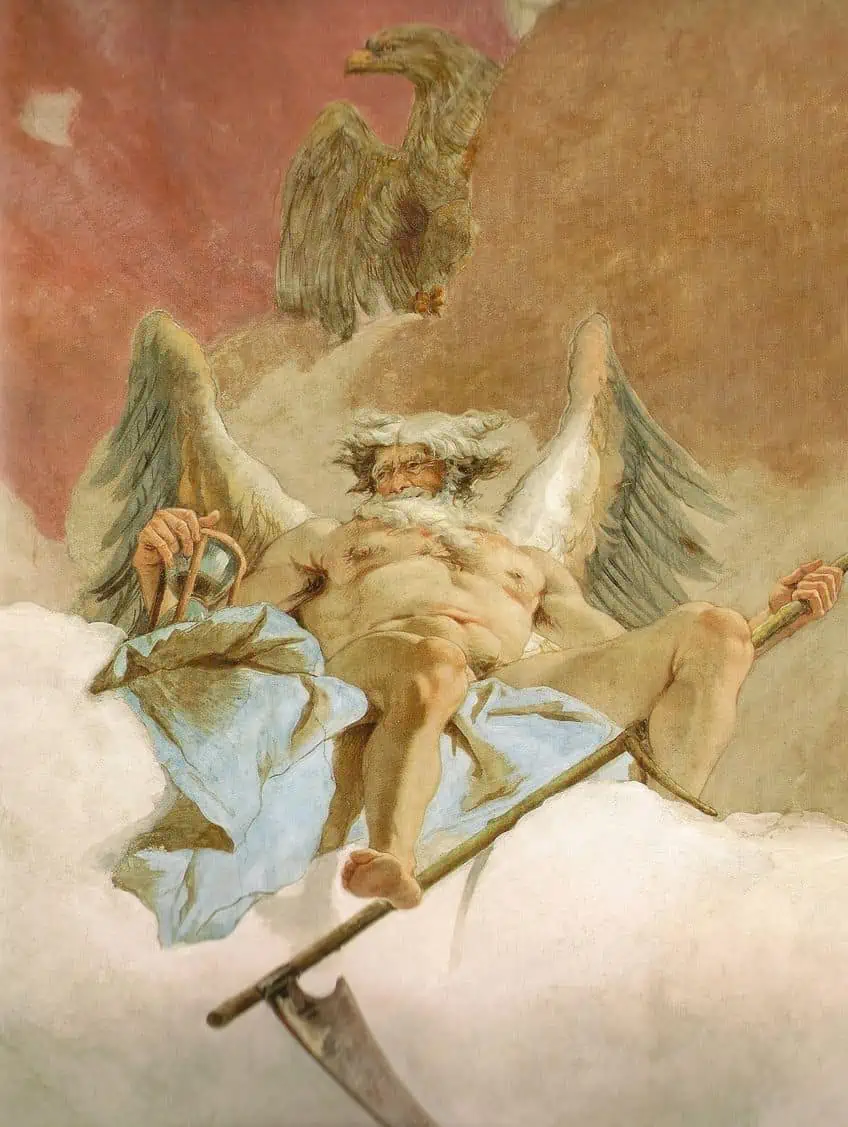
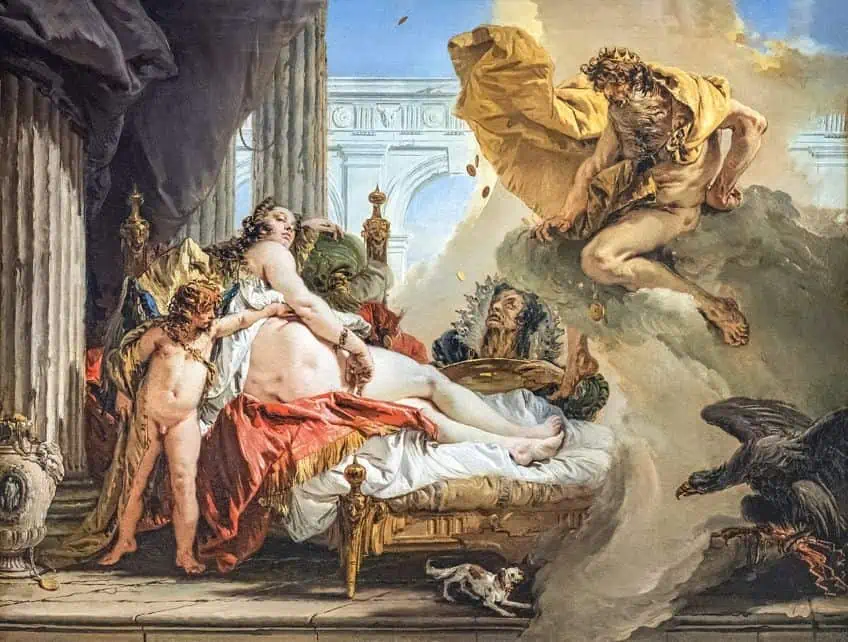 Danae and Jupiter (1736) by Giovanni Battista Tiepolo; Giovanni Battista Tiepolo, CC BY-SA 4.0, via Wikimedia Commons
Redraw the Same Shape to Practice Foreshortening
Aside from becoming physically familiar with your subject, it is useful to practice drawing and redrawing shapes. Start out by drawing the same shape at various degrees of foreshortening from barely any to extreme foreshortening to perfect giving your shape depth. Once you feel comfortable with basic shapes, try redrawing larger and more complex subjects.
With some practice, you can transform a simple cube to a dramatic skyscraper.
Experiment With Distance
Experimenting with redrawing your subject from different distances is also very helpful to understanding foreshortening, as the proportions of objects tend to become more distorted to the viewer the closer they get to them. You can either take close-up pictures of your subject or try and draw what you see. For bigger objects, such as a tree, start from further away and then grandly stand closer to your subject. Notice how much shorter the tree becomes and how large the trunk that is close to you is compared to the canopy reaching into the sky above. Play around with different extreme perspectives and the depths they lend to your subject, as the more dramatic angles yield the most distinct foreshortening.
 Detail of the Frescos in the Würzburger Residence (1753) by Giovanni Battista Tiepolo; Giovanni Battista Tiepolo, Public domain, via Wikimedia Commons
Practice Exaggerating and Understating Your Subject
Once you have become comfortable with realistic foreshortening, it can be fun to experiment with exaggerated or understated foreshortening. While there will always be some amount of foreshortening in your pieces, understating it can be a great artistic tool for creating a more flat and cartoonish art style. Using creative exaggeration in your pieces, on the other hand, creates a greater sense of drama as the subject is distorted. This can be used to highlight certain aspects of your piece and draw the viewers’ attention.
As with before, first practice drawing simple shapes using exaggerated and understated foreshortening and then move onto more complex subjects.
Use Perspective Lines
Perspective lines are lines that extend out from a single point on the eye level line. These lines can be used to determine how the relative size of objects change as they recede into the background of your piece. Perspective lines can be a little tricky to work with at first, so start with simple shapes before moving to more complicated ones.
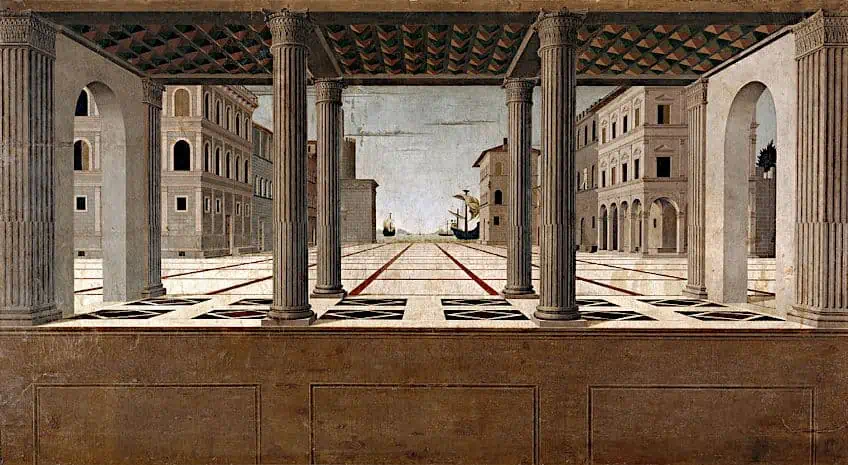 Architectural Veduta (1490) by Francesco di Giorgio; Attributed to Francesco di Giorgio, Public domain, via Wikimedia Commons
Focus on Your Edges and Contours
The edges and contours of your subject can really affect how well your foreshortening appears within the piece as a whole. Some edges are more important than others as they separate the subject from the background or define its features. These lines and contours are important in foreshortening as they emphasize the depth and dimension that the technique gives you.
It is important to spend some time looking at your art to identify these edges and make sure that they are clearly defined.
Pay Attention to Continuity in Your Piece
As we have already covered, foreshortening often comes with many shapes that overlap. Not paying attention to the continuity of hidden objects in your piece can result in mismatched edges, which will impact the realism and sense of harmony. To practice continuity in your art, draw multiple simple shapes of different sizes overlapping each other. Practice having only a part of a larger shape being concealed by a smaller one or have a longer shape cut a wider shape in two.
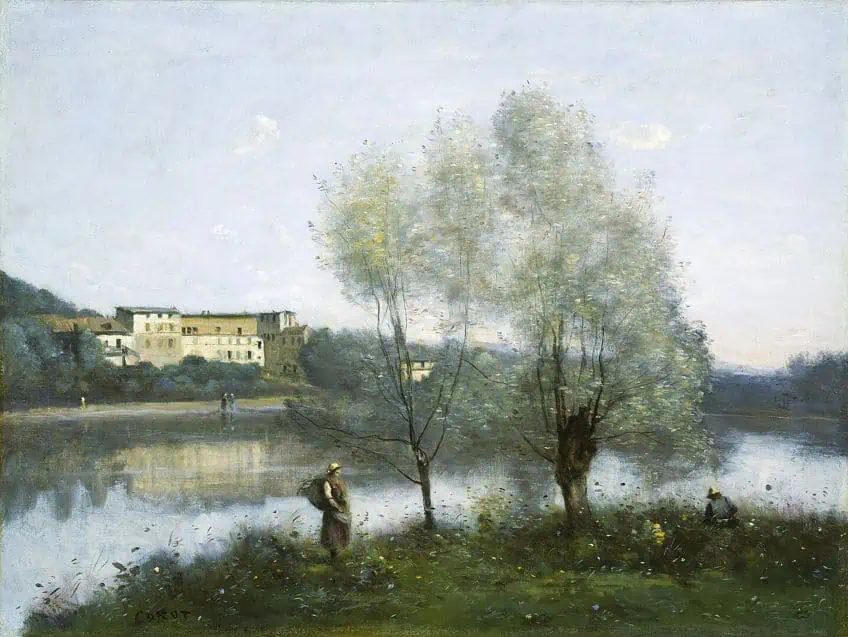 Ville-d’Avray (1867) by Jean-Baptiste Camille Corot; Jean-Baptiste Camille Corot, Public domain, via Wikimedia Commons
Practice Points of Transition
Alongside continuity, transitions are some of the most overlooked aspects of art. Many foreshortening techniques involve breaking down objects into simple shapes, however, the way you transition from one shape to another is important for the final look of your piece. Having disjointed transitions between the different parts of your objects will look disorganized and unfinished. However, it is not just about the transition between different parts of the same object, but also about the transitions between objects and the piece as a whole. When looking at your art, observe how well objects transition between each other as well as their environment and setting. Many objects have natural points of transition that you can use in your art, such as muscles or joints in human figures.
Redrawing elbows, hinges, or other points of transition is great practice and allows you to create more accurate and harmonious art.
Trace Works That Have Foreshortening
If you are struggling to understand how to recreate foreshortening in your art, it can be helpful to trace over pictures of famous works that demonstrate foreshortening. Tracing takes all the thinking out of your sketches and allows you to train your eyes and mind into drawing foreshortened objects without any preconceived ideas. As with all of these exercises, you do not need to be perfect but rather use these rough shapes to really understand the underlying mechanisms of the foreshortening technique.
 The Vladimirka Road (1892) by Isaac Levitan; Isaac Levitan, Public domain, via Wikimedia Commons
Foreshortening is an essential skill for any aspiring artist representing our three-dimensional world on their canvas. Foreshortened objects will not only become smaller as they recede into the background, but will also overlap and appear to shorten. Remembering these key characteristics will allow you to achieve more realism and depth in your drawings, which will take your art to the next level!
Frequently Asked Questions
What Is Foreshortening?
Drawing with foreshortening is a perspective technique that is used to give objects in paintings and drawings a sense of depth and distance. The technique involves making objects become smaller and shorter as they recede into the background of the piece, to give them the illusion of appearing further away.
How Does Foreshortening Affect Your Drawings?
Foreshortening has many effects on your drawings, with the most notable being the sense of depth it gives objects. Additionally, foreshortening also makes your art more realistic by placing your subject within the space and giving it the illusion of weight and distance. All three-dimensional objects are drawn with some degree of foreshortening, which can be increased or decreased depending on how dramatic you want the effect to be.

Megan is a writer and researcher who graduated from the University of Cape Town with a degree in Social Sciences, specializing in Psychology and Environmental Science. Her passion for knowledge and leaving a positive impact has fueled her current work in conscious and sustainable growth in Southern Africa. Megan’s love of nature has also led her to train as an animal behaviorist. She works part-time training and rehabilitating dogs. Megan is interested in the physical and psychological effects of colors in our environment on our mood and well-being. In addition, she is concerned with how art and creativity have been an integral part of human society. Megan van Schoor has been writing blog posts on the topics of painting, drawing, and color theory for acrylgiessen since 2021.
Learn more about Megan van Schoor and about us.