How to Paint a Watercolor Butterfly – Create A Beautiful Butterfly
This post may contain affiliate links. We may earn a small commission from purchases made through them, at no additional cost to you.
Understanding how to paint a watercolor butterfly is a valuable skill to have since it can be used to improve a variety of different paintings. Painting butterflies in watercolor is somewhat easy, but it does take some time, so patience is required during the project. While following this watercolor butterfly tutorial, keep in mind that there are many different methods available to create a watercolor butterfly painting. Our approach is both enjoyable and straightforward, requiring just a few easy steps to complete. Understanding how to paint butterflies is a terrific way to improve your watercolor abilities.
Our Easy-to-Follow Watercolor Butterfly Tutorial
In our watercolor butterfly tutorial, you’ll learn how to paint a watercolor butterfly in only a few steps. It starts with a rough drawing of the butterfly’s size and shape. We may also experiment with other colors; nevertheless, in this watercolor butterfly painting, a nice option is to utilize blue. We may experiment with different blue treatments to create great texture and features in our watercolor butterfly painting. Painting butterflies in watercolor is a terrific watercolor exercise for honing your watercolor abilities, and they may also be a nice highlight in many paintings.

Step-by-Step Instructions on How to Paint Butterflies in Watercolor
We will start by sketching the butterfly with a pencil as we work our way through this watercolor butterfly tutorial. We want to ensure that our pencil lines direct our watercolor butterfly painting. We will progress from creating the primary color of the butterfly to the shade of our choosing as we keep learning the process of painting butterflies in watercolor. We next continue to use black paint to add features to our watercolor butterfly painting. Then we add some gentle washes with the same hue to give our watercolor butterfly painting additional complexity and texture. That concludes our discussion.
We may now begin our tutorial on how to paint butterflies with our tools in hand and our paper in front of us.
Step 1: Sketching Our Butterflies
Let us begin by sketching a basic outline of our butterfly. We want to ensure that the form of the wings is correct since butterflies’ wings are fairly symmetrical. Let’s start with the body; the body has a basic form, similar to that of a ballpoint tip. This lesson does not provide a reference image since it is unneeded. You may, however, look up the photo of a butterfly for help if necessary. The upper wings have a form that resembles two right-angle triangles. But, at the apex of the wings, we want to add a curve or an arch.
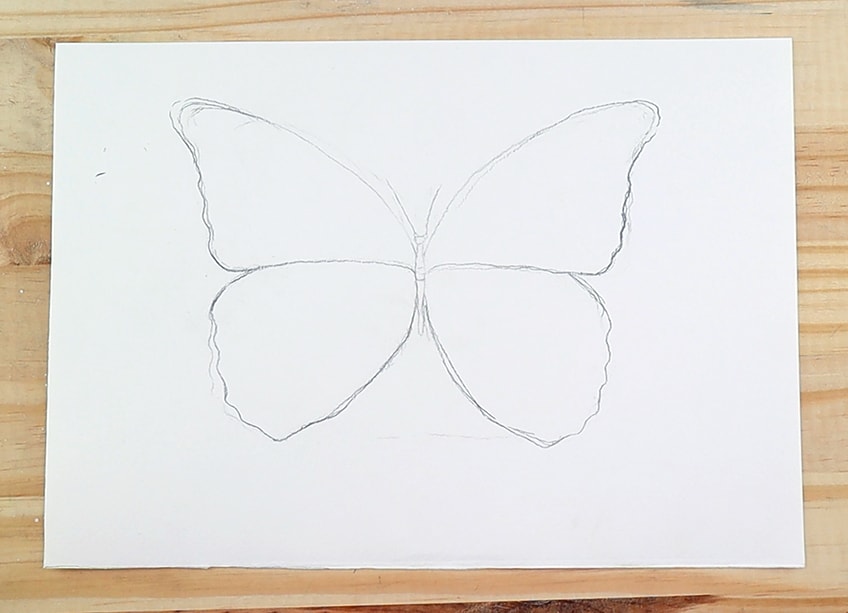
Allow extra time for this section of the instruction since the wings should be as symmetric as feasible. We want to make the bottom wings more spherical as we design them. The lower wings have a round or oval form compared to the upper wings. They might alternatively be seen as two spearhead-like structures protruding into the butterfly’s body. We would like to give our butterflies some distinctive forms, which we can accomplish by curving their wings. Adding little curves to the sides of the wings gives them a more distinctive aspect, providing the butterfly with a more lifelike appearance.
After we’ve created and determined the main form of our butterfly, we’ll use an eraser to lightly erase the design. We’ll carefully remove the pencil traces so they’re visible for instruction but don’t take away from the painting portion of our lesson.
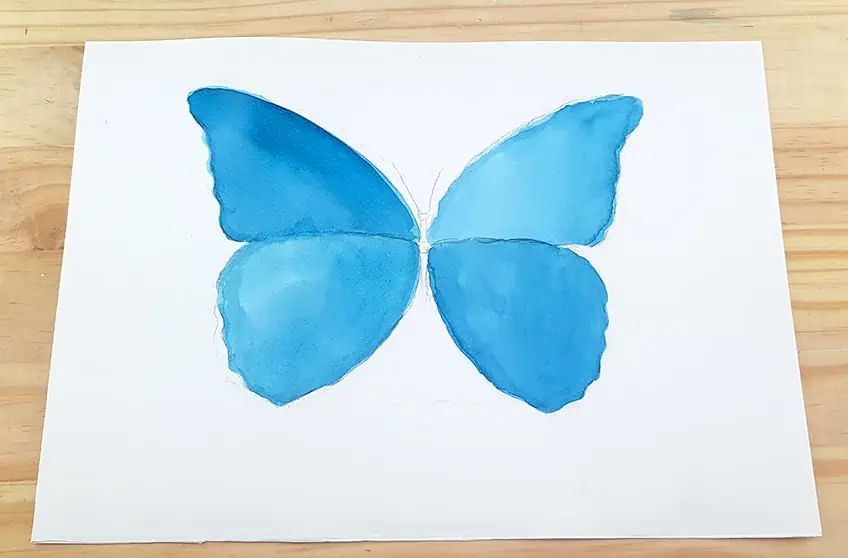
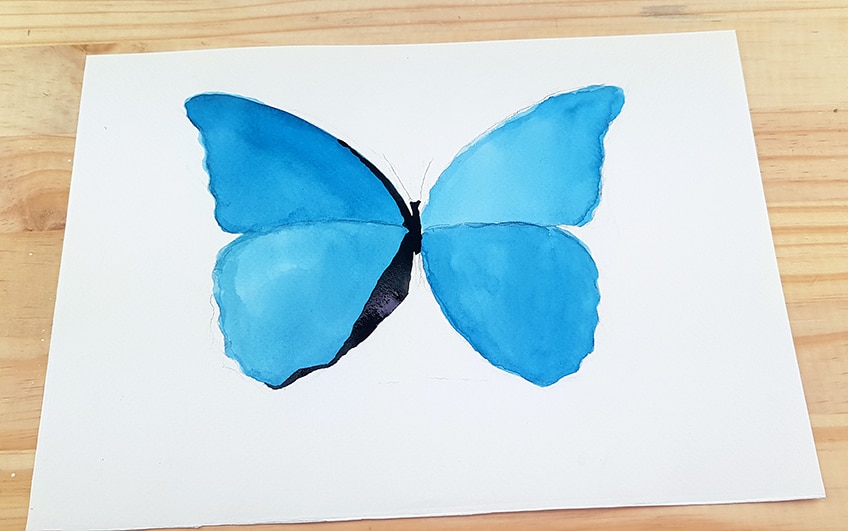
Step 2: Creating the Primary Color of Your Butterfly Painting
Let’s start with the painting phase of our lesson by creating a light blue blend. After that, we’ll paint a little wash of blue on the butterfly’s wings. We don’t want to color outside of the wings, so be cautious around the edges when painting the wings. We’ll notice that one wing is somewhat brighter or darker than the other when we paint the wings. This is okay; in fact, it is beneficial since it adds diversity to the wings. We’ll see how this helps to accentuate the markings we’ll later color over this faint wash.
If you want to darken any of the wings, paint additional coats over your blue wash. But, the major goal here is to apply the initial coat of our watercolor butterfly’s underlying color scheme to the butterfly’s wings. Furthermore, while painting the blue in your watercolor butterfly paintings, pay sure to color along the margins of the wings with precision and gentleness.
We would like to ensure that the wings are painted as accurately as possible, so do not rush this step.
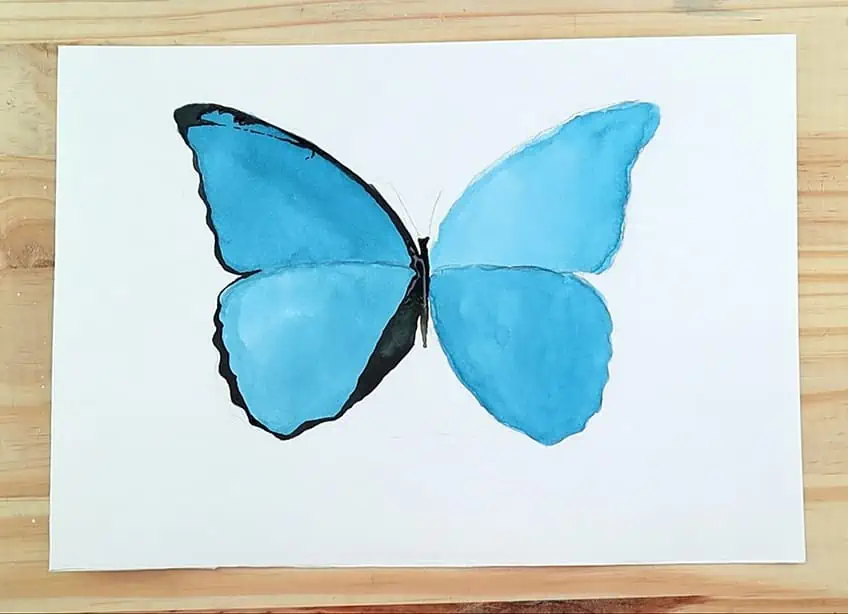
Step 3: Coloring the Butterfly Body and Details of the Left Wing
We’ll next color the body of the butterfly, as well as the borders of its wings. We’ll begin by wetting a little thin brush with black paint. The easiest approach to color the body of the butterfly is with black paint. We may now go forward and paint the entire body black. We can create a thick dark line along the edge of the bottom wing with our black paint. Begin with one wing and work your way to the next. This band should be rather thick, but we would like it to also be as straight as possible, with an angle that begins to slide into the bottom wing’s side.
The goal is to create a black line down the wings’ sides. This black band, on the other hand, is larger in the inner regions of the wings and then becomes narrower as it moves along the wings’ sides. We would like to trace the little curves in the wings as we paint down the sides. The two black lines that go down the top wings from the body should be narrower than the bottom wings. They both get thinner as they advance up the sides of the wings, though. You want to narrow the black details as you paint around the side borders of the butterfly wings, as though the butterfly’s wings are scorched. Triangular arcs that arch down into the wing are a fantastic element to add to the upper corner of the higher wings. Because most butterflies have this characteristic on their top wings, you can utilize a source photograph to have a better grasp of this detail.
We may make any features we want as long as we can duplicate them in the opposite wing.
Step 4: Coloring the Butterfly’s Right Wing
Now we’ll take a look at the dark spots we produced around the margins of the butterfly’s wings. We’ll now go ahead and replicate these elements along the wing’s boundaries. Let’s start with the top wing again, this time painting the black elements that travel down the wing’s edge. We want to mimic all of the elements on the upper wing, including the top corner design that arcs into the wing. We are not attempting to paint completely duplicated details, but we do want to make them as similar as possible. Don’t be concerned if there are minor discrepancies.

We want to make sure we’re duplicating the left wing when we paint the features around the margins of the right butterfly wing as we make our way towards the bottom wing. We’ll color the thick black band of the inner half of the bottom wing once we finish painting the black edges on the small bends in the wings. Make sure to take your time; we should end up with a blue butterfly with black details that travel around the edges of the wings after this phase.
The two black streaks on the bottom wings’ inner part should merge into the butterfly’s abdomen.
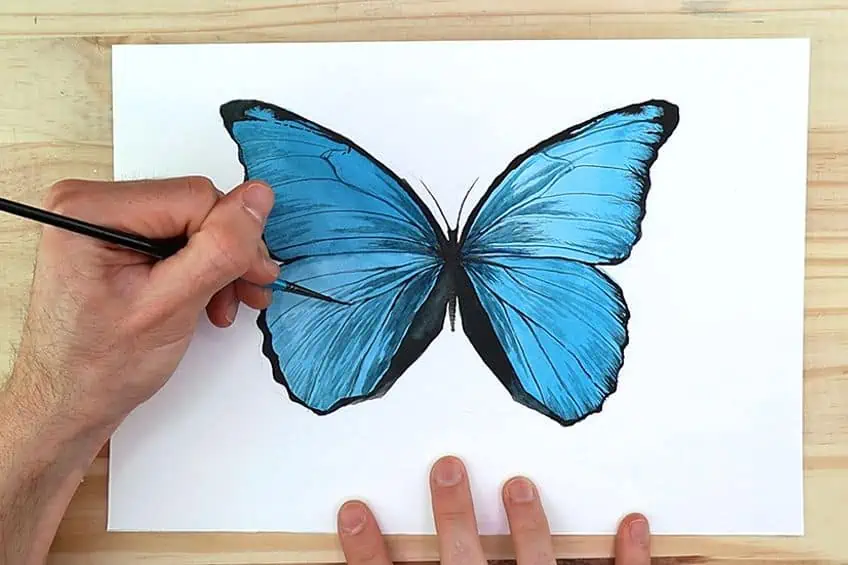
Step 5: Creating the Wing’s Veins
Now it’s time to create the wing’s veins. Although coloring the veins in a butterfly’s wings is straightforward, we should proceed with caution. To start, we’ll apply a little wash of black color. Begin painting delicate sweeps from the body to the arching feature on the top wings using a little, thinner brush. Once again, we don’t require a source picture; but, if you need one, you can utilize one for reference. Let us start with the right-hand side wing and draw some basic lines that blend into the wing’s edges. Make an attempt to link your lines to the tops of the little arcs that go down the wings’ sides. We could also darken the veins’ ends where they link to the wings’ sides.
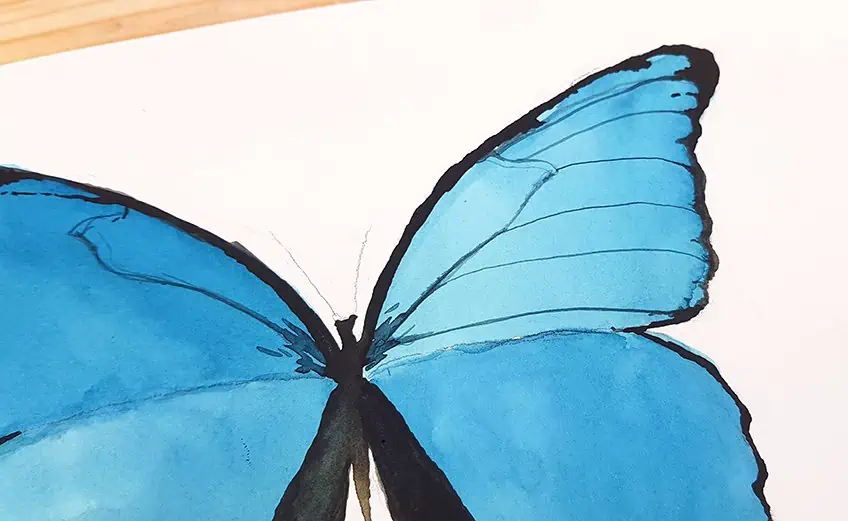
We don’t need so many lines in the wings, so keep them as basic as possible. Little sprouting markings that emerge outwards from the body are another wonderful touch we might add. Each vein we create should stream into the body, blending with the sprouting markings to give the impression that the lines are flowing forth from the body. Small black lines that you brush inwards from the margins of the wings are another lovely detail to add. The inner borders of the wings are given a bit more substance by adding these little sweeps of lines. Yet, to avoid disrupting the veins as a feature, maintain these features narrow and short, not extending into the wing.

After you’ve finished painting one wing, repeat the technique on the opposite wing. The lower wings strive to imitate the top wings’ vein diversity once more. We don’t need so many veins, but we do want them to emerge from the body and link to the wings’ edges like spokes on a bike. Remember to apply the paint slowly and gently when painting these veins. As they speak forth from the center and branch into the margins of the wings, we wanted these lines to be smooth and graceful.
We may paint small black strokes around the margins of the wings heading inwards after the veins are drawn.
Step 6: Creating Butterfly Wing Details
After we’ve drawn our veins, we can add additional features to our butterflies’ wings. There are a variety of ways to learn how to paint a watercolor butterfly, but this approach explains the basic layering process. Once our butterfly is totally dry, we can add some additional sprouting markings to the body with a faint wash of blue. Fill in the spaces between the veins with these markings. We want the blue wash to be extremely light so that it doesn’t overshadow the veins when it dries. At this stage, we can experiment with different line markers. The light wash will dry and produce a subtle texture within the wings when we paint these markings in between the veins.
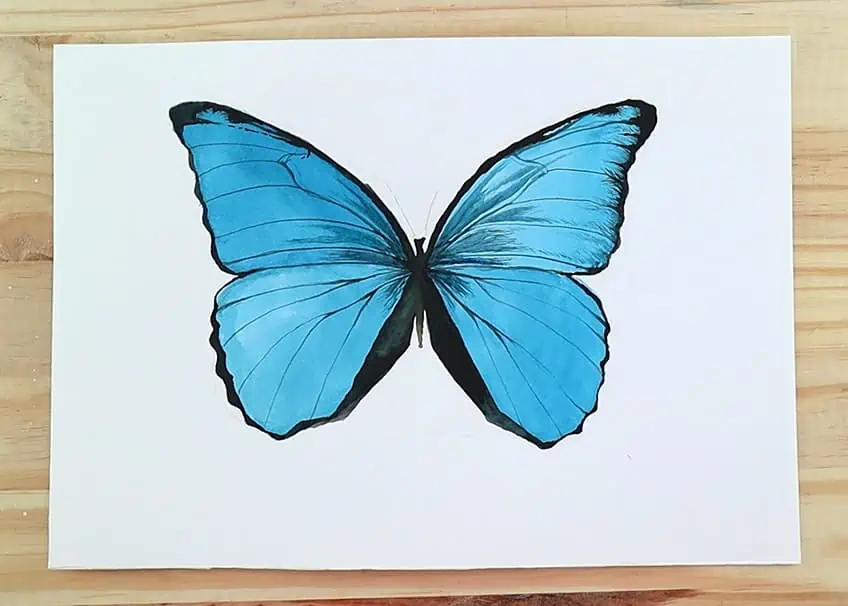
Allow yourself to have fun with this section of the instruction; the only thing to keep in mind is to be careful around the veins so they don’t smear. Continue with lines that flow along the veins inside the wings to color with the movement of the veins. The goal of producing these markings is to create texture rather than a specific element inside the butterfly, thus we don’t need to be excessively symmetrical.
The quality of shadow and shape in the wings is created by experimenting with where these markings develop on the wings.
Step 7: Watercolor Butterfly Touch-Ups
Leave the painting to dry fully before retouching any details after we’re pleased with the markings we’ve produced. Ensure the antenna is attached to your butterfly. These are tiny lines that curl outwards from the head of your butterfly and may be painted with a fine watercolor brush.

Another idea is to refill your thin paintbrush with black paint and run over the arteries in the butterfly wings carefully. Remember, we’re only darkening these lines to make them more noticeable as a feature. As you color over these lines, be careful and kind. Finally, take another look at your butterfly to determine if there are any more features you want to add. With your light blue wash, you may add some additional linework. Another fantastic idea is to add a few additional little black sweeps of lines around the wings’ borders.
That’s it for a beginner’s guide on painting a watercolor butterfly!
Helpful Tips for Your Watercolor Butterfly Painting
When learning how to paint butterflies, you will discover that there are a variety of approaches to use. Here are a few more pointers to assist you with the painting process.
- Because we are not dealing with the full page, you do not require to tape it down; thus, don’t be concerned if the page warps somewhat.
- While painting, make absolutely sure you have two jugs of water on hand. To ensure that the brush is clean, we’ll give it the first wash and then a second rinse.
- Before adding fresh markings to our painting, we want to ensure that each coat is dry.
- Take your time with this lesson. Do not be discouraged if you don’t get it right the first time since it may be difficult.
- We want to make sure the wings are proportional, but it is fine if they’re somewhat different.
- Make sure you enjoy yourself while working on this lesson, and don’t put too much stress on yourself to get it perfect.
In this lesson, we used a more straightforward technique by painting a watercolor butterfly in the primary color and then layering features on top of it. We focused on adding features that provide good contrast in the butterfly after painting it in blue with watercolor. Our watercolor butterfly tutorial explains how to paint a watercolor butterfly in a straightforward and easy-to-follow manner.
Frequently Asked Questions
How Does a Beginner Create a Watercolor Butterfly Painting?
When discovering how to paint a watercolor butterfly, you’ll discover that the designs in the wings may be painted in any way you like. This is due to the fact that butterflies’ wings frequently exhibit quite abstract characteristics. Yet, you should try to make the butterfly as uniform as possible. This is due to the fact that butterflies are incredibly symmetrical, and the designs on both wings exactly mimic each other. Nevertheless, sketching a butterfly first and getting the form accurate is the ideal route to go about creating one. We next attempt to paint the butterfly’s wings in the color that will act as the butterfly’s primary color. It’s only a question of applying features and texture from there. The butterfly’s body may be painted extremely black, which will help it seem more lifelike while also being a simple technique to paint the body.
How Do I Create Wings in a Watercolor Butterfly Painting?
We begin by sketching the complete butterfly from start to finish. We want the wings to be as close as feasible in terms of form and size. After that, we apply the primary color for our watercolor butterfly. We’ll then go on to painting the details, focusing on the arteries in the watercolor butterfly’s wings. We may then apply some light washes of the same color to the butterfly’s wings to give another layer and texture, making the butterfly appear more genuine. This is a rough notion of how to paint a simple and feasible watercolor butterfly.
Which Colors Should Be Used in a Watercolor Butterfly Painting?
When painting butterflies in watercolor, there are no precise colors to use. When studying how to paint butterflies, we’ll discover that there are a variety of techniques to create unique details in the wings. We can achieve this by blending colors using a wet-on-wet technique, but layering markings on dry surfaces is the simplest method. This is the simplest method for painting a butterfly and gives you greater control over your butterfly painting. Painting butterflies in watercolor allows for a wide range of color combinations, which is ideal given that butterflies are frequently brightly colored.

Matthew Matthysen is a multidisciplinary artist. He completed his fine art degree, majoring in History of Art and Contemporary Drawing Practice at the University of Witwatersrand, South Africa. Before joining acrylgiessen In 2020, Matthew worked part-time as an art teacher at Reddford Blue Hills High school. Matthew creates drawing and painting tutorials for acrylgiessen and captures them not only photographically and in written form. He also records the creation of his works in his own creative studio as in video format, from which later with a voiceover and a video editor also drawing tutorials for the Youtube channel of acrylgiessen are created.
Learn more about Matthew Matthysen and about acrylgiessen.