Wolf Head Drawing – Draw a Cunning Wolf Face Sketch
This post may contain affiliate links. We may earn a small commission from purchases made through them, at no additional cost to you.
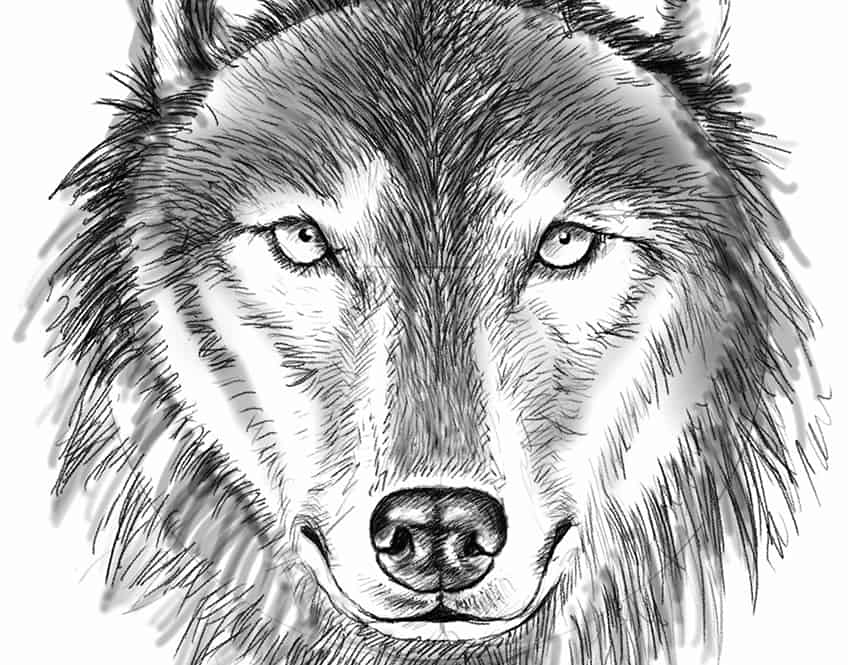
Wolves are perhaps one of the most strikingly beautiful animals due to their intimidating features. Their extreme exterior makes for great artwork because of how beautiful and unique they are. A wolf drawing is also a great exercise for practicing your shading and drawing skills, due to the combination of shading and line work. Learning how to draw a wolf head is also a great visual skill to gain for adding to your drawing repertoire, as it can be a great addition to various artworks. Wolf sketches are also just interesting enough to be an artwork of their own, and in this wolf face tutorial, we will learn how to draw a wolf beautifully and realistically.
An Easy Guide to Drawing a Wolf Head
A wolf head drawing can seem complicated and highly detailed, however, once broken up into a few digestible steps, we will find that the drawing process is quite simple and easy. As we learn how to draw a wolf head, we will break up the process into digestible bits that slowly turn a simple wolf sketch into a refined and realistic wolf drawing. The process of a wolf head drawing, easy and simple as it may be, will still require some attention to the drawing process.
As long as we are patient, there is a lot we will gain from this wolf drawing tutorial.
Necessary Materials
In this tutorial on how to draw a wolf step-by-step, we will need a few materials. This tutorial is aimed at keeping the process simple, so you will need a pencil, a pen, an eraser, and a sharpener. This tutorial is done on a digital device; however, all the drawing processes are transferable to these simple traditional drawing tools. This wolf drawing, easy and digestible as it may be, will require some concentration. We will want to make sure that we find a space that is conducive to focusing so that you remain undistracted during the drawing process.
All of the materials can be found through the links below.
- Ballpoint pen
- Micron pens
- Pencil
- Eraser
- Sharpener
- Paper
Step-by-Step Guide on How To Draw a Wolf Head
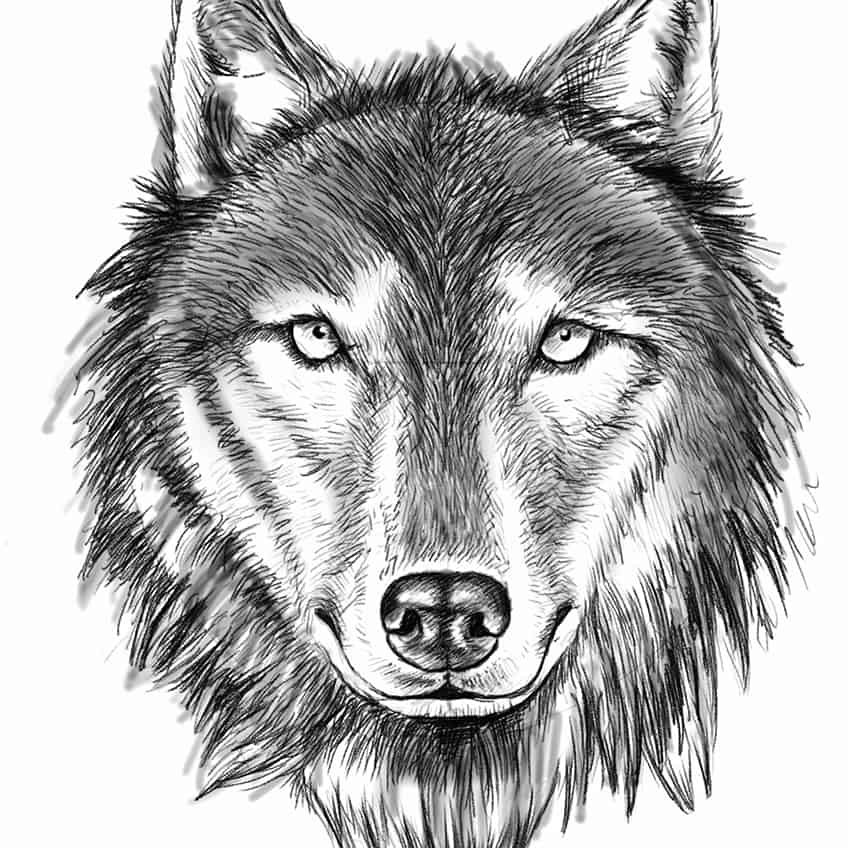
In this tutorial we will learn how to draw a wolf face, starting with a simple process of forming the head shape. Once we have done that, we will proceed by lightly sketching the features and placing them correctly in the face. From there we can work on refining the details of the wolf head with the use of shading and line work. As we continue, we will learn how to create fur-like qualities on the wolf by the use of line work and darker shading.
Now that we know what’s in store, let us get into this tutorial on how to draw a wolf head.
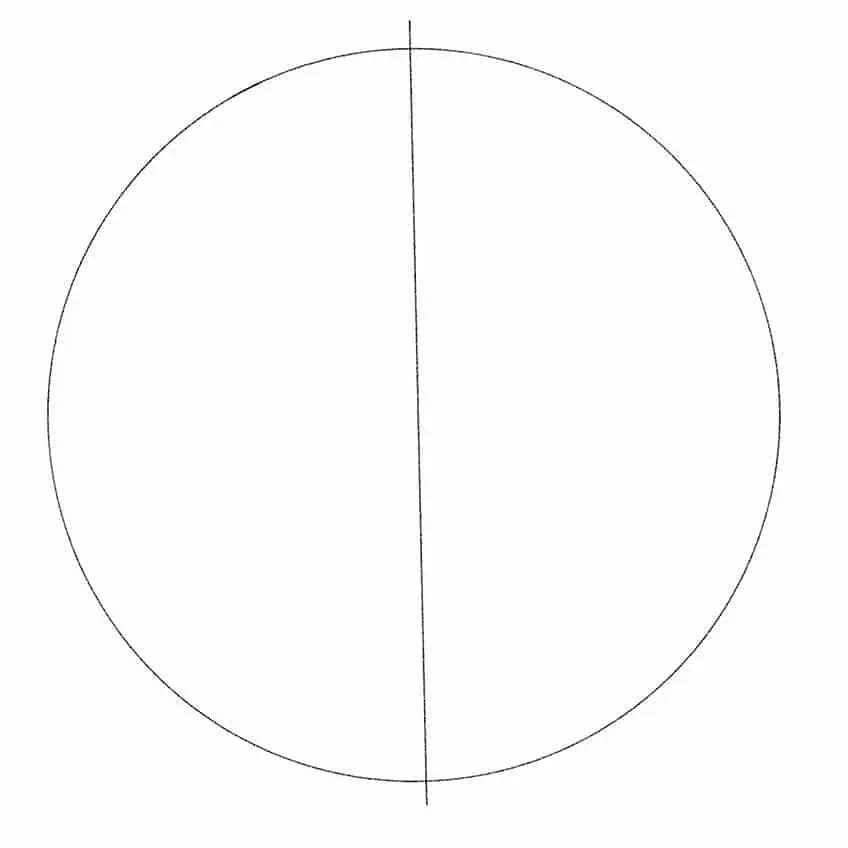
Step 1: Shaping the Head
We are going to start by drawing the basic shape of the wolf’s head as we would when drawing a face. We can start by drawing a circle with a vertical line directly through the center.
From here, we want to start placing features in their correct positions within the face. We want to start by drawing the nose along the vertical line near the bottom of the circle. We then want to extend the nose into the upper section of the circle where they will flow into the eyes of the wolf head.
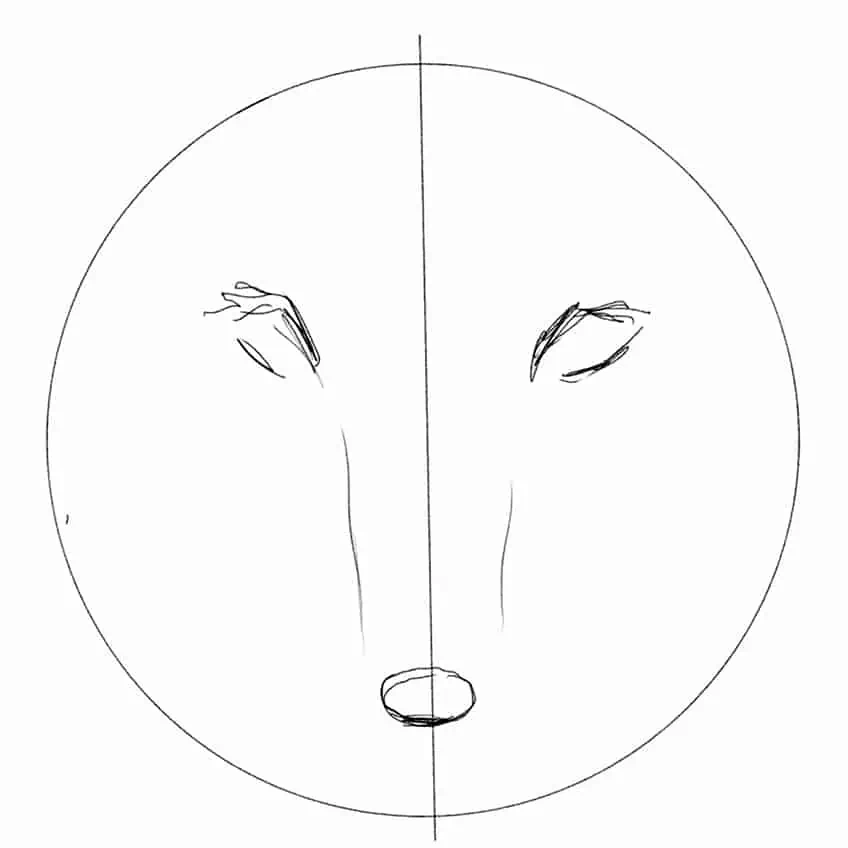
We can also start to police the ears directly above the eyes on top of the circle. The ears will have a triangular shape that narrows to a point. We can also draw the mouth of the wolf directly below the nose.

Once we have lightly sketched out the basic features within their correct positions, we can then start to work on disheveled fur around the face. We can play around with how we want the fur to shape the head of the wolf.
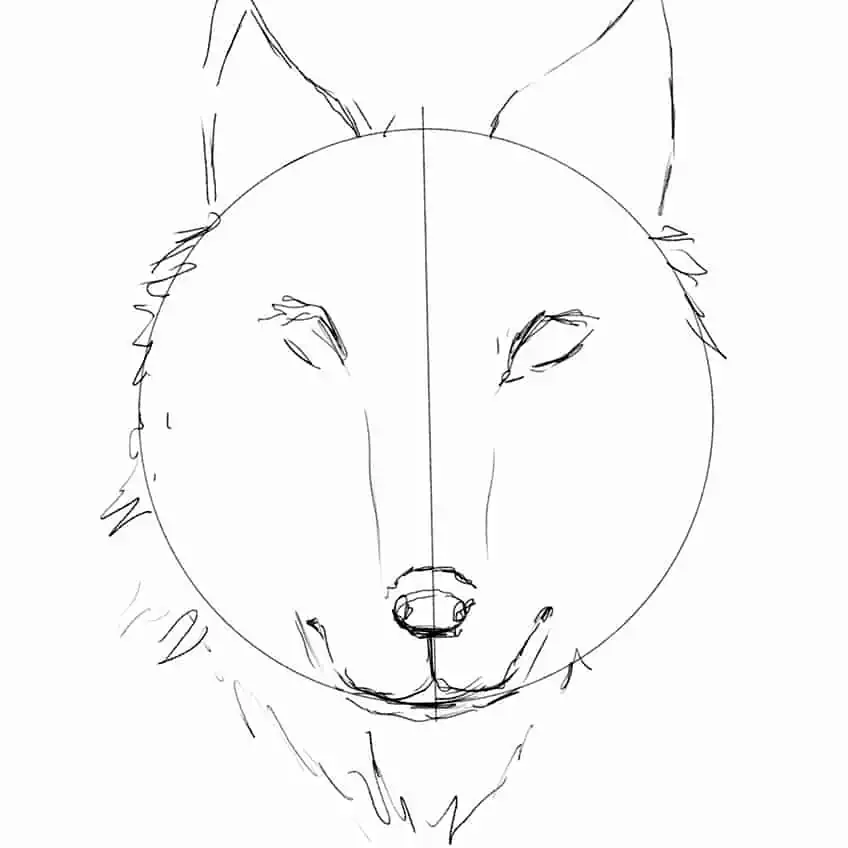
This is where we want to start using some basic line work to bring definition to the structure of the wolf face. Try to consider the narrow shape of the wolf’s nose and how to define this quality by the use of line work.

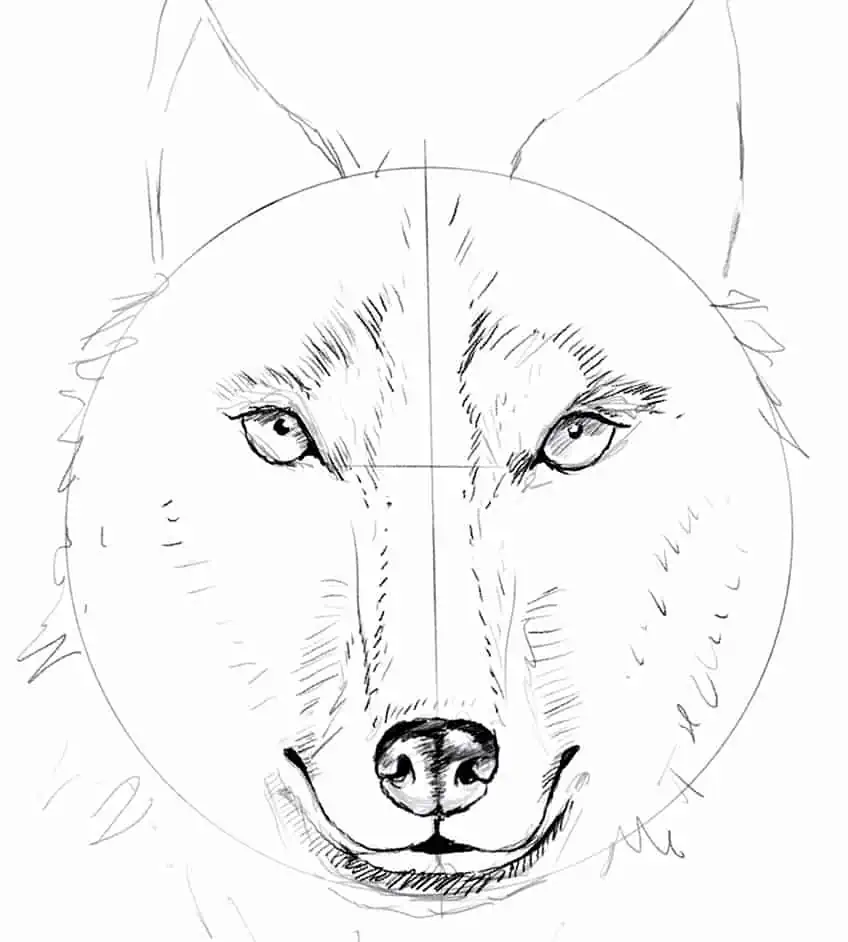
Step 2: Refining the Facial Features
Once we have sketched out a basic wolf head and established the form of the head, we can lightly erase the drawing, leaving only light ghost lines. From here we want to start going through the features to refine their details.
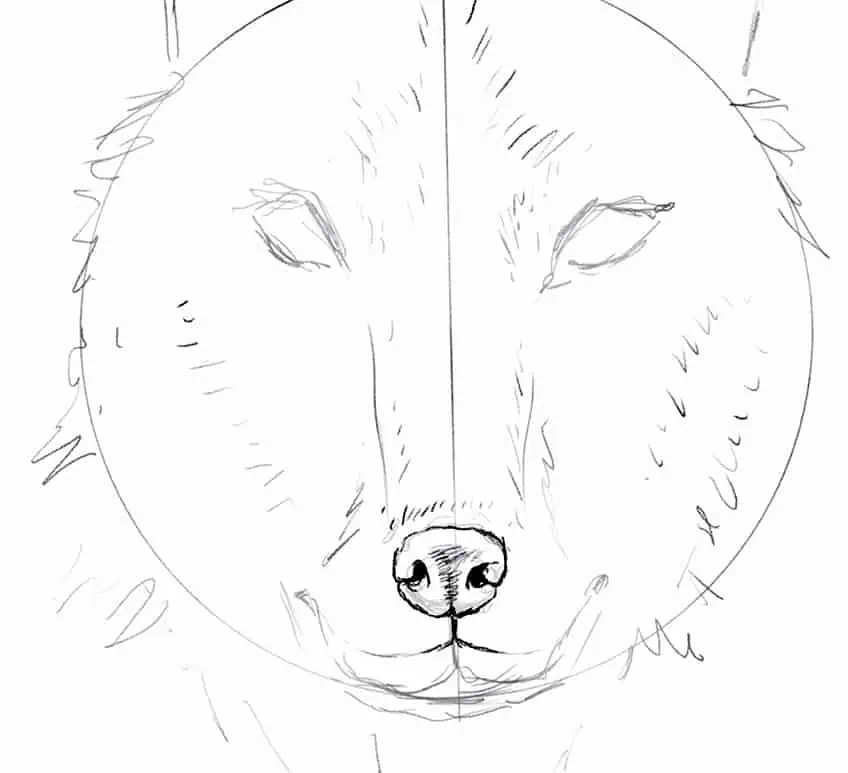
We want to make sure we work strategically to bring definition to each of the features with the nose, we want to darken it whilst leaving a little negative space to suggest a slight sheen on the moist surface.
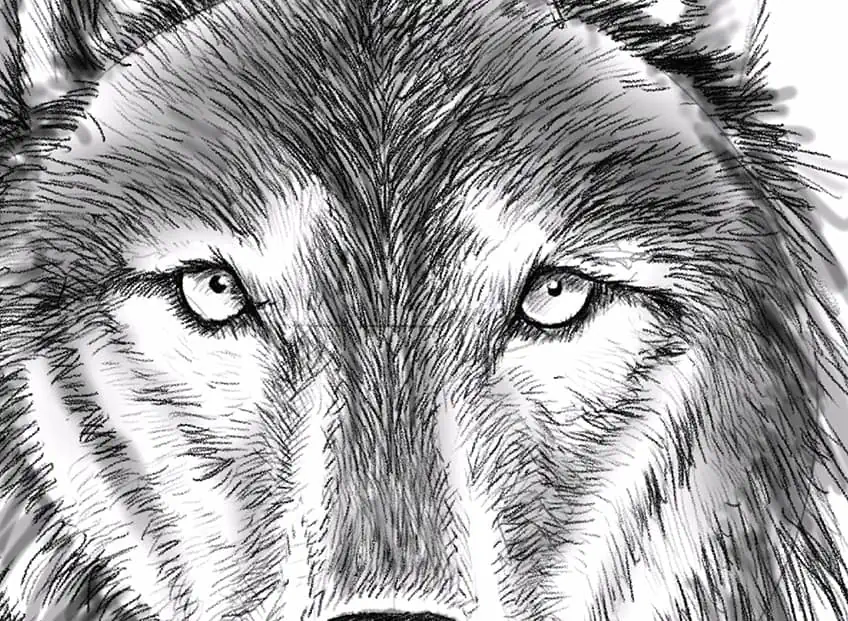
We also want to start consolidating the shape of the eyes.
The eyes of the wolf are quite football-shaped, with a large center and narrowed edges. Wolves do have brow ridges which give that narrowed curvature aesthetic to the eyes. We can also draw in the small pupil and add shading to the upper section of the eyeballs to suggest shadowing from the brows.
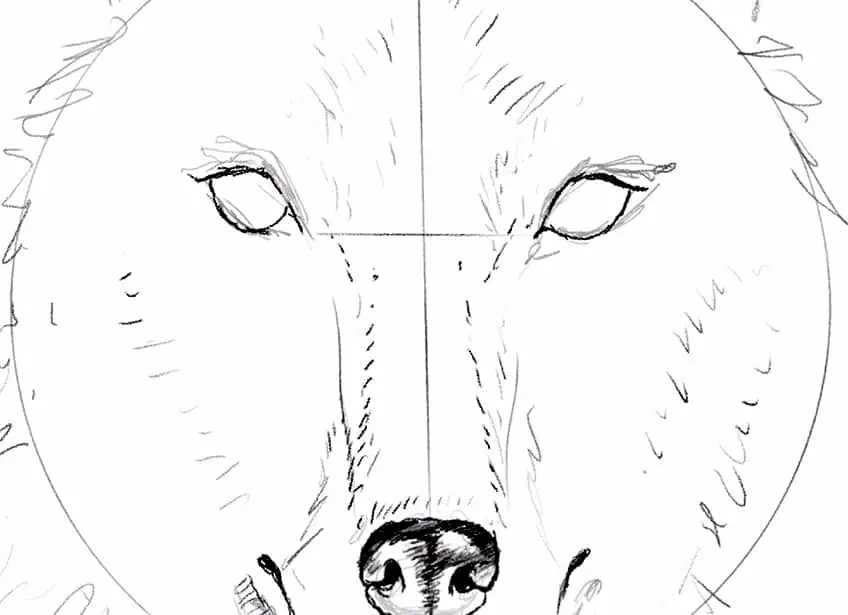
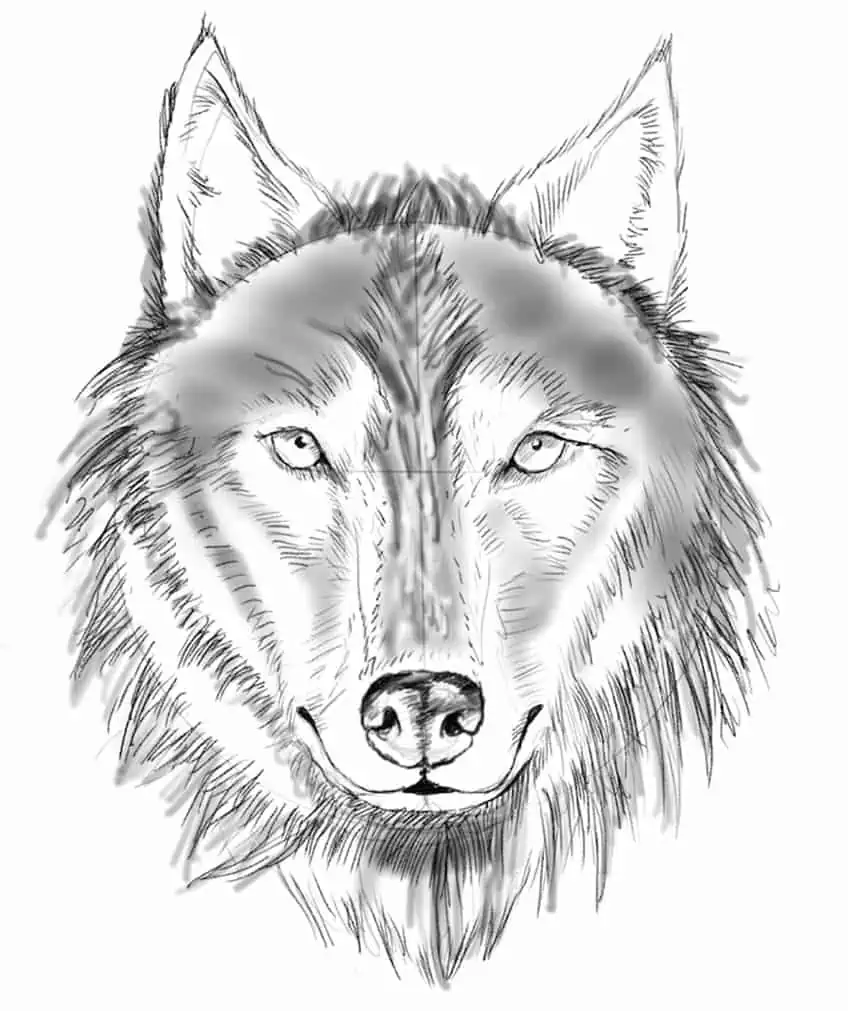
Step 3: Refining the Fur on the Face
This is where we want to start paying attention to the fur and how it creates unique patterns within the face of the wolf. We want to start creating different segmentations within the fur to define the difference in fur color around the facial features.
Wolves tend to have lighter fur near the brows and around the face, so we want to start creating these sections with line work. We also want to make sure we create the darkened ridge of fur that runs along the forehead of the wolf.

Using line work, try to work in little lines around the features to make them more disheveled and less smooth. We can do this around all features, such as the ears, around the head, and so on.

We want to take our time working in line work to create segments in the face of the wolf that define its different fur coloration. This is particularly true on the sides of the nose, as the fur can shift between dark and light near these areas of the face.
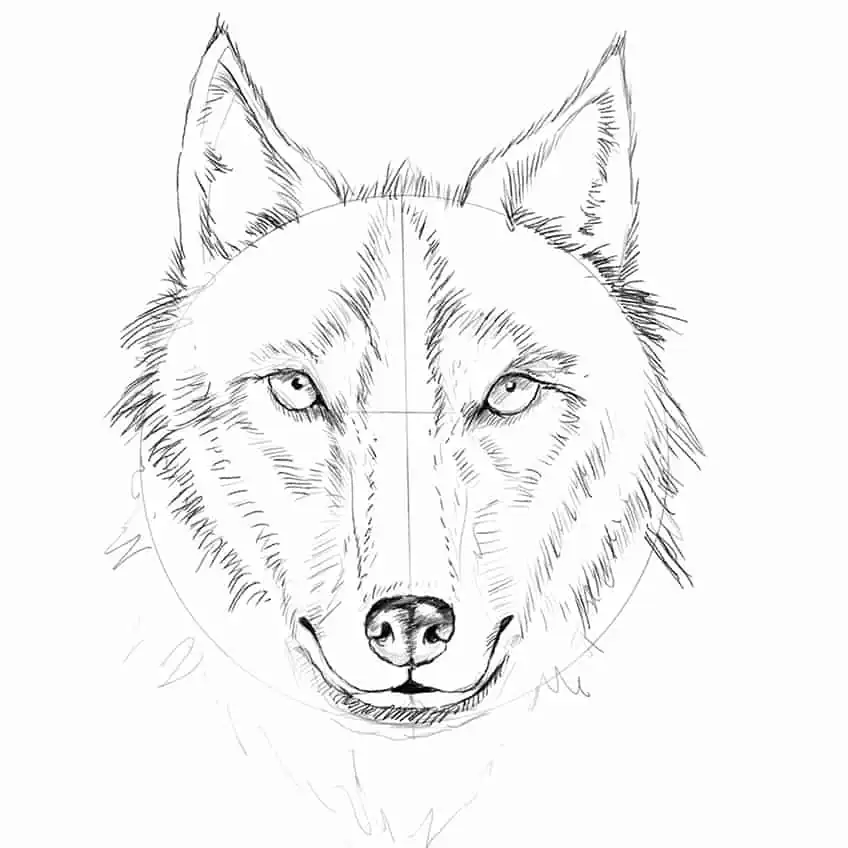
We can also start to work in lines that form around the bottom of the wolf’s head, which starts to bring shape to the fur coat of the wolf. We want to slightly elongate the lines of the fur beneath the mouth area as this is quite a common feature of a wolf’s fur coat.
Try to take your time with shaping the wolf, making sure that the fur coat narrows to a point beneath the mouth area. We can also make sure that the fur coat is quite disheveled and pokes out around the sides of the wolf’s face.
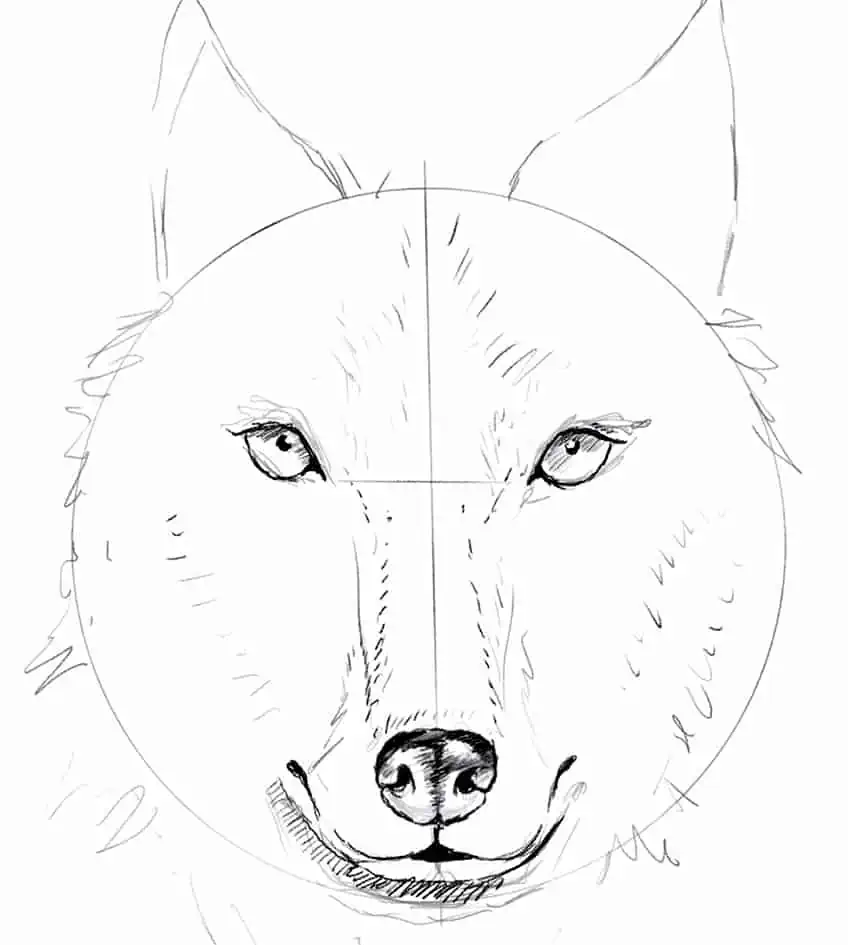
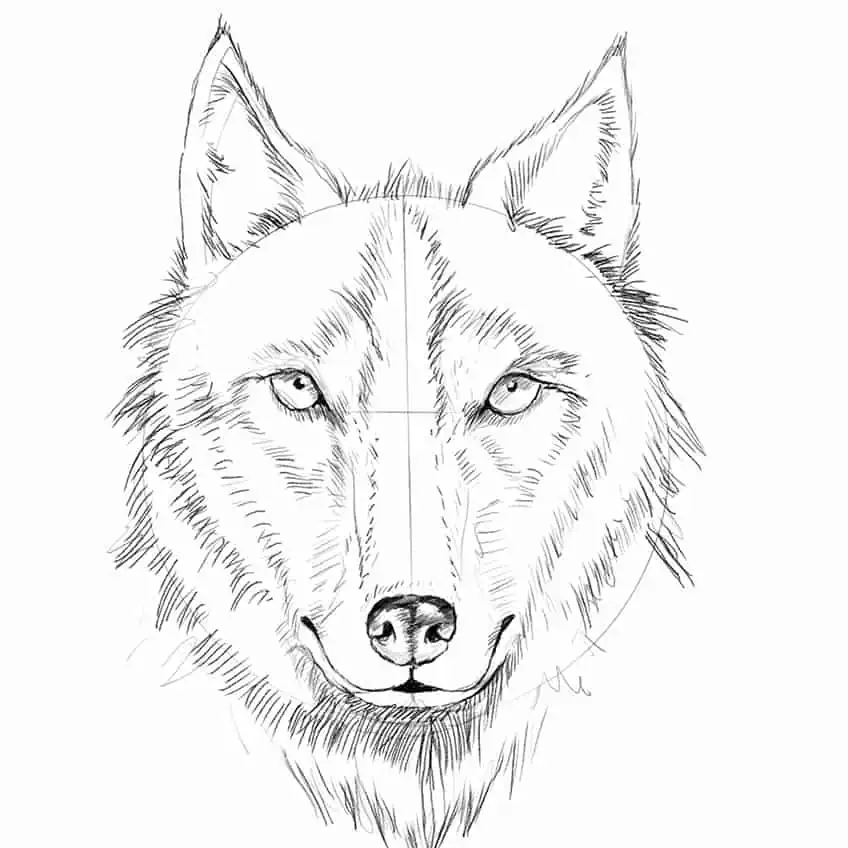
Step 4: Adding Light Shading to the Face
Once we have established the segments within the face, we can start working on some shading to further distinguish the different colorations within the face. We want to work in some light shading which will indicate where we can darken the fur when adding in more lines later.
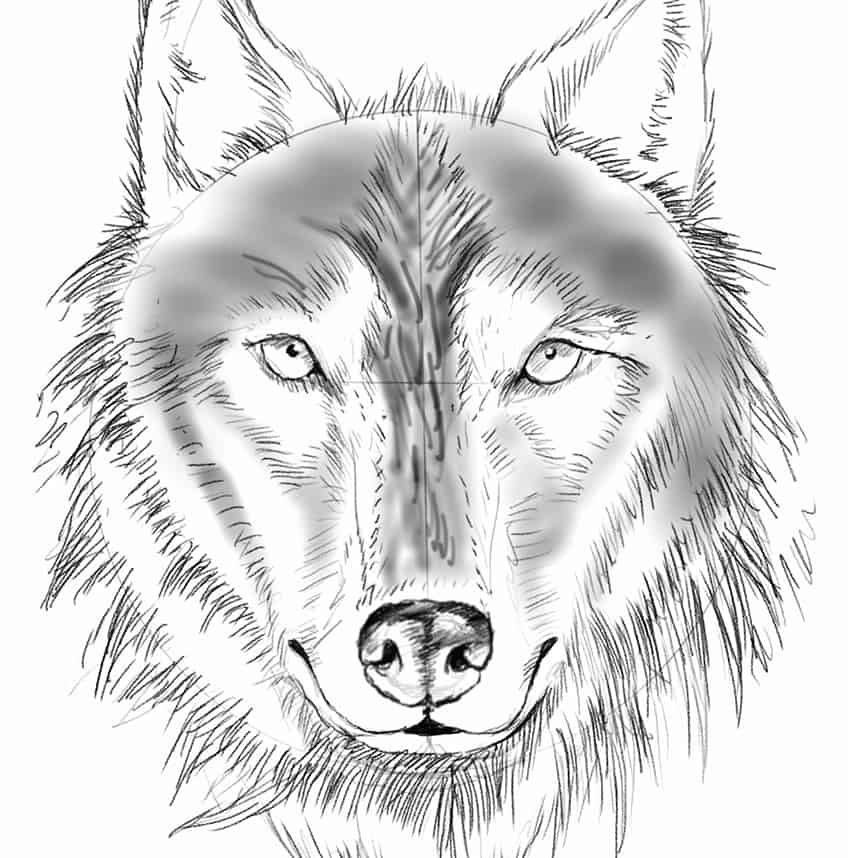
We want to be quite strategic with how we add in lighter and darker shading to break up sections in the face that will be fairly light and darkened in fur. We want to make sure that the shading is slightly darker along the ridge section of the nose and around the outer edges of the fur around the face.
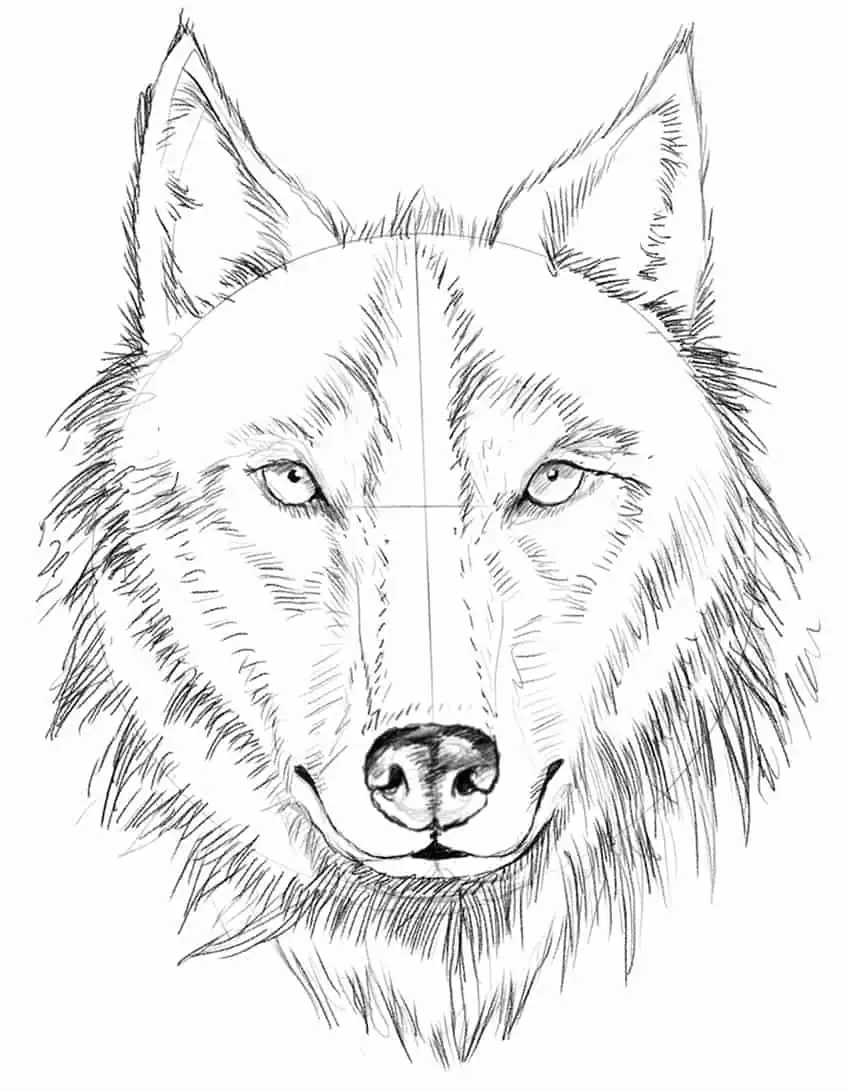
Step 5: Refining the Fur With Line Work
Once we have worked on some smooth shading, we want to continue with line work and go over the shaded area. The shaded areas will have been established where the fur is darkest and lighter within the wolf’s face.
This is where we will take our time and work in lines to create a fur-like effect.
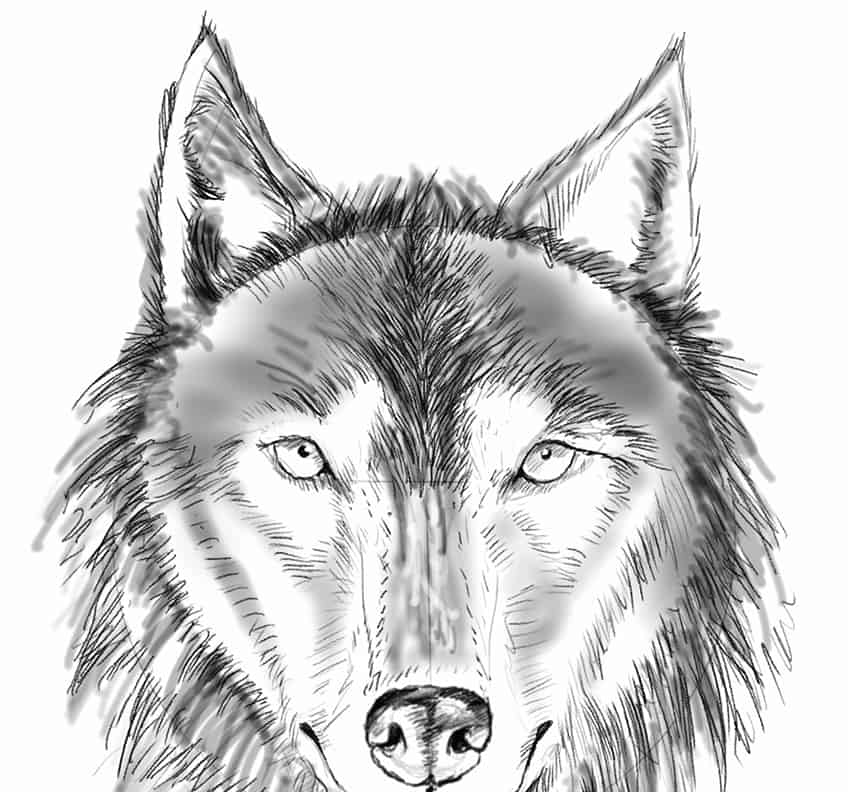
Take your time with adding in line work, especially near the eyes. We want to make sure we create the darkened edges of fur around the eyes of the wolf. We also want to make sure that we work lines into the shaded and non-shaded areas of the face.
The shading is simply there to darken areas of the wolf’s face; however, the entire face should still be covered in fur, therefore in lines. So, we want to keep lines consistent within the entire face of the wolf.

We can also take this time to work in some line work around the nose area, where there are generally whiskers. We also want to make sure the lines are slightly shorter near this area of the wolf as they commonly are.
This process does take time, but we do want to make sure we work along these lines patiently. We also want to make sure that as we draw lines, we are not just drawing them in any direction, but making them flow upwards along the face.

We want to make sure the flow of the fur makes sense, often wolves’ fur on their flows upwards and outwards along the face. We want to make sure that we are adding lines that run vertically along the face.

The fur starts to become slightly more horizontal near the sides of the face as it starts to slowly downturn near the outer edges of the fur coat. So, it will move up along the nose and slowly downturn around the sides of the fur like an arch formation.
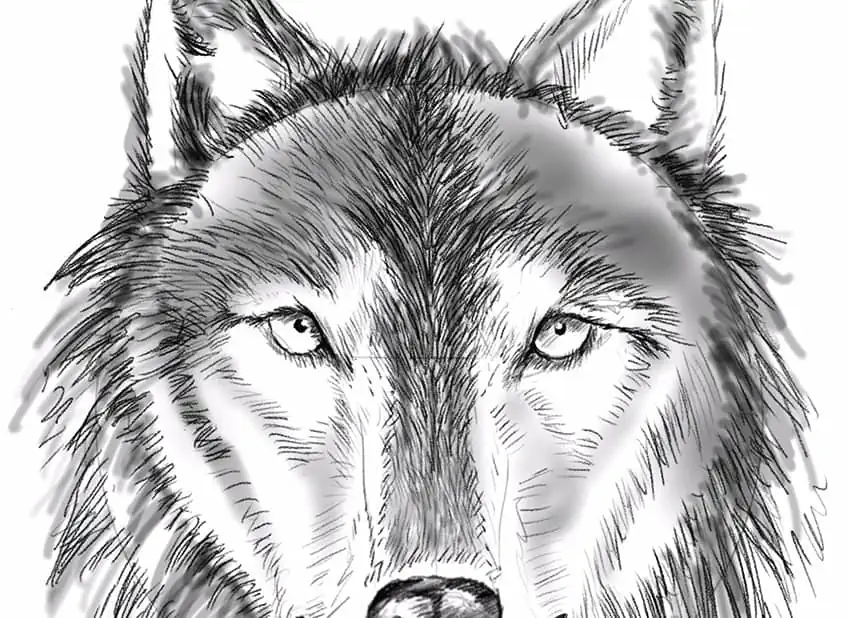
Step 6: Darkening Lines Along the Outer Fur Coat
As we continue, we can also start to elongate and darken the lines along the outer fur coat. We can also start to make these segments in the fur that make the outer fur coat seem thicker around the wolf’s face.
With the fur coat around the lower section of the wolf sketch, we can be more sporadic with line formation to suggest a more disheveled aesthetic in the fur coat of the wolf.
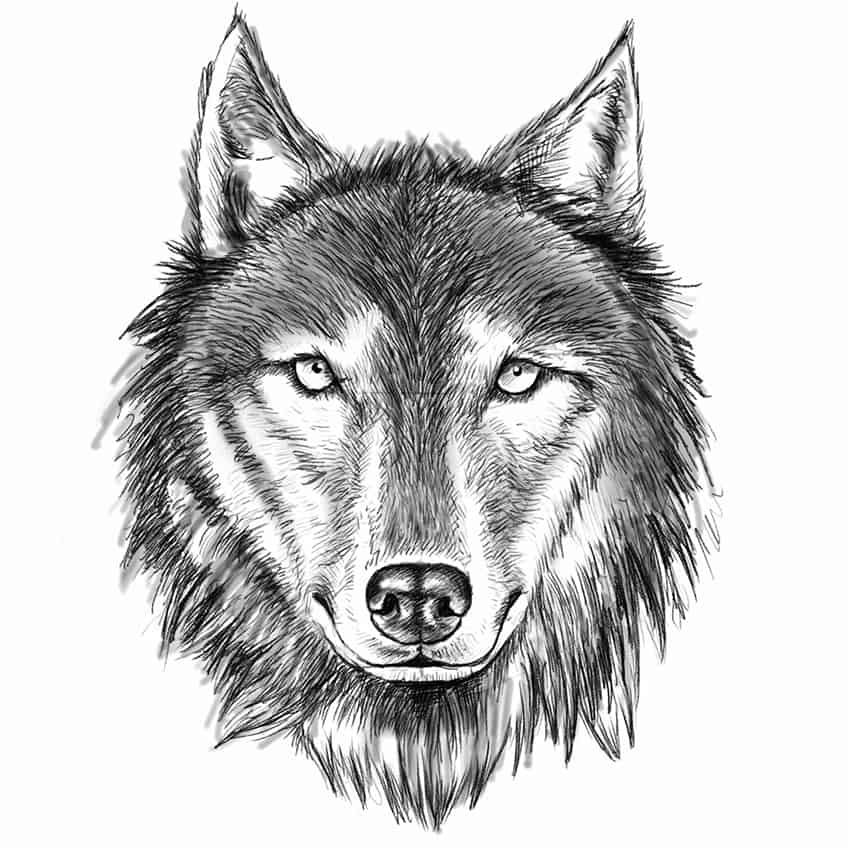
At this point, you can continue with this process until you are satisfied with the outcome. And there you have it, how to draw a wolf in a few simple steps.
Tips and Tricks To Remember
- Work out the shape of the wolf’s head for symmetry. As we learn how to draw a wolf head, we want to work with some guidelines to create symmetry.
- Establish the general areas of the features. Take your time working on the features of the wolf sketch for accurate placement of features.
- Take your time with the segments of fur. You want to work with smooth shading to establish the different areas in which the fur of the wolf drawing will be dark and light.
- Use line work to define the qualities of fur. The line work is a great way to define the fur-like qualities within the wolf drawing.
In this tutorial on how to draw a wolf step by step, we see how the process can be broken up into digestible bits. It’s about slowly building up the structure from the shape and, ultimately, refining the wolf sketch into a unique wolf drawing. Wolf drawing, easy as it may seem, requires one specific skill, which is line work. Once you know how to work in line work you will slowly see how the wolf drawing starts to become more realistic.
Frequently Asked Questions
How Do You Draw the Eyes of a Wolf?
Wolf’s eyes are quite simple as they have a basic shape, however, the key is symmetry. We want to make sure that the nose of the wolf flows into the eyes, and that the eyes are placed at the same height. The shape of the eye is similar to that of a football shape, with more sharpened corners near the inner and outer edges. The brow creates a curved feature along the top of the eye that gives the wolf’s eyes a more football-like shape. The pupils of the eye are generally small, with shading along the upper section of the eyeball. This will suggest three-dimensionality in the eye, and that the brow is casting a shadow over the eyeball. This is the general way to create a realistic eye in a wolf face drawing.
How Do You Draw the Fur on a Wolf?
Wolves tend to have a segmentation of color within the fur along their face. How we achieve this in a wolf head drawing is by adding smooth shading strategically, to give the wolf variation in the fur coloration. Once we have shaded in the segments and figured out the pattern, we can then use line work to go over these shaded areas to establish the fur-like quality in the wolf’s face. We also want to work the fur in an upward direction, from the center of the nose, and then arch outwardly towards the side of the face. The fur on the face should arch as the line moves from the ridge of the nose toward the fur along the sides of the wolf’s face. This is the basic process of drawing fur in a wolf drawing.

Matthew Matthysen is a multidisciplinary artist. He completed his fine art degree, majoring in History of Art and Contemporary Drawing Practice at the University of Witwatersrand, South Africa. Before joining acrylgiessen In 2020, Matthew worked part-time as an art teacher at Reddford Blue Hills High school. Matthew creates drawing and painting tutorials for acrylgiessen and captures them not only photographically and in written form. He also records the creation of his works in his own creative studio as in video format, from which later with a voiceover and a video editor also drawing tutorials for the Youtube channel of acrylgiessen are created.
Learn more about Matthew Matthysen and about acrylgiessen.