Wood Burning Tips – Essential Pyrography Techniques
This post may contain affiliate links. We may earn a small commission from purchases made through them, at no additional cost to you.
Wood burning has been around as an art since before the 4th century AD. Many civilizations have used wood burning to cement their cultures and beliefs into history, and it remains a very popular wood crafting style today. If you are a seasoned wood burner or want to know more about it, we’ve created a list of professional wood-burning tips for you to follow and (hopefully) use one day. Read below to find out more!
What Is the Craft of Wood Burning?
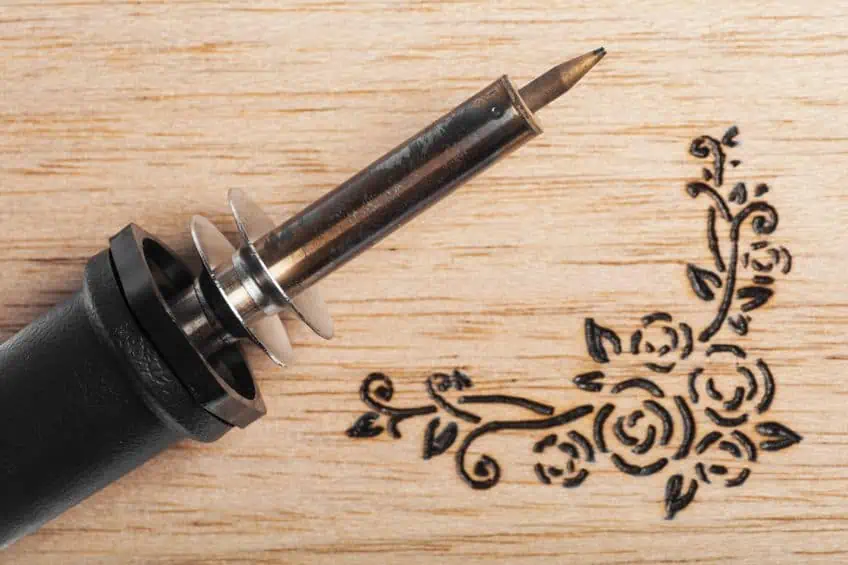
Wood burning is commonly referred to as pyrography, and is the practice of burning designs into wood to make incredible works of art. While wood burning used to be done differently in ancient times, these days professional pyrographers use a pyrography pen (which looks and behaves a lot like a soldering iron) to burn their designs into wood surfaces.
There are endless possibilities when it comes to pyrography. You can burn everything from letters to numbers, to reliefs, and even highly detailed portraits into wood.
Obviously, more intricate designs take a lot more practice to pull off, but if you dedicate time to practicing different techniques and have the right tools you should be able to create anything you set your mind to.

These days pyrography has become a very popular art form, with many people all over the world displaying and selling their designs online. The perceived limitations of what can be done with wood burning have been pushed to the limits, with some crafters producing nearly photo-realistic depictions of people, animals, and even entire landscapes. The cool thing about pyrography is that it can be easily combined with other wood crafting disciplines to create a kind of mixed-media artwork.
You can combine pyrography designs with furniture creation, installation artwork, trim pieces, novelty pieces, and even wood painting if you want to.
Wood Burning Tips
If you’re a novice or are trying pyrography out for the first time, we’ve prepared a few tips you can follow to improve your technique. Always keep in mind that wood is a highly malleable material, and even though it feels rigid, you can bend it to your will with enough practice and the right approach.
Practice on Scrap Pieces of Wood
Like painting, airbrushing, and sketching, it’s always best to start off on some scrap wood. Therefore, our first wood-burning tip is that practice makes perfect. After all, why waste a really expensive wood board when you can polish up your technique and approach on some spare board? Being realistic about your skill and comfort levels can save you a lot of time, money, and frustration down the line.

Start Off With Soft Wood
Most wood-burning tutorials will showcase an impressive design on some ridiculously expensive hardwood. Professionals can get away with this as they know how to compensate for the hardness of the surface and the density of the wood grain, but you might not be able to.
Softwood is forgiving and will ensure that most of your passes go off -without a hitch.
Slow and Steady Wins the Race
When starting out wood burning it can be easy to forget that you are, in fact, burning wood using a hot iron. This can lead to treating your burning tool as a pen, which won’t yield results. When burning wood using a pyrography pen you’ll need to work slowly not only to shape your lines correctly but to achieve the right tone as well.

Practice Patience As Much As Possible
One of the best wood-burning tips we can give you is to practice as much patience as possible. Not just while you are working, but with the learning process too. It can be a bit frustrating when you’re starting from scratch, but it’s worth it once you’ve got the flow of things.
Don’t rush yourself, and if you do make a mistake try to decipher what you could have done better and implement it.
Be Simple and Direct When Starting Out
Most crafters start out with a beginner’s pyrography kit. These kits are easy to work with and usually come with a variety of tips for your burner. Use the tip you feel most comfortable with and stick with it until you get a feel for the craft.
Using multiple tips can confuse you, preventing you from forming a relationship between input and result.
Prepare Your Board Before Starting
While pyrography might seem like drawing, it most definitely isn’t. While a page doesn’t need to be prepared, your wood does, and if it isn’t prepared correctly, it could catch your pyrography pen. This could result in a ruined workpiece so be sure to smooth the surface of your board using some sandpaper and remove the resulting wood particles before firing up your pen.

Adjust Your Heat As Needed
Before you begin working on your wood you will need to adjust the heat of your pen.
The best way to determine how much heat you need is to test your pen on some spare wood before you touch your actual workpiece.
This will allow you to gauge the appropriate amount of heat and not cause any lasting damage to your final product.
Remember to Blot and Move
One of the best wood-burning tips we can give you is to remember to keep your pen moving. The longer you hold your pen on one spot the darker your mark will be. Before you begin working, blot your tip on some spare wood to get rid of any heat buildup on the tip. Once the excess heat has been removed, begin working on your actual workpiece.

Keep moving your pen. Do not allow your pen to stand still or it will darken that area of the workpiece. If your pen is at the correct heat it should burn your workpiece with little to no pressure, and if it doesn’t, try adjusting your heat accordingly. This is called the “blot and move” technique, which is a staple among pyrographers.
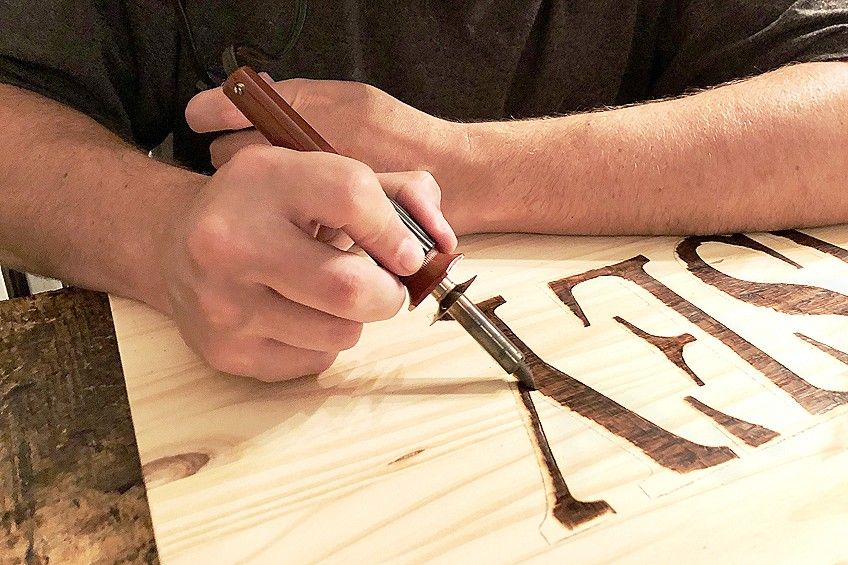
Practice Consistency of Pressure
You will need to be consistent when using a pyrography pen. Remember not to apply actual pressure to the tip of your pen, you should be aiming for a gliding action, allowing the pen to make its way through the material.
Pressing should never be done unless you intentionally mean to darken a particular area, and if this is the case you could simply turn up the heat of your unit.
With that being said, you should also be consistent with the speed at which you are moving. Planning the route you will be taking can help with this, as you won’t have to figure out where you’ll be moving next on the fly. Moving your pen at a consistent speed will ensure you don’t create uneven tones across the surface of your workpiece.
Pick a Burn Direction
The direction you choose to burn in can also have an effect on how your artwork looks. On either end of the tip, you’ll have a slanted edge, which you’ll have the choice of pulling downward or pushing upward. While it is possible to work well when pushing the pen upward, you’ll have better control and apply pressure more consistently should you pull the pen downward instead.
Burn direction can be influenced by other factors too though. For example, the grain direction of your wood could conflict with the direction you want to push/pull your pen in.
The path of least resistance is to burn following the direction of your wood grain, whether this be up and down or side to side.
While pushing or pulling against the grain is possible, it will be more challenging and is not the ideal scenario for beginners.
Overlap and Re-Burn
Shading in pyrography is not unlike shading when sketching. The concept of overlapping your burns and going over certain areas again can help create a smooth aesthetic without any breaks in the tone of your burns. This is easily done with the edges of your pen and can be done while you work or after you have completed your outline.
Basically, once you create a line with your pen you want to slightly overlap the next line with the existing one to create visual continuity.
Not doing so leaves an open patch between the two lines, which the human eye picks up quite easily. To smooth out the look, you can reburn these sections, by simply following the lines you have already made.
Use a Stencil
When starting out in wood burning you might be tempted to start your design freehand. While this is possible, and there’s nothing wrong with doing so, this won’t help you develop your precision and technique as much as using a stencil will. How does using a stencil help you to develop your technique though?
Using a stencil will help you develop your ability to follow lines closely and adapt to changes in the grain of the wood as you follow these lines.
It will also give you an idea of how much pressure you need to apply and how to hold your pen to achieve certain effects. You might even need to change tips while working to follow certain parts of the stencil more closely.

Invest in the Right Tools
One of the best wood-burning tips we can give you is to ensure you have the right tools for the job. We mentioned previously that most beginners invest in a pyrography kit. These kits can vary considerably in tool quality and variety based on the brand and price range. These kits will almost always provide you with a universal tip and a pyrography pen.
Good kits for beginners will often provide you with wood to start off with and a few instructional guides to get you started.
If you intend to make words, we recommend getting a calligraphy tip early on so you can develop your technique, or invest in a set of letter tips so you can practice your spacing as you continue your pyrography journey.
Avoid Working Around Children and Animals
Pyrography is a fun and incredibly useful skill to have, but pyrography pens generate a lot of heat and can be a potential hazard if not used correctly.
Accidents happen, and the best way to ensure that your pets and little ones are safe is to ensure that you don’t use your pen in close proximity to them and to always ensure that your immediate environment is well-ventilated.
There are many things you can do to ensure that you are able to practice pyrography safely. One of them is to never leave your pen unattended, especially while it is still powered on. Ensure that your tips are safely stored and not left lying around, and always keep a spray bottle of water nearby in case anything needs to be extinguished.

Always Make Use of Your Stand
Regardless of the brand of pyrography pen you are using, it should come with a stand. This stand is similar to the other stands found with glue guns and soldering irons. These are either attached to the pyrography pen and can be deployed and retracted when needed or are entirely separate and sit on your work table until your pen needs to be rested.
You should never rest your pyrography pen on your work table or on your table mat. Pyrography pens are incredibly hot and can start a fire if left unattended.
Pyrography pen stands are designed to insulate and dissipate the heat produced by your device and should be set up as part of your preparation routine when wood burning.
Remove Your Tips Correctly
While this might not form part of wood-burning tips, it is important to know how to handle your pyrography pen correctly. Removing the various tips from your pen should be done correctly or you could damage your pen, after all, pyrography tips are threaded and if removed incorrectly you could damage the internal thread of your pen or the external thread of your tips.

To insert a pyrography pen tip, you should ensure the device is powered off and thread the tip in by hand. Once it’s flush with the base of the pen, tighten the tip using pliers or the dedicated tool provided by the manufacturer. To remove your tip, ensure the pen is powered off and cooled down before loosening the tip with pliers and threading it out by hand.
These are some of the things that you need to know about starting out in wood burning and how to handle a pyrography pen correctly. With that being said, exploring pyrography art forms and developing your own style by using these steps as a base can be tons of fun, so be sure to practice the fundamentals and try out new and interesting designs regularly!
Frequently Asked Questions
What Is Wood Burning Called?
Wood burning as an art form that is commonly referred to as pyrography or pyrogravure. This is the practice of creating art by lightly burning wooden surfaces using a pyrography pen. You can create animals, portraits, landscapes, and even abstract art using this medium.
What’s the Difference Between Wood Burning and Pyrography?
The terms wood burning and pyrography are often used interchangeably, but they are technically two different things. What is the difference, you ask? While pyrography involves using fire or heat to create designs on any material, wood burning art is made on wood only.
Is It Hard to Learn Pyrography?
Pyrography has become increasingly popular over the last couple of years as tools and information have become more accessible. Although it can seem intimidating, the learning curve associated with learning pyrography isn’t steep at all, and you should be able to become relatively good at it with regular practice.

In 2005, Charlene completed her wellness degrees in therapeutic aromatherapy and reflexology at the International School of Reflexology and Meridian Therapy. She worked for a company offering corporate wellness programs for several years before opening her own therapy practice. In 2015, she was asked by a digital marketer friend to join her company as a content creator, and it was here that she discovered her enthusiasm for writing. Since entering the world of content creation, she has gained a lot of experience over the years writing about various topics such as beauty, health, wellness, travel, crafting, and much more. Due to various circumstances, she had to give up her therapy practice and now works as a freelance writer. Since she is a very creative person and as a balance to writing likes to be active in various areas of art and crafts, the activity at acrylgiessen.com is perfect for her to contribute their knowledge and experience in various creative topics.
Learn more about Charlene Lewis and about us.