Abs Drawing – Create a Muscular Drawing of Abs
This post may contain affiliate links. We may earn a small commission from purchases made through them, at no additional cost to you.
Abs, short for abdominal muscles, are a hot topic in the fitness world. Whether you’re looking to get a six-pack or just strengthen your core, having strong abs can improve your posture, balance, and overall health. But achieving those washboard abs takes more than just doing endless crunches. A combination of proper diet, cardio, and targeted exercises can help you sculpt your midsection and achieve your fitness goals. So, get ready to say goodbye to muffin tops and hello to a toned tummy with some dedicated ab work! Prepare your pencils and brushes for an exhilarating drawing tutorial, as we guide you through the step-by-step process of drawing abs.
How to Draw Abs in 10 Easy-to-Follow Steps
If you’re just starting with drawing abs, it can be a daunting task, but don’t worry! There are a few things you can keep in mind to make the process easier. Firstly, it’s important to understand the anatomy of the abdominal muscles and how they work together to create the appearance of a six-pack. This will help you to know which muscles to emphasize in your drawing.
Secondly, practice drawing from reference images or even from a live model if possible, as this will help you to see the subtle variations in muscle definition that can make a big difference in the realism of your drawing. Finally, don’t be afraid to experiment with shading and highlighting to create depth and dimension in your drawing. With some dedication and practice, you’ll be drawing impressive abs in no time!
You too can acquire the skill to draw and paint realistic abs by following the steps depicted in the below collage!
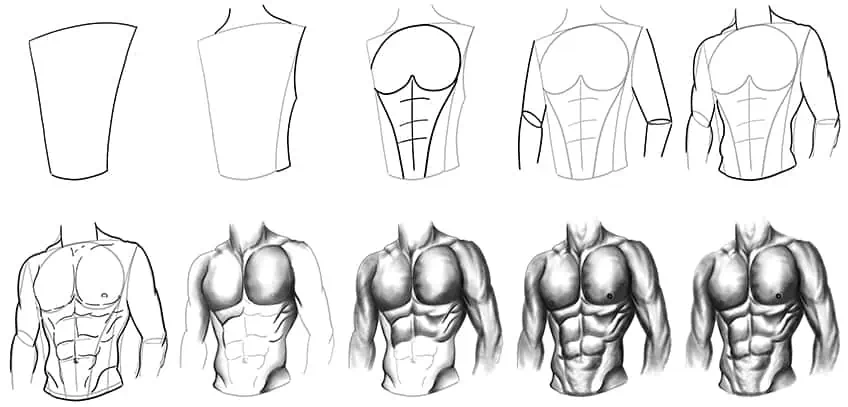
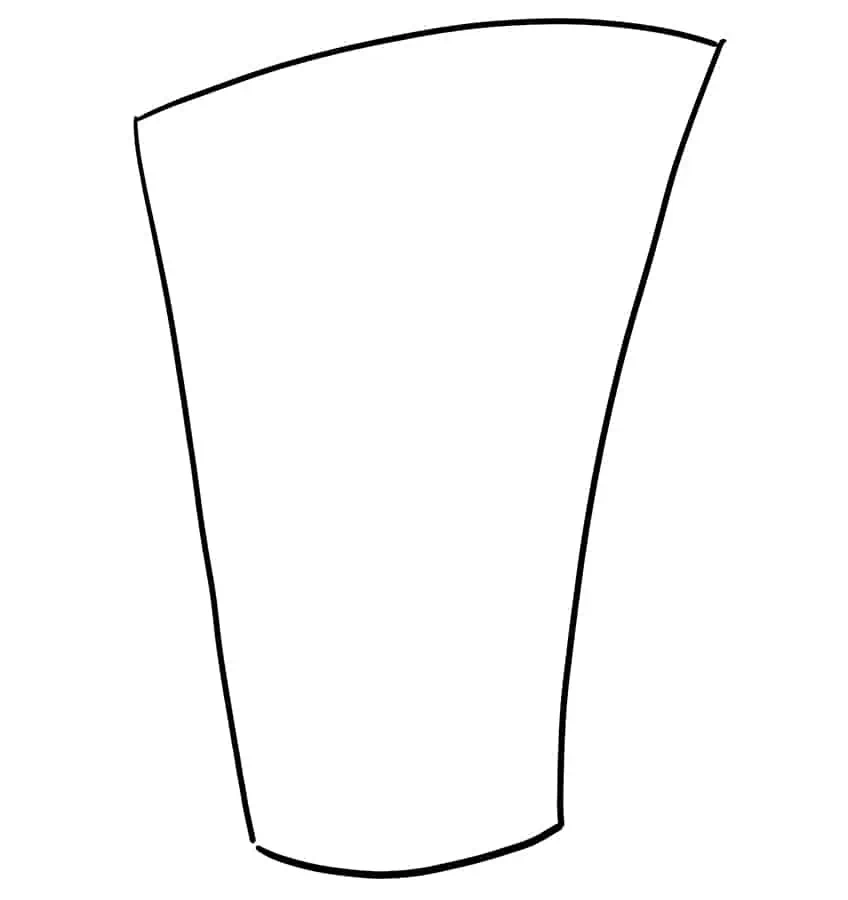
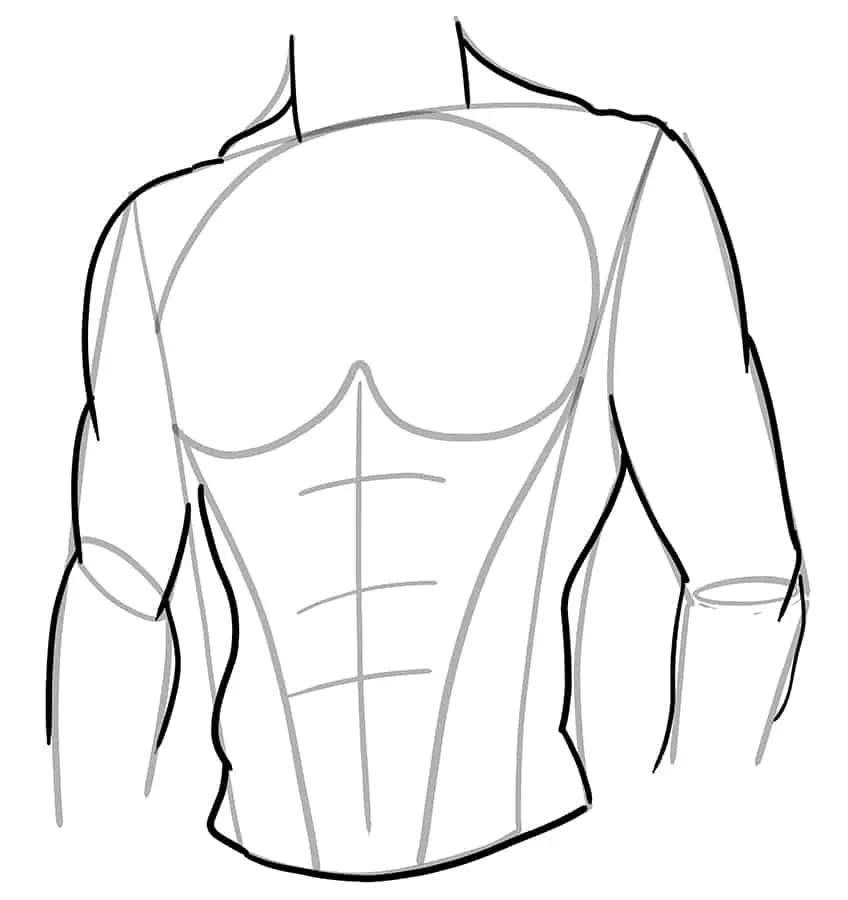
Step 1: Draw the Main Body of Your Abs Drawing
Begin our tutorial on how to draw pecs, by drawing a short curved line at the bottom, and a longer curved line at the top of your drawing area. Continue the step by simply connecting the two with extended lines to create the general shape of the human body.
Step 2: Add the Necklines
Above the main body, draw two curving lines with enough space between them to represent the neck area. Complete the step by drawing the additional right-end body curve lines.

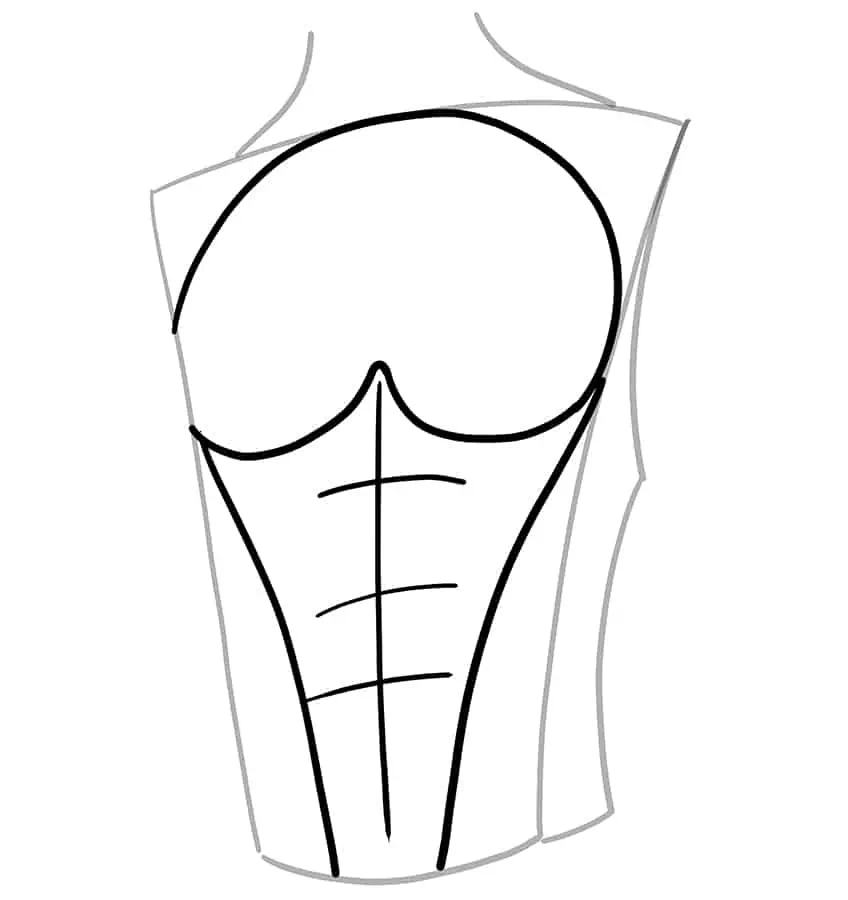
Step 3: Draw the Chest and Abs
Within the top part of the main body, draw two half circles and two curved lines to create the shape of a chest. Draw the vertical center line between the two chest parts leading downwards. Continue to draw the curving line from each end of the chest leading downwards. Finish this step by drawing the three ab lines on the center line.
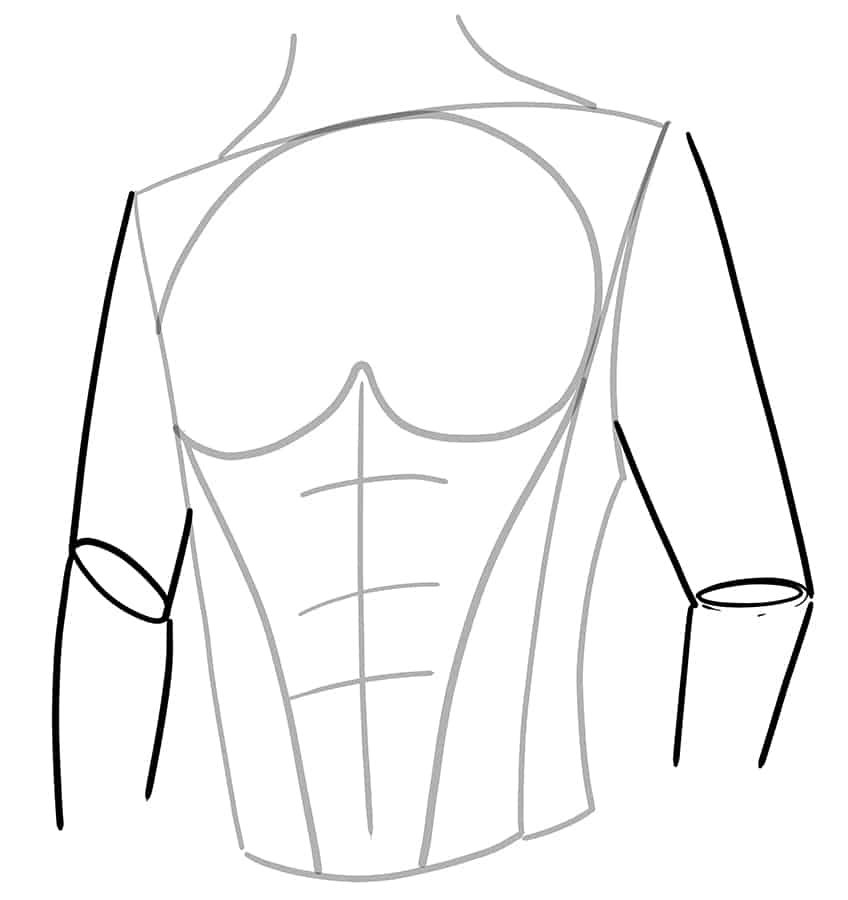
Step 4: Add the Arms to Your Abs Drawing
Continue your abs drawing, by drawing the partially visible left arm. Draw two lines from the main body leading outwards, and draw the joint represented by an oval shape to continue onto the forearm.
Continue this step by drawing the second fully visible right arm. Again draw two lines attached to the main body leading outwards, and an oval shape to represent the joint that continues to the forearm.
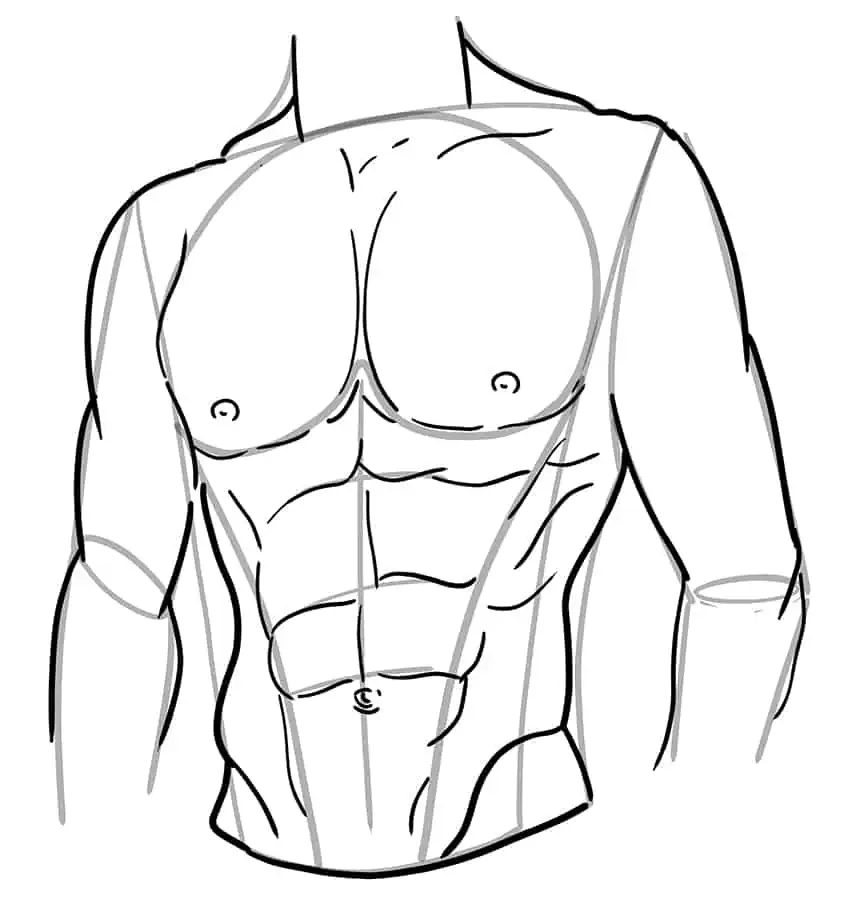
Step 5: Outline the Body
Use the previously drawn construction lines to aid you in outlining a more realistic and muscular body shape.
Step 6: Continue to Outline Your Abs Drawing
Use the construction lines drawn in step three to aid you in outlining a more realistic-looking chest and ab set. With these steps completed, draw the belly button and the nipples. Once you have completed this, you are now ready to erase any overlapping and construction lines that are still visible.
Step 7: Shade the Chest
In this step, begin to shade your how-to-draw pecs drawing by selecting a small, soft brush and black paint, and add shading along the edges and around the chest frame. Continue to apply soft shading along the necklines and the waist edges. Repeat using a fine, brush to enhance the structure lines of the body.
Complete the step using a blending brush to soften and spread the shading.
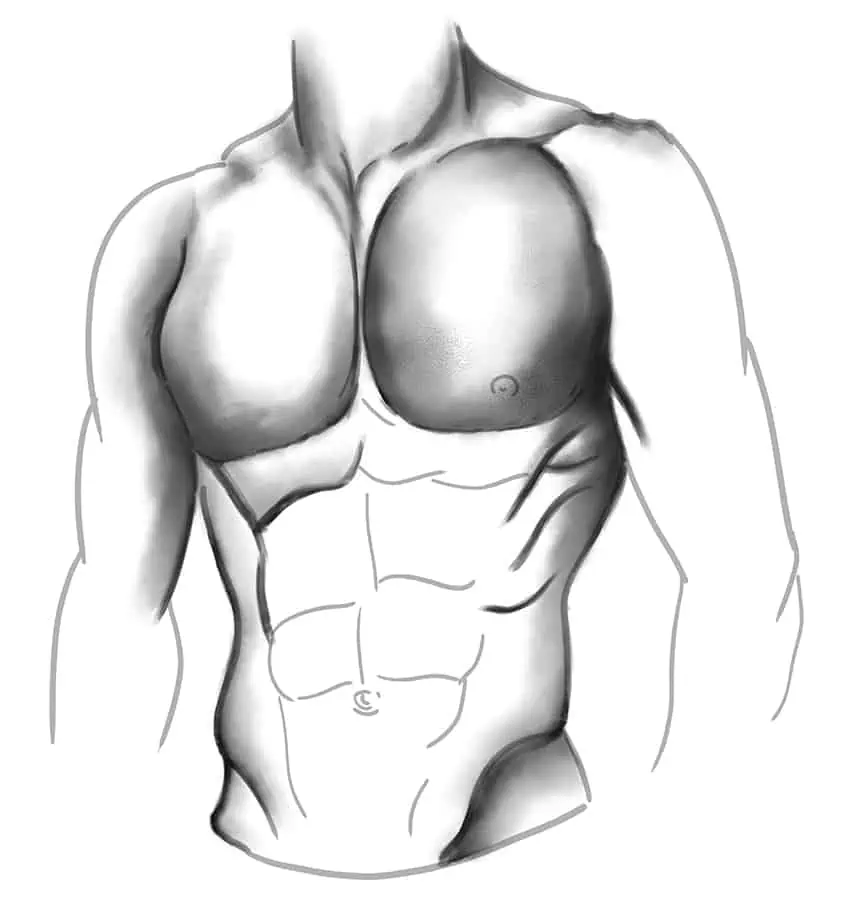
Step 8: Shade the Upper Abs
Continue the same process as before and enhance the abs using a soft brush and black paint. Repeat this step using a thin brush to enhance the structure lines. Apply shading within the arms with a soft brush and black paint. Once completed make use of an eraser to add realistic streaks of muscle tone and highlights along the arms and shoulders. Finish this step using a rough texture brush and black paint, and lightly dab along the arms.
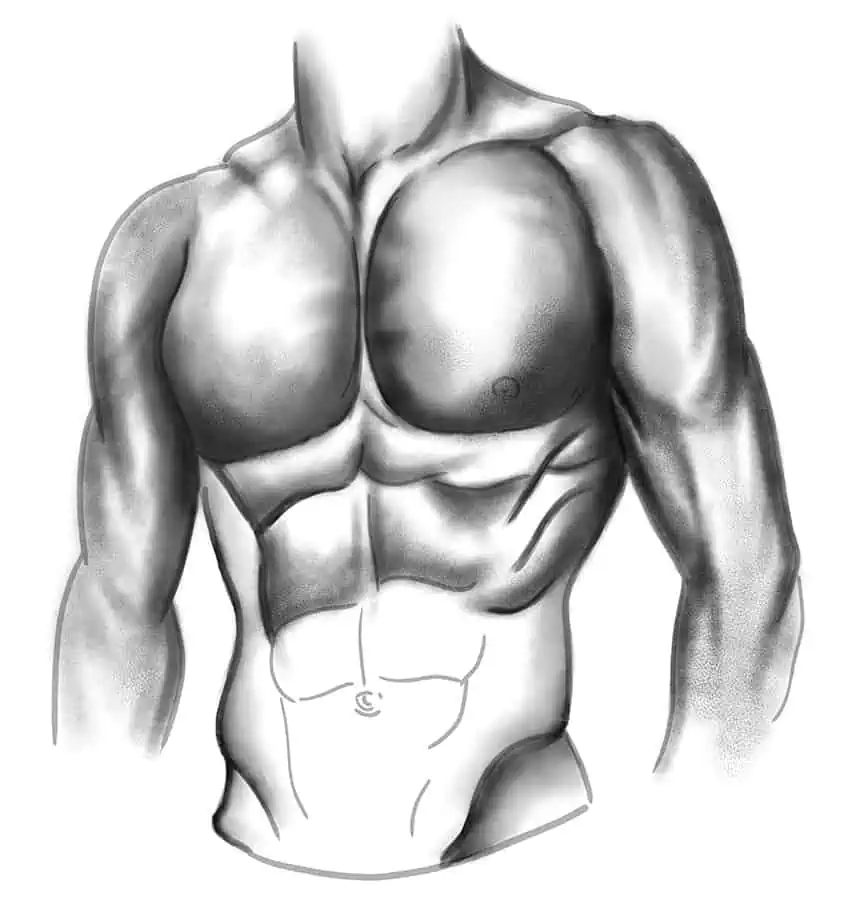
Step 9: Continue to Shade Your Abs Drawing
With a small, soft brush and black paint, continue to add the final shading along the edges of the lower abs and waistline. Repeat the step using a thin brush to enhance the structure of the body. With an eraser, begin to add realistic highlight streaks along the sides of the waist. Continue to trace the nipples on the chest using a fine, sharp brush and black paint.
With a rough texture brush, add a hairy texture patch along the lower stomach area and the edges of the chest. Finish this step using a blending brush to soften and spread the shading.
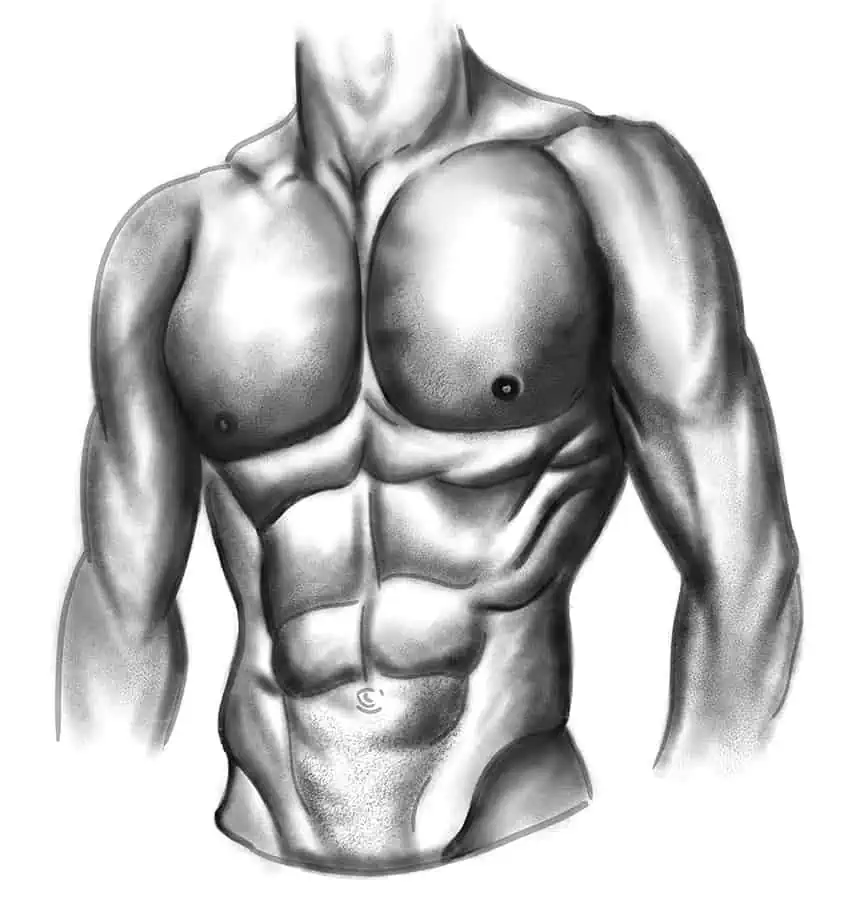
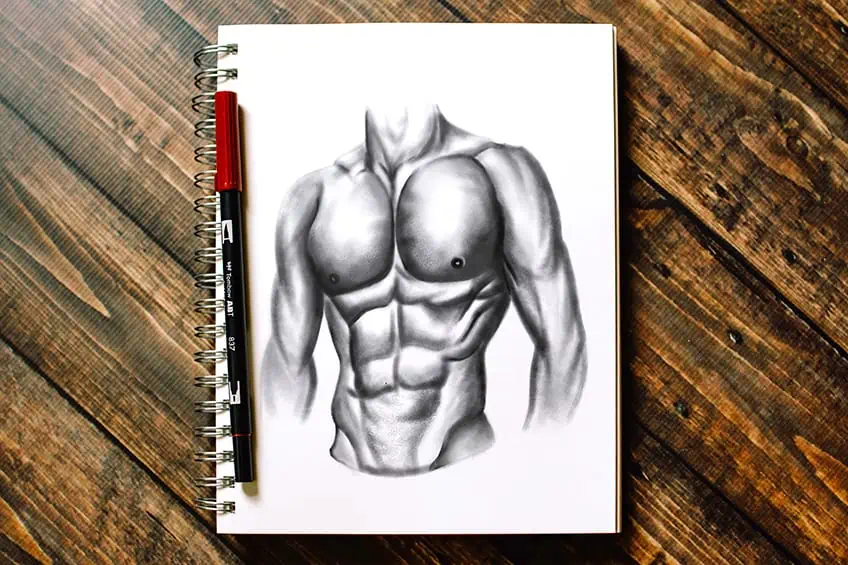
Step 10: Finalize Your How to Draw a Six-Pack Drawing
You are one step closer to finalizing our tutorial on how to a six-pack. To do this, erase any outlines that are still visible.
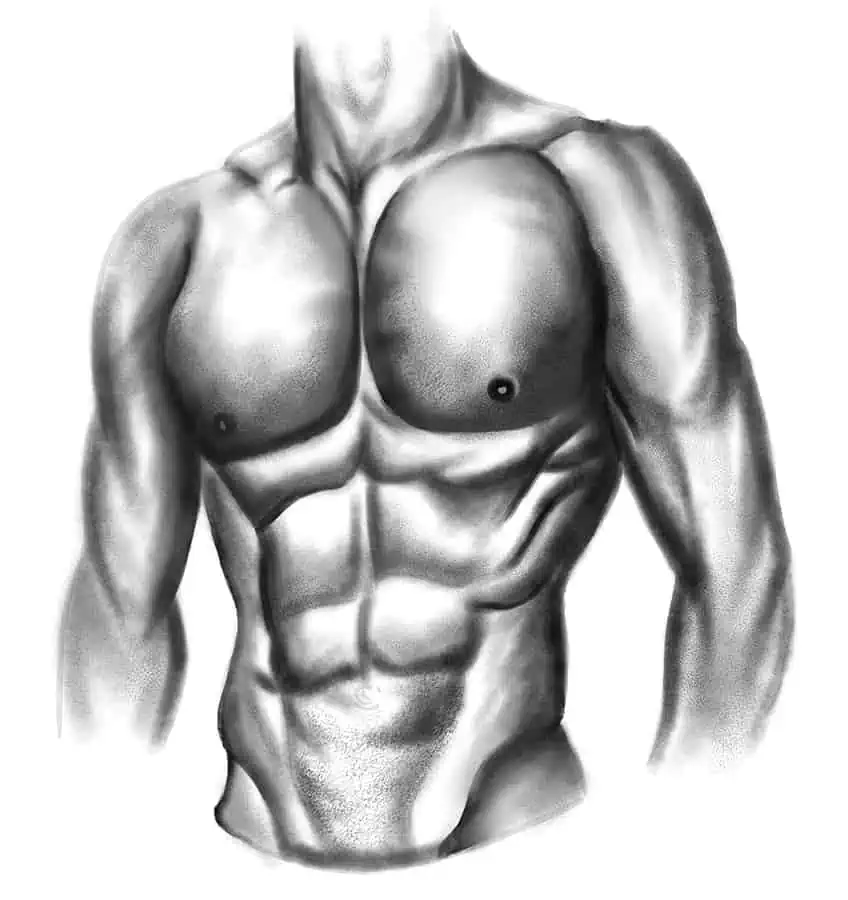
Congratulations on finishing our tutorial on how to draw a six-pack! It’s no easy feat to capture the complex anatomy and definition of the abdominal muscles. Take a moment to step back and admire your work. If you’re happy with the overall result, consider taking some time to refine the details and add some shading to create depth and texture. You might also want to experiment with different lighting and angles to see how they affect the appearance of the abs. Remember, practice makes perfect, so keep drawing and studying the anatomy to improve your skills. You never know when your next masterpiece might just be around the corner!
Frequently Asked Questions
How to Draw Abs That Look Realistic?
Drawing realistic abs requires a combination of understanding anatomy. Start by studying the anatomy of the abdominal muscles and how they work together to create the appearance of a six-pack. Next, practice drawing from reference images or even from a live model to capture the subtle variations in muscle definition. Pay close attention to the lighting and shading of the abs, as this can greatly affect their appearance. Use a variety of shading techniques, such as cross-hatching and blending, to create depth and texture. Finally, don’t be afraid to experiment with different angles and poses to create a dynamic and engaging drawing. With practice and patience, you will learn how to draw abs in no time!
How to Add Texture and Depth to an Abs Drawing?
Adding texture and depth to an abs drawing can greatly enhance its realism and impact. To achieve this, start by studying the anatomy of the abdominal muscles and understanding how they interact with each other. Next, experiment with different shading techniques, such as cross-hatching, stippling, or blending, to create texture and depth in the muscles. You can also create the illusion of depth by adding shadows and highlights that follow the curves and contours of the muscles. Another technique is to use a white pencil or eraser to add highlights and create the appearance of light reflecting off the muscles. With practice and attention to detail, you can add texture and depth to your abs drawing and take it to the next level.

IzzyBll is a digital artist and content creator from Israel and currently residing in South Africa. Originally coming from videography, Izzy then turned to digital graphic art. He specialized in using digital drawing software such as Photoshop and Procreate. Drawing and photo editing has always been a sort of second nature for Izzy. In doing so, he can now look back on 5 years of experience in the industry, completing commissions for various well-known brands such as Audi.
Learn more about IzzyBll and about us.