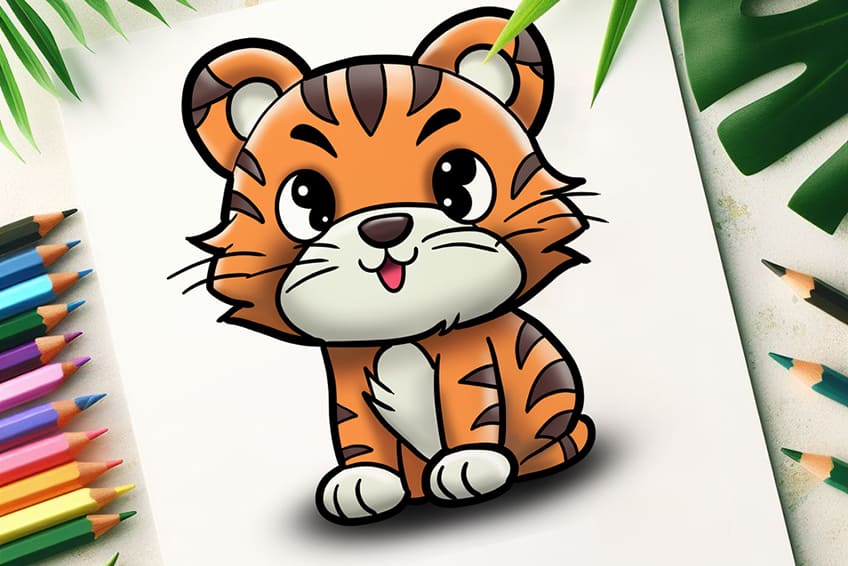
Tiger Drawing – From Jungle to Canvas
This post may contain affiliate links. We may earn a small commission from purchases made through them, at no additional cost to you.
Drawing a tiger can be an exhilarating and gratifying artistic endeavor. Whether you’re fascinated by wildlife, interested in capturing the essence of one of nature’s most majestic creatures, or simply aiming to expand your drawing repertoire, this guide will lead you through 18 essential steps to create a realistic or stylized representation of a tiger. This comprehensive guide on how to draw a tiger ensures that you have the tools and techniques at your disposal to bring the vibrant and dynamic beauty of a tiger to life on your canvas!
Capturing Majesty: Tips for Drawing Tigers With Power
This illustrated guide carefully details every step required to create the final depiction of a tiger. By following this guide closely, you’ll achieve expertise in the art of learning how to draw a tiger!
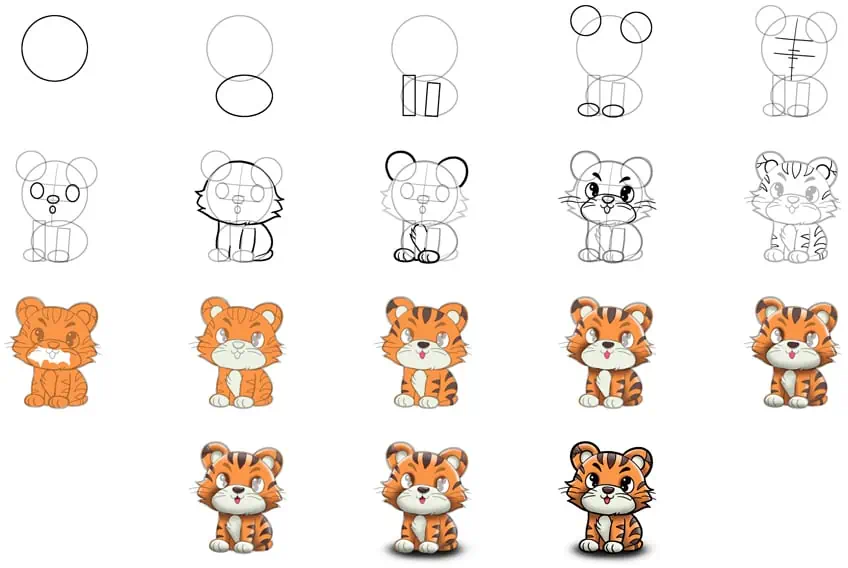
Step 1: Begin Your Full Body Tiger Drawing
Start by drawing a circle to represent the head of your realistic tiger sketch.

Step 2: Add the Body to Your Tiger Sketch
Beneath the previously drawn circle, draw an oval shape slightly overlapping to represent the main body of the tiger.

Step 3: Draw the Legs
Draw two rectangles to represent the legs. These should be along the center and left areas of the main body.

Step 4: Add the Ears to Your Tiger Face Drawing
Overlapping the head, draw two circles to represent each of the ears. Complete the step by drawing two oval shapes at the bottom of the previously drawn leg construction lines.

Step 5: Draw the Facial Guidelines
Draw a centerline within the head, dividing it into two then draw five horizontal cross guidelines on your tiger face drawing.

Step 6: Outline the Facial Features on Your Tiger Sketch
Using the guidelines to aid you in placing and drawing the facial features, begin by drawing the eyes represented by two oval shapes. Then draw the nose and mouth between the shorter guidelines.

Step 7: Outline the Head and Main Body
Continue to outline the furry head and main body on your realistic tiger drawing.

Step 8: Continue Onto the Ears and Paws
Begin to outline each of the curved ears and paws. Within each paw, draw the curving lines and the furry chest on your tiger sketch.

Step 9: Add Detail to the Face
Using the construction lines, being to outline the overall face shape including the facial features. Start by filling in the eyes and eyebrows. Then, draw the nose and mouth line using two half circles, with the tongue visible. Finish the step by adding the whiskers and erasing any remaining construction lines.

Step 10: Draw the Patterns on Your Full Body Tiger Drawing
Draw sharp curved tiger patterns around the face, ears, and main body of the tiger. Finish off by drawing the ear lobe circle within each of the ears.

Step 11: Color in Your Realistic Tiger Drawing
With a fine, sharp brush and orange paint, begin to color in the entire coat of your tiger sketch.

Step 12: Continue Onto the Secondary Color Coat
Using the same brush and a light lime color, evenly coat the ear lobes, mouth area, chest, and paws. With white paint, evenly coat the eye sclera area.

Step 13: Color the Patterns on Your Tiger Drawing
Use a fine, sharp brush and brown paint to cover each of the pattern lines drawn in step 10. Continuing with the same brush, switch to dark brown paint to cover the nose. Finally, apply pink paint to cover the tongue.

Step 14: Shade and Highlight the Tiger
Begin to shade the sides of your tiger using a soft brush and black paint. If you need to soften the shading, take a blending brush and smooth it out. With white paint, add soft highlights to your tiger drawing.

Step 15: Continue Onto the Secondary Color Coat
Utilize a small, soft brush and black paint to softly shade the mouth/muzzle area, ears, chest, and paw area. Repeat the process using white paint to add gentle highlights. Finally, use a blending brush to blend the coats for a seamless finish.

Step 16: Add Shading and Highlights to the Patterns
In the same manner as the previous step, utilize a small, soft brush and black paint to shade the patterns, nose, and mouth. Continue with white paint and add gentle highlights in these areas.

Step 17: Apply a Ground Shadow
Select a small, soft brush and back paint, and shade beneath the tiger. Begin softening the shading with a blending brush.

Step 18: Complete Your Realistic Tiger Sketch
Utilize a fine, sharp brush and black paint to outline the details, completing your full-body tiger drawing. Remember to fill in the eyes to enhance the overall appearance. Congratulations! You’ve finished our tutorial on how to draw a tiger.

Well done on successfully completing the 18 steps to drawing a tiger! You’ve navigated through the complexities of capturing the essence and majesty of one of nature’s most magnificent creatures, transforming simple shapes into a detailed and lifelike representation. This achievement not only adds a striking tiger to your portfolio but also enhances your drawing skills, enriching your artistic expression. Remember, each step you’ve taken is a testament to your dedication and creativity. Keep practicing and exploring the boundless possibilities your newfound skills can unlock.
Frequently Asked Questions
How Do I Draw the Facial Features of a Tiger Realistically?
Capturing the intricate patterns of a tiger’s stripes in my drawings is a delightful challenge that I approach with careful observation and attention to detail. Personally, I begin by studying reference images of tigers, noting the unique arrangement and curvature of their stripes. Then, I sketch out the basic outline of the tiger’s body, ensuring proper proportions and positioning of the stripes. Using a combination of fine lines and varying pressures, I meticulously fill in the stripes, paying close attention to their thickness, spacing, and direction.
How Can I Capture the Intricate Patterns of a Tiger’s Stripes in My Drawing?
Drawing the facial features and expression of a tiger realistically is a rewarding aspect of my artistic process. Personally, I start by focusing on the eyes, which are often described as the windows to the soul. I carefully observe the shape, size, and placement of the tiger’s eyes, ensuring they convey the animal’s characteristic intensity and focus. Then, I move on to the nose, mouth, and ears, paying close attention to their proportions and subtle details. Capturing the essence of a tiger’s expression, whether it’s a fierce glare or a gentle gaze, requires patience and precision, but the end result is always worth the effort, bringing the tiger to life on the page with depth and authenticity.

Matthew Matthysen is a multidisciplinary artist. He completed his fine art degree, majoring in History of Art and Contemporary Drawing Practice at the University of Witwatersrand, South Africa. Before joining acrylgiessen In 2020, Matthew worked part-time as an art teacher at Reddford Blue Hills High school. Matthew creates drawing and painting tutorials for acrylgiessen and captures them not only photographically and in written form. He also records the creation of his works in his own creative studio as in video format, from which later with a voiceover and a video editor also drawing tutorials for the Youtube channel of acrylgiessen are created.
Learn more about Matthew Matthysen and about acrylgiessen.