How to Draw a Nose – A Realistic Nose Drawing Tutorial for Beginners
This post may contain affiliate links. We may earn a small commission from purchases made through them, at no additional cost to you.
Drawing a face is challenging for any artist, and nose drawings are an especially challenging factor to consider! No matter how difficult it may seem, it is very important to get the proportions of the face correctly aligned! In this how-to-draw-a-nose tutorial, we will look at the method used to achieve the correct proportion and scale of the feminine nose. We will explore how lighting and shadows work and how to draw a realistic nose at an angle. Drawing a nose is tricky, but luckily you have come to the right place to learn how! You should finish this lesson with the know-how of how creating a realistic face on paper or canvas is done.
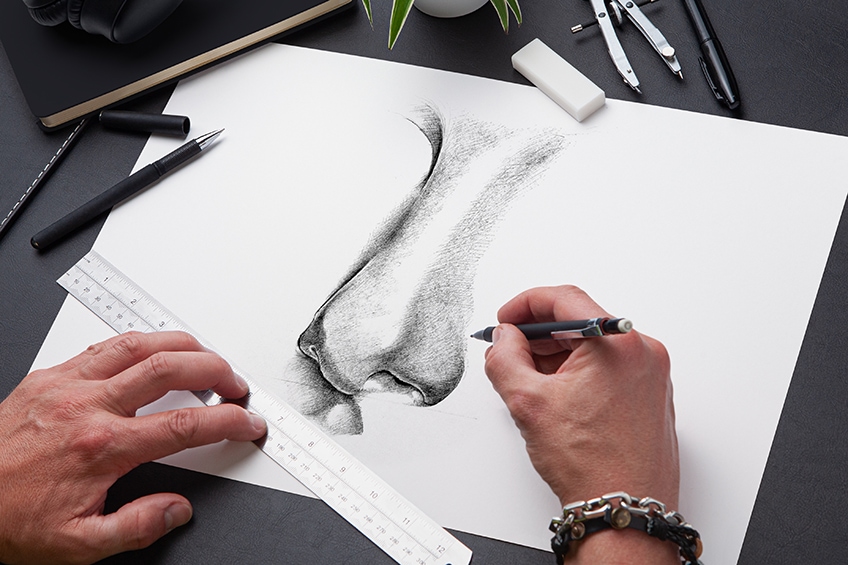
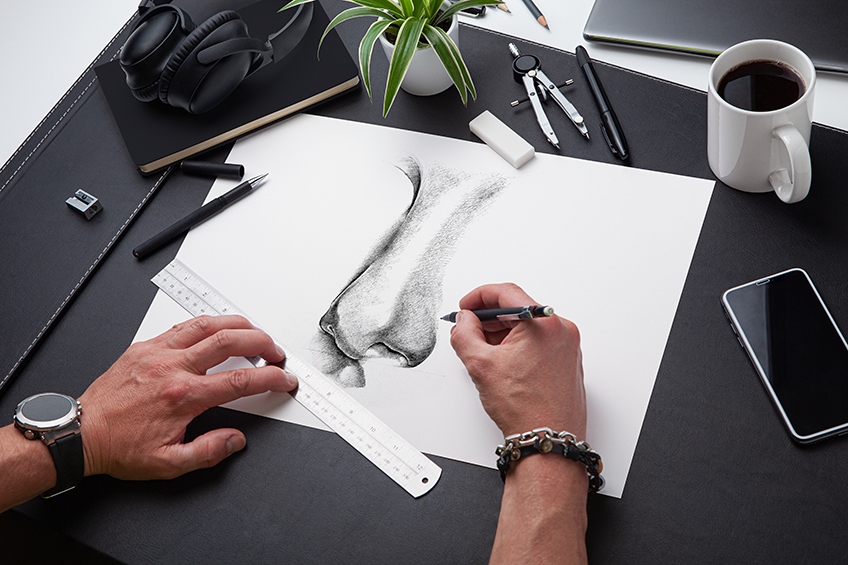
Before You Begin Your Nose Drawing
Settle into a comfortable position at your desk, get your art tools laid out, and begin preparation for our how-to-draw-a-nose tutorial! Make sure you are well prepared with everything you may need: drawing paper, drawing pencils, an eraser, a ruler, and a ballpoint pen. For this lesson, you may want to have your source image printed so that you can use it as a visual reference. Alternatively, you can use an iPad or tablet, this will enable you to utilize the zoom option to study the finer details.
A Step-by-Step Guide on How to Draw a Nose
Take a moment to study the source image provided. Drawing facial features and drawing noses is not too difficult once you master the art of proportion, lighting, and shadows! Any drawing or painting relies on these fundamentals to create a true, third-dimensional, and realistic sketch. The best way to achieve this is to envision the way light reacts to the surface of the skin.

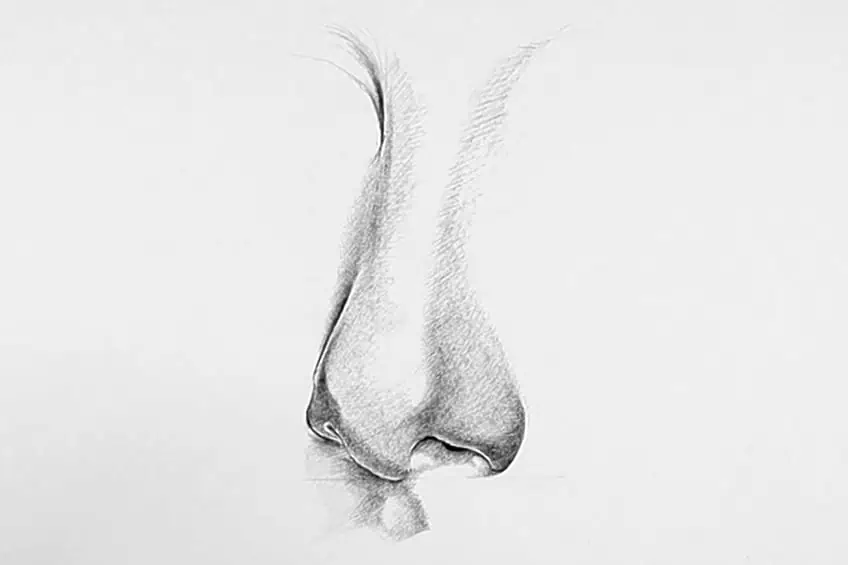
Learning How to Draw a Nose From an Angle
For this part of our guide, you will learn how to draw a nose from an angle. An important part of drawing noses, this view encompasses the curves of the nostrils and the various signature features of a nose shape, the slightly slanted side view catches the light and shadows, which may seem difficult to draw, but, with our easy-to-follow directions, it should be much easier! Like any drawing, you must create the foundation lines first. Remember to use a ruler to map out the correct proportions.
Now, let’s get going and begin with step one of our nose drawing!
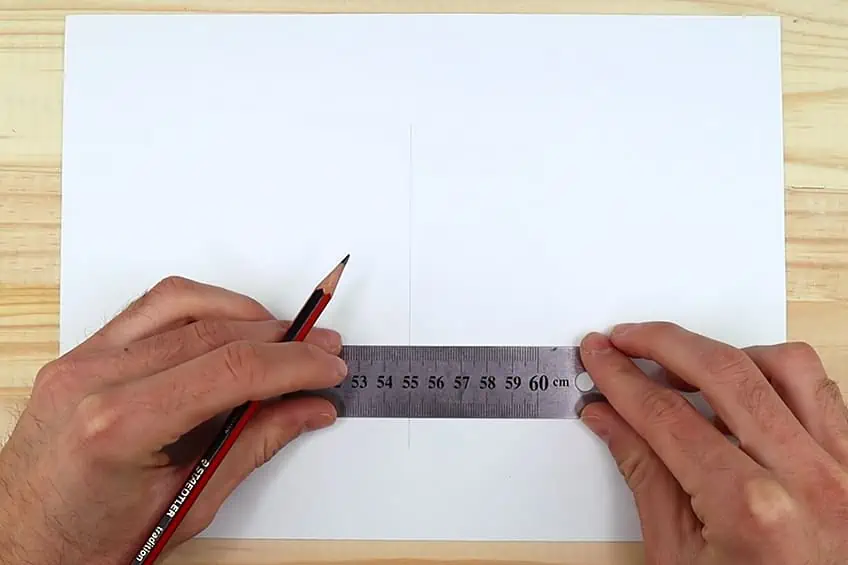
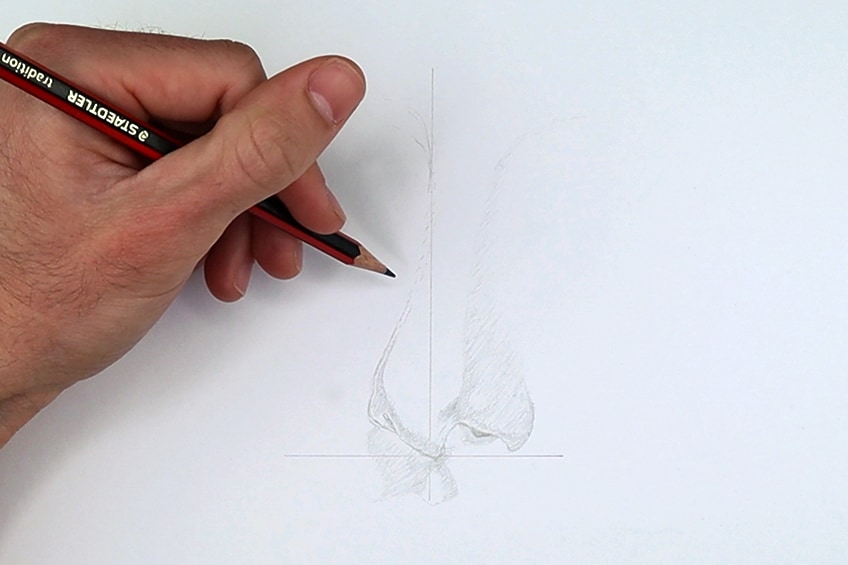
Step 1: Measuring and Creating Your Nose Drawing’s Grid Lines
To begin the first step in nose drawing, you should choose a soft pencil and use a ruler to draw a vertical line in the middle of your page. Next, draw a horizontal line through the bottom of the vertical line. It should resemble an upside-down cross. These will be your foundation lines to assist you in creating the correct proportion for your nose drawing.
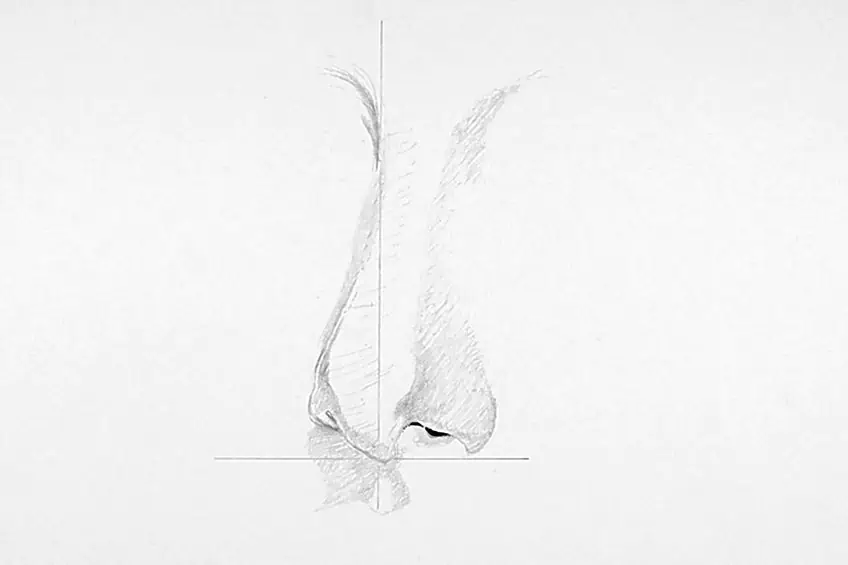
Step 2: Sketching Your Nose Drawing in Pencil
Continue using your soft pencil as you begin sketching the nostrils on the vertical line. Both the left and the right nostril must be aligned. Use the vertical line as a boundary for your nose sketch. As you can see from your source or reference image, the left nostril is somewhat hidden, yet the nostrils remain in alignment with one another.
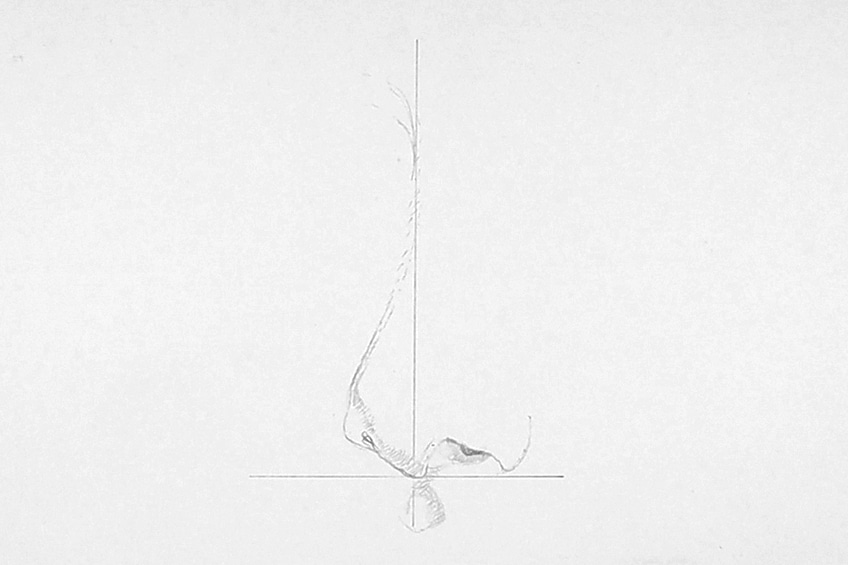
You have constructed the nose shape and sketched the nostrils on both sides of the nose. Next, you must take into consideration the area beneath the nose where the skin is concave above the upper lip. This part of your drawing should have some shading to create depth. It is important to include this, or your nose sketch may look a bit strange and unrealistic.
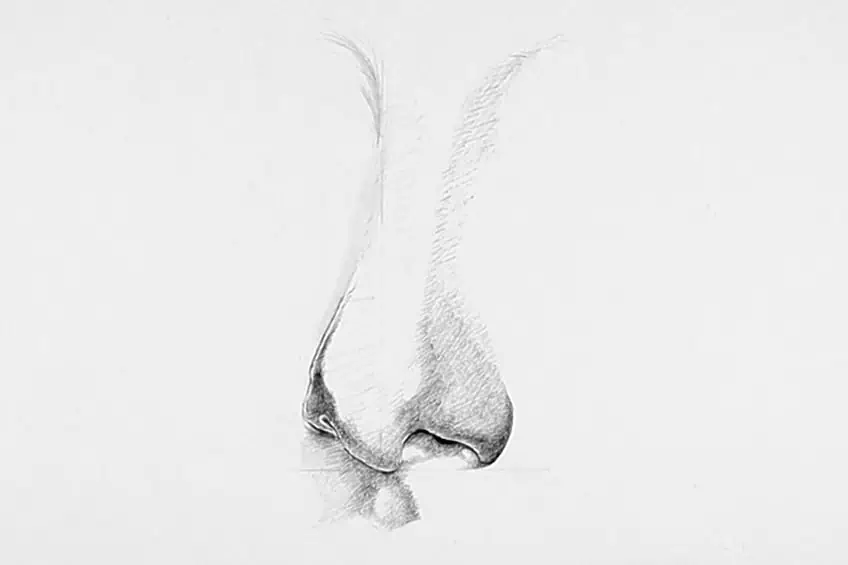
Continue sketching the shape of the nose. Next, you can focus more detail on the bridge area and strengthen the lines around the nose tip. You can also add gentle shading marks at the base of the nose to give it perspective. We will return to this at a later stage. Once you have completed the gentle shading, you can take a pen and darken the inner nostril area.
Step 3: Using Pen to Add Shading to Your Nose Drawing
At this point in your drawing-a-nose lesson, you should be ready to transition from pencil to pen. Use a ballpoint pen and begin shading around the nostrils. Take your time and pay attention to the detail. Don’t forget to reference your example image for guidance! Now that your nose drawing’s nostrils have some shading, you can focus on creating a shadow on the area beneath the nose. This small section of the face is called the philtrum groove.
It is important to do this because you don’t want your nose to look two-dimensional. Use the source image as a reference if needed.
Using your pen, you can shade the dark areas around the nostrils and draw layer by layer to create a balance of light and dark. Begin at the inner nostril at its darkest point because this is what you would describe as the focal point.
Continue with the shading process. The left nostril will be darker than the right nostril because of how the shadow falls on the subject. Follow this to the upper ridge of the nose. If you feel lost, you can refer to your nose-drawing reference image.
As your nose drawing develops, you will notice the way shadows fall and how this shapes the image. Tonal variation is crucial to follow to make a realistic nose drawing. The light source is directed from the right-hand side, this must be taken into consideration so that you can place the shadows in the correct position. The shadow that falls on the bridge of the nose is generally lighter. Trace around the edge of the nose point to define the nose shape.
Drawing a nose or any facial feature is easy when you consider the tonal variations and can focus on the way the light falls. Using your pen, you can add dark lines to the top of the ridge curve and nostril area and create a definition.
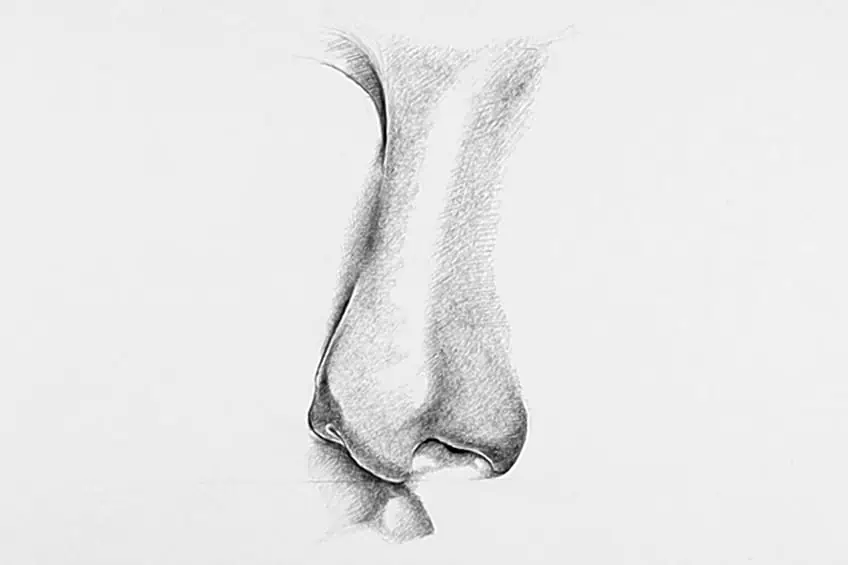
Using your pen, you can continue the shading process layer by layer. It is best to create light strokes and go over the pencil shading. As you reach the tip of the nose, make a gentle curve, and darken the area where the nose would begin to a natural point. You will see that the shading process will develop into a shape that will result in a realistic nose image.
In any facial drawing, the key is which angle the light falls and how the shadow produces depth. If you follow this basic rule, you should be able to create a realistic drawing of a nose. To complete your artwork, you should touch up the shadow at the bottom of the nose.
If you need to remove any dark areas on the ridge, erase them gently.
Handy Tips for Drawing a Nose
Understanding the basic steps of how-to-draw-a-nose is possibly the best choice you could make when it comes to drawing facial features! It is one of the most challenging subjects, and not many get it right the first time!
- Construct foundation lines to assist in creating a symmetrical face and nose shape.
- Identify the light source’s direction as this will determine the tonal variation of your realistic nose drawing.
- Keep your hand in a tilted position, using light pressure as you begin drawing with a pen. This should be done very slowly, layer by layer.
- Use the source image as guidance. This is especially helpful if it is your first attempt at drawing a nose.
- Slow and steady! To make a realistic nose drawing, you will need to be patient to get your shading and shadow work just right!
In nose-drawing, you should follow a few basic rules to achieve a realistic outcome. The biggest factor you should consider is getting the angle of the light and shadows correct. Drawing a nose correctly will determine the proportions of your drawing’s entire facial structure. In this drawing a nose tutorial, you will learn the basics of creating and planning your nose outline as well as adding dimension and shading.
Frequently Asked Questions
What Is the Best Way to Draw a Realistic Nose From an Angle?
The best way to draw a nose from an angle is to understand how light falling on the face will create shadows and how to use those shadows for your nose drawing. To start, you need to draw a horizontal and vertical line over one another and begin your nose sketch using the boundaries of the crossed lines. From this point, you will use shading techniques to develop your realistic nose drawing.
Can I Create a Realistic Nose Sketch?
Any drawing or painting will require you to focus on how the light hits the surface and the opposing shadows. In this nose sketch guide, you will learn to identify the difference between light and dark shadows, and how these shadows will create depth and proportions for drawing a nose.
Are Male and Female Noses the Same to Draw?
The difference between drawing a nose that is feminine or drawing a masculine nose will be the symmetrical structure. A female’s nose is generally more petite and pointed, whereas a male’s nose is more robust and slightly larger. It is all relative to the subject – no two noses are the same! For this lesson on how to draw a nose, you will use a feminine nose as a reference point.

Matthew Matthysen is a multidisciplinary artist. He completed his fine art degree, majoring in History of Art and Contemporary Drawing Practice at the University of Witwatersrand, South Africa. Before joining acrylgiessen In 2020, Matthew worked part-time as an art teacher at Reddford Blue Hills High school. Matthew creates drawing and painting tutorials for acrylgiessen and captures them not only photographically and in written form. He also records the creation of his works in his own creative studio as in video format, from which later with a voiceover and a video editor also drawing tutorials for the Youtube channel of acrylgiessen are created.
Learn more about Matthew Matthysen and about acrylgiessen.