How to Draw Skeleton Hands – Anatomical Hand Bones Sketch
This post may contain affiliate links. We may earn a small commission from purchases made through them, at no additional cost to you.
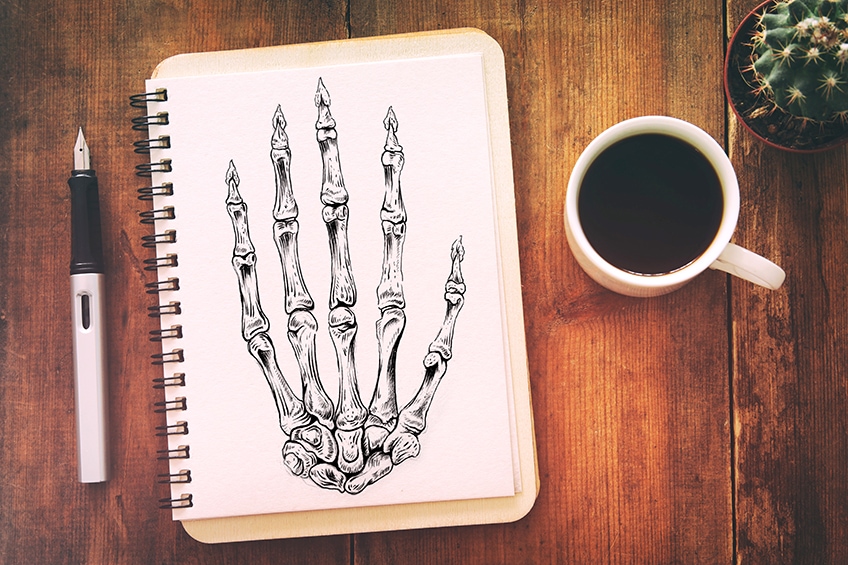
The skeleton hand is an interesting anatomical feature that makes for an excellent introduction to human anatomy. You are effectively studying how to create a hand when you master how to draw skeleton hands. You may better grasp the relative sizes of the fingers by learning the basic underlying bone anatomy of a hand. Skeleton hand drawings are a valuable tool for understanding how mobile the hand’s structure is. We’ll examine the many bones that make up the hand in detail in this skeleton hand tutorial. The skeleton hand has an intriguing meaning related to life and death, so it may also be a terrific addition or element in other artworks.
Our Skeleton Hand Sketch Tutorial
Creating a bone hand drawing is an easy and entertaining pastime. A detailed description of the bone architecture of each finger is given in a skeleton hand tutorial, which offers an interesting perspective on how hands are made. By teaching you how a hand is created in its bone frame, studying to draw skeleton hands offers you strong fundamental knowledge for drawing hands as well.
Creating a Skeleton Hand Sketch Step by Step
This method of producing a skeleton hand drawing is fairly straightforward. We start with a lighter skeleton hand sketch with pencils, continually referring to our reference images for assistance. We’ll spend some time here erasing and redrawing the bone hand drawing until it approaches the exact anatomy of a skeleton hand. We’ll then use our pencils to add some faint shading to the skull hand drawing. We may progress to the next phase once we are pleased with the pencil drawing and believe it adequately mimics the original image. The following stage will need some concentration, as we will draw with a pen using our pencil markings as guides.
Since we now know exactly what to expect, let’s get started with the skeleton hand tutorial.
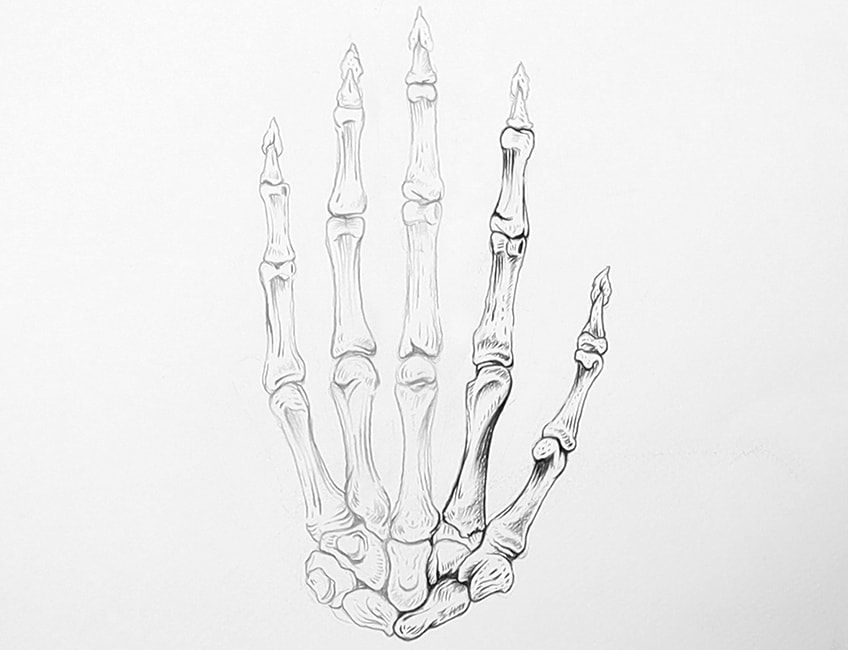
Step 1: Creating a Rough Skeleton Hand Sketch
We wish to start by studying our source images for a little period of time. Despite being an illustration of a skeletal hand, the reference picture seems like an authentic portrayal. With a light pencil, such as a 2H pencil, we want to start by drawing the bones in the palm. Take your time and concentrate on where each bone in the palm is located.
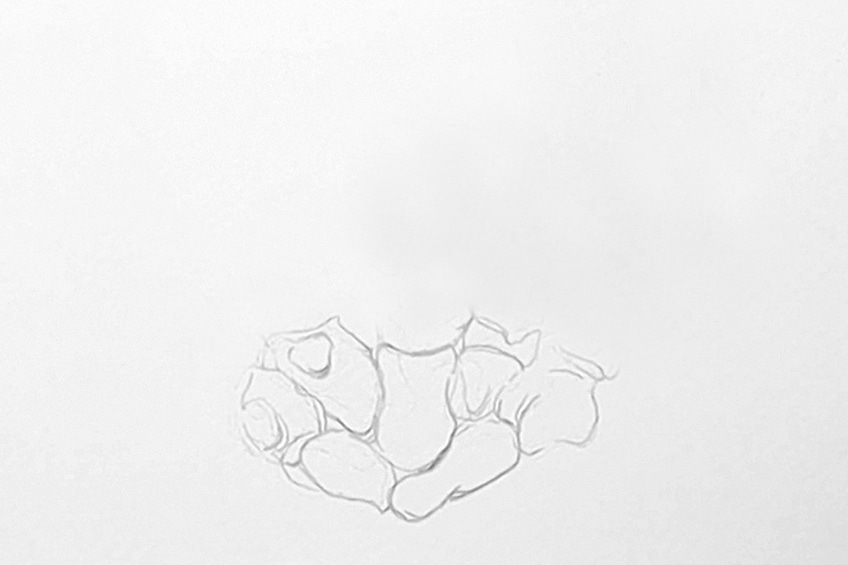
As we go through this stage, we want to switch between our skeleton hand drawing and our source images. We want to go on to draw the fingers, this time merely lightly sketching them while continually consulting the reference images for direction. The length of the finger bones is something to pay attention to; keep this advice in mind while you sketch.
An excellent option here would be to draw the bones in the palm before moving on to sketch the row of lower bones seen in the fingers. Continue through the metacarpal vertebrae of each finger after you have defined those in a preliminary drawing. This stage aims to determine the shape and size of each hand bone.
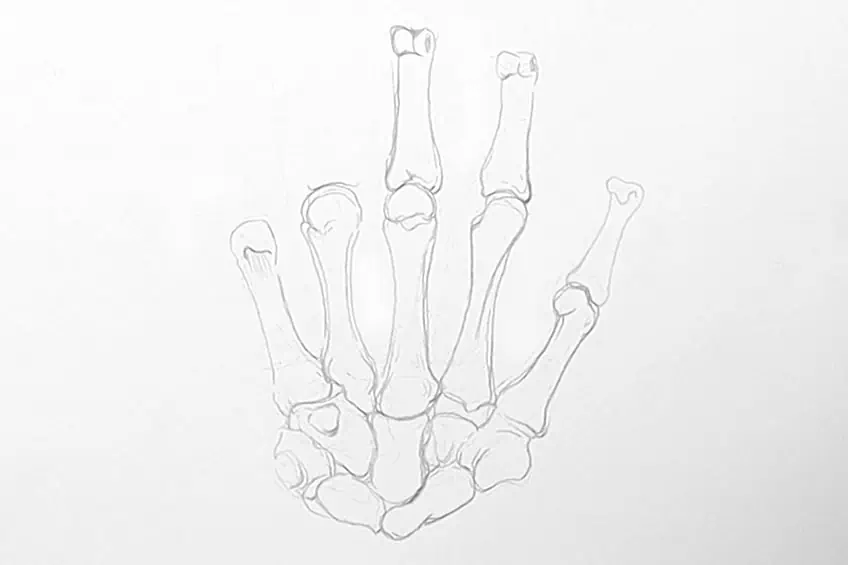
Allocate time for both the pencil and eraser to be used throughout this procedure. As we continue to sketch each finger, we want to keep returning to our reference images. Once more, we need to do a quick drawing of the fingers to identify the different types of bones that are there. At this stage, we must make every effort to accurately represent the length of each bone.

Use your reference images to direct your sketching technique as you continue to form the hand using both your pencils and erasers. Spend some time examining the hand, particularly when determining the diameters of each bone. The metacarpal and phalanx bones should be scaled as accurately as feasible. Use your erasers and recreate as many as necessary until you believe that your drawing accurately captures the source images.
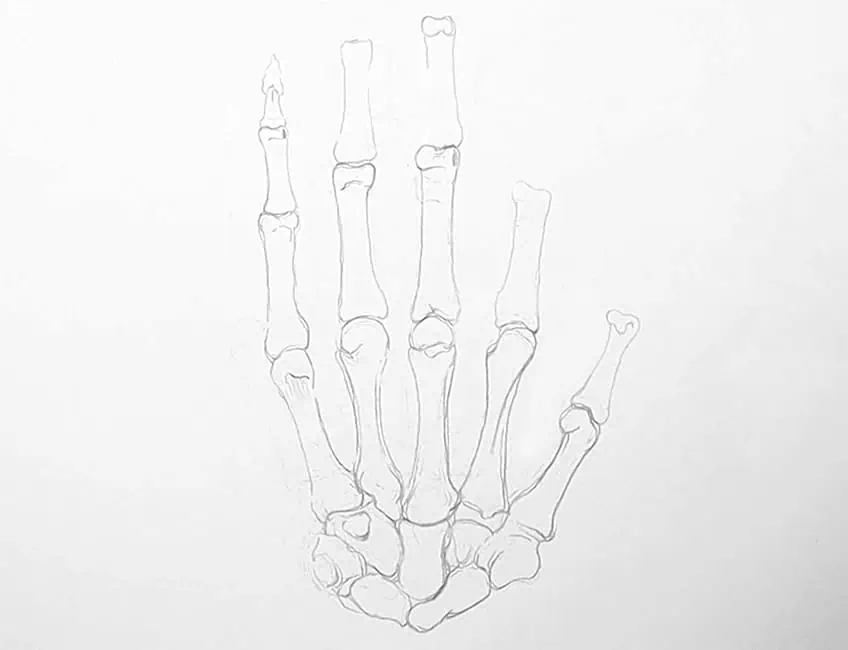
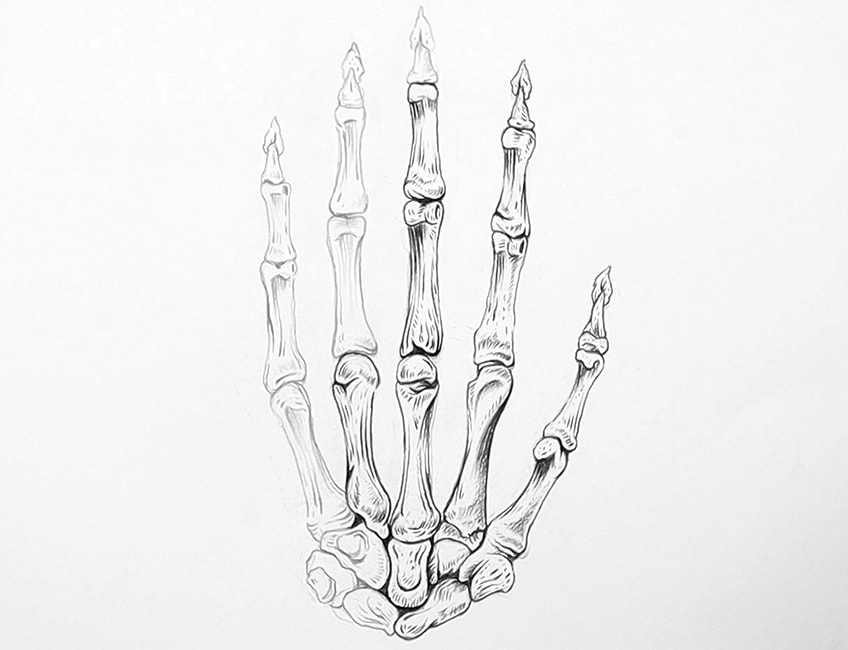
Step 2: Refinement of the Skeleton Hand Drawing
A multitude of mark-making techniques may be practiced while sketching skeletons by hand. For example, in the source images, we can see how the lines and various shading techniques work together to clearly show the textures of the bone. Let’s use our pencil to add some shading, stippling, and line work to our skeletal hand. We’ll start with the thumb and work our way down the hand to the pinky.

Within the drawing, we want to use connections. This may be accomplished by paying attention to all the little dents present in the reference image. Little groups of lines spread throughout the bones to form these indentations. This type of linework may give smooth surfaces the appearance of indentations. Examine your source images and experiment with this type of mark-making.
Pay close attention to where the knuckles and joints are located. Variations of lines, stippling and completely colored regions make up these areas. Make sure to go through the bones in the palm region as you make your way through the fingers, going from one side to the other. We can observe that there are darker patches in between the bones, providing the illusion of depth inside the bones.
We intend to take our time with this procedure. Working from one side of the hand to the other is an excellent idea. In a vertical motion, go through each finger and into the palm. This should be repeated for each finger until we have applied some detail to each one. Try to apply your eraser as you add features and edit them as you go, using the source images as you go.

Try to investigate your line work as you add details, moving over each finger. Drawing various sorts of lines, some broad, some thinner, might result in diverse properties inside the bones. Thicker lines can provide the appearance of greater contrast and harder indentations inside the bones. Thin lines, on the other hand, might give the bone a gritty feel. Experiment with your linework while analyzing your source images throughout the sketching process.

We also want to play with contrast, so we make all of the little spaces between the bones darker. We add depth to the bones by darkening the little crevices in the bone. If the gaps are darker, it indicates that light is having difficulty penetrating those places, making the fingers brighter and more visible in the front. Gradients with softer shading may also be added, and while the creases within the bone remain black, they may fade as the bones smoothen out. This is especially effective in the knuckle portions of the fingers because the bone protrusion forms a fading shadow that goes along the fingers as they level out.
Grooves at the joints and knuckles can be found on each finger. As you gradually refine the drawing with your erasers and pencils, keep an eye on the source images and how certain sections of the fingers are delineated within it. Take your time drawing a succession of lines and gradients to try to get distinct attributes within each finger.
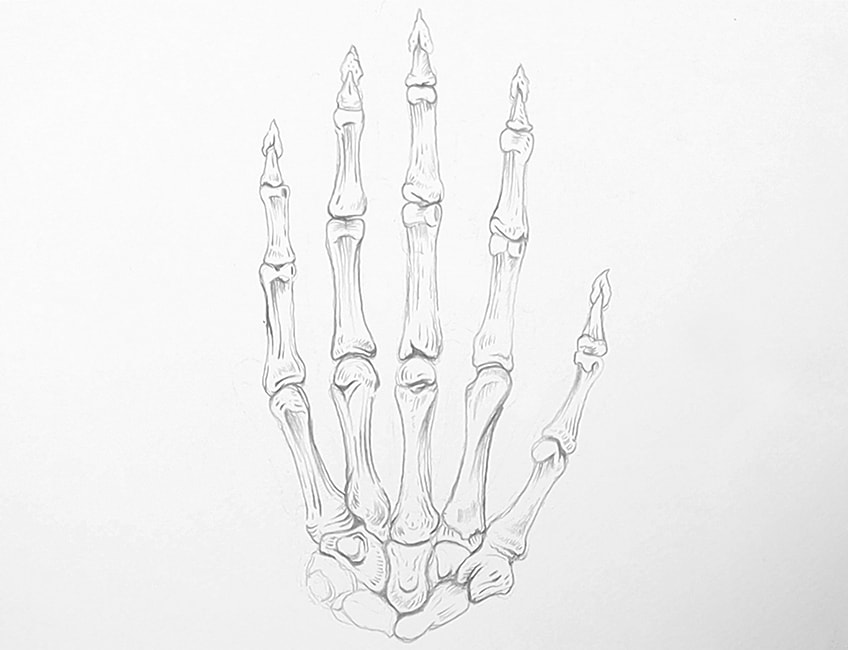
Step 3: Using a Pen for Outlines and Shading
We may now proceed to sketch with a pen if we are confident that we have finished our bone hand drawing in pencil and that it properly resembles the source images. We’ll take our time now, utilizing the reference images and pencil markings as guides. Begin carefully going over your pencil lines with your ballpoint pen.
Remember the approach you used while sketching in pencil as you fill in the sketch with your pen. You should go over these pencil markings as a reference for your mark-making procedure while sketching with a pen. Using your pen, draw over the lines, the subtle shading, and dark spaces between the bones. Try not to rework anything during this process. Again, concentrate on the regions surrounding the joints and knuckles. You’ll want to use the pencil markings to guide your pen sketching technique. Take your time with the creases within each finger and pay attention to each finger as you proceed from one side of the hand to the other.
We want to darken the spaces between the bones in the palm of the hand. It will push the bones to the forefront of the drawing. We want to use the pencil line work we made, particularly around each finger joint. We produce a more bone-like texture by drawing these lines. Use your pencil markings and references to help you draw the lines. Stippling is another technique used to enhance the artwork. We improve the appearance of a bone-like texture by adding a few spots here and there. During this level of sketching with a pen, you may be more fun with this phase.

We wish to keep adding details with our pens throughout this procedure. retracing all of the pencil lines, adding small spots with the fingertips, and shading in spots. Keep in mind to be patient and take your time. If you need to, take a break since drawing needs focus and can quickly become tiresome. You can add any small features you think could improve the image as you go through each digit of the skeleton hand sketch. Nevertheless, be careful to use pencil markings to guide you while you sketch. We want to utilize pencil lines to aid us as much as possible because drawing with a pen might go awry fast.

The tips of the fingers, or the distal region, are another part of the fingers where stippling can be added. A useful approach to shade in places with a little surface area, is to add stippling or dots to small areas inside the fingers. Allow yourself to continue working slowly through your skull hand drawing. Draw any lines, spots, or other instances of shade using your pen that you think would improve the drawing. Remember that this is only a guide, so feel free to experiment with your own methods for sketching at each stage.
And that’s our skeleton hand tutorial completed!

Useful Tips
- Always use the reference picture as a guide. A fantastic approach to designing a skeleton hand more accurately is to make frequent references to the source images as you work.
- Make sure your pencil markings are as precise as you can. To make sketching in pen simpler for yourself later, you want the pencil sketch to be as exact as you can.
- Do the tutorial at your own pace. Try to have patience with the process; sketching is a skill that needs practice.
- Use the eraser. The first part of the lesson calls for you to sketch and then erase with the goal of perfecting the bone hand drawing until it matches the source images.
- When you start to feel exhausted, stop. Keep in mind to take a rest, recharge, and then resume your work.
- Most importantly, enjoy yourself! Consider playing some music to make the session more pleasurable.
By paying particular attention to shape, form, and proportion in this skull hand drawing lesson, you will improve your observational abilities as you discover how to draw skeleton hands. In this article, we have walked you through the straightforward and uncomplicated steps that turn a regular bone hand drawing into a lifelike skeleton hand drawing.
Frequently Asked Questions
Can Anyone Learn How to Draw Skeleton Hands?
Making a bone hand drawing is a simple and enjoyable activity. A skeleton hand tutorial provides a full description of the bone architecture of each finger, providing a fascinating viewpoint on how hands are structured. Studying to draw skeleton hands provides you with solid foundational information for drawing hands by showing you how a hand is constructed in its bone frame.
What Are Some Useful Tips for Creating a Skeleton Hand Drawing?
Constantly refer to the reference image as a guide. Making regular comparisons to the source photos as you work is essential for depicting a skeletal hand realistically. Make your pencil markings as exact as possible. To make the pen sketches easier for yourself, make the pencil sketch as precise as possible.

Matthew Matthysen is a multidisciplinary artist. He completed his fine art degree, majoring in History of Art and Contemporary Drawing Practice at the University of Witwatersrand, South Africa. Before joining acrylgiessen In 2020, Matthew worked part-time as an art teacher at Reddford Blue Hills High school. Matthew creates drawing and painting tutorials for acrylgiessen and captures them not only photographically and in written form. He also records the creation of his works in his own creative studio as in video format, from which later with a voiceover and a video editor also drawing tutorials for the Youtube channel of acrylgiessen are created.
Learn more about Matthew Matthysen and about acrylgiessen.