How to Paint Watercolor Sunflowers – Sunflower Watercolor Guide
This post may contain affiliate links. We may earn a small commission from purchases made through them, at no additional cost to you.
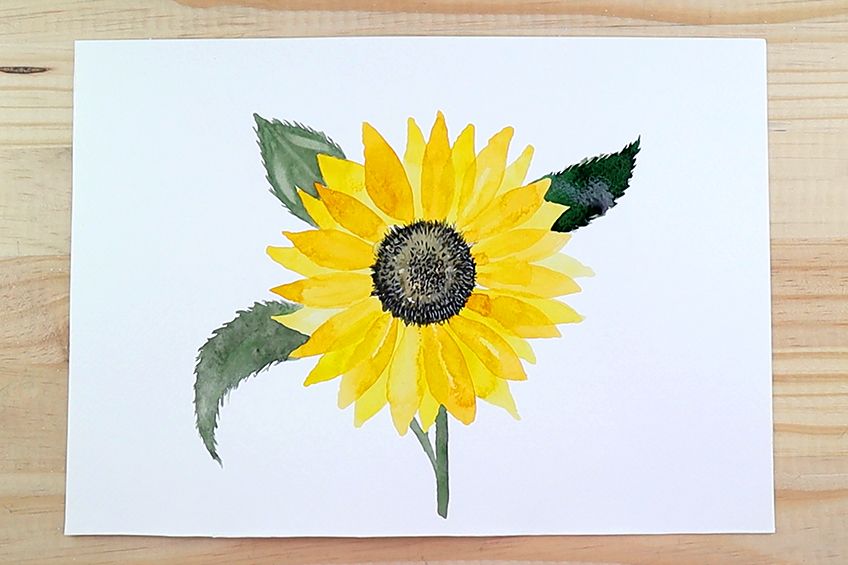
Creating a sunflower watercolor painting is a simple and enjoyable undertaking. Due to their simplified structure, learning how to paint watercolor sunflowers is excellent painting practice. Sunflowers are a wonderful, lively feature that can be incorporated into a variety of landscapes or created as a single theme on your canvas. In any case, painting this plant is an awesome experiment for honing your watercolor skills while also learning how to paint a sunflower that can be used in a diverse array of manners in upcoming paintings.
Table of Contents
- 1 Our Easy Sunflower Painting Tutorial
- 2 Step-by-Step Instructions on How to Paint Watercolor Sunflowers
- 2.1 Step 1: Creating the Sunflower Pistil
- 2.2 Step 2: Creating Layer One of the Petals
- 2.3 Step 3: Creating Layer Two of the Sunflower Petals
- 2.4 Step 4: Creating the Pistil’s First Layer
- 2.5 Step 5: Creating the Pistil’s Second Layer
- 2.6 Step 6: Creating the Pistil’s Final Layer
- 2.7 Step 7: Creating the Sunflower’s Leaves
- 2.8 Step 8: Creating the Sunflower’s Stem
- 3 Tips and Tricks to Keep in Mind
- 4 Frequently Asked Questions
Our Easy Sunflower Painting Tutorial
There are numerous methods for learning how to produce a sunflower watercolor painting; but even so, not all painting methods are simple. In our easy-to-follow sunflower painting tutorial, you will be taken through a step-by-step guide on how to paint watercolor sunflowers. The method of learning how to paint a sunflower is heavily reliant on layering. This means that we start with the lighter components of the bloom and work our way to the darker sides of the flower. Sunflowers are a wonderful blossom to portray because there are so many different mark-making techniques to try, which will help you improve your watercolor abilities on the whole.
Step-by-Step Instructions on How to Paint Watercolor Sunflowers
Grasping how to paint a sunflower is a relatively easy exercise. We begin by making a bud for the flower’s core, which will be used to assist our creative process for the petals. We will then color the sunflower petals in the lightest hues and let them fully dry. We then create new petals in the spaces between our first petals, creating a multilayered effect for our petals. We will then color the darkest portion of the sunflower, which is the bud of the bloom, followed by the stems and leaves of the easy sunflower painting tutorial.
That’s all! That being said, let us get started.
Step 1: Creating the Sunflower Pistil
Creating the flower’s center, also known as a pistil, is a simple undertaking. We’re looking for anything round, like a glass, or something spherical to be used as a stencil. We will then use this as a stencil, drawing a ring around it with a pencil. Due to sunflower pistils usually being perfectly round, we want to ensure we have created a perfect circular shape. This serves to maintain the flower’s proportions as authentically structured as possible.

Step 2: Creating Layer One of the Petals
Before we begin painting the first layer of petals, we should start preparing a gentle wash of yellow. The sunflower’s petals are usually painted in the form of a surfboard. This means that the petals are narrower near the point and wider in the middle.
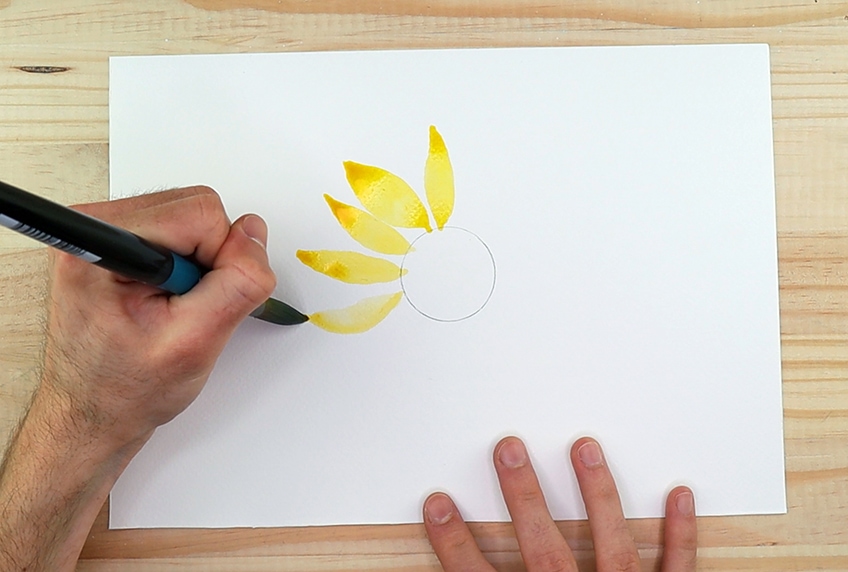
A good place to start painting each of these petals is the pistil. Begin with a light-handed stroke, then push down a little bit harder as you paint the middle of the petal, and then soften your touch again as you reach the point of the petal. The motion should not be heavy-handed. Then, apply some force to the brush before making a light-handed stroke towards the petal’s tip.
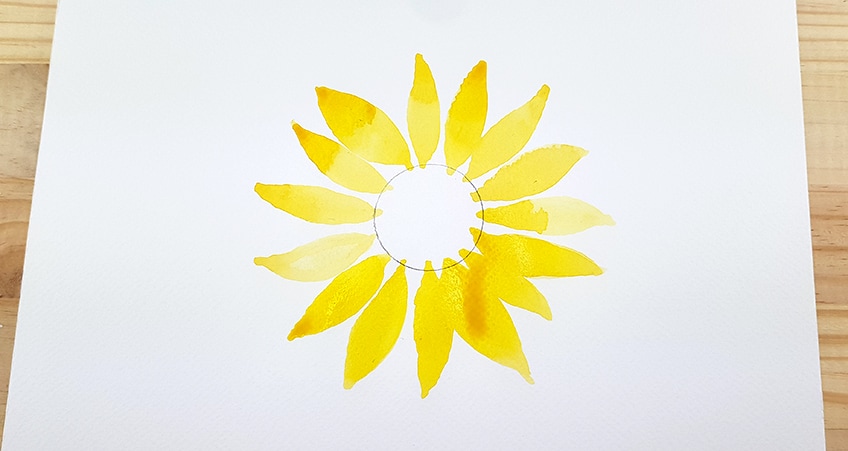
W can also suggest using a round paintbrush, which will have a thicker body as well as a pointed tip. Because of its shape, this brush is ideal for creating petal-like strokes.
When painting these petals, try and keep them all the same length to maintain an even ratio between the pistils and the petals.
Step 3: Creating Layer Two of the Sunflower Petals
After the first layer of petals has completely dried, you can begin painting the next layer of petals. Now we want to darken our color combination slightly with a smidgen of orange. These petals will soften in color as they dry. Try and create the sunflower petals’ second layer in the spaces of the first layer that we created. Be mindful of your hands smudging your color as you create the petals around your circle. Do not be concerned if your petals combine; this is a normal aspect of the medium in which the water can combine colored marks in some situations.
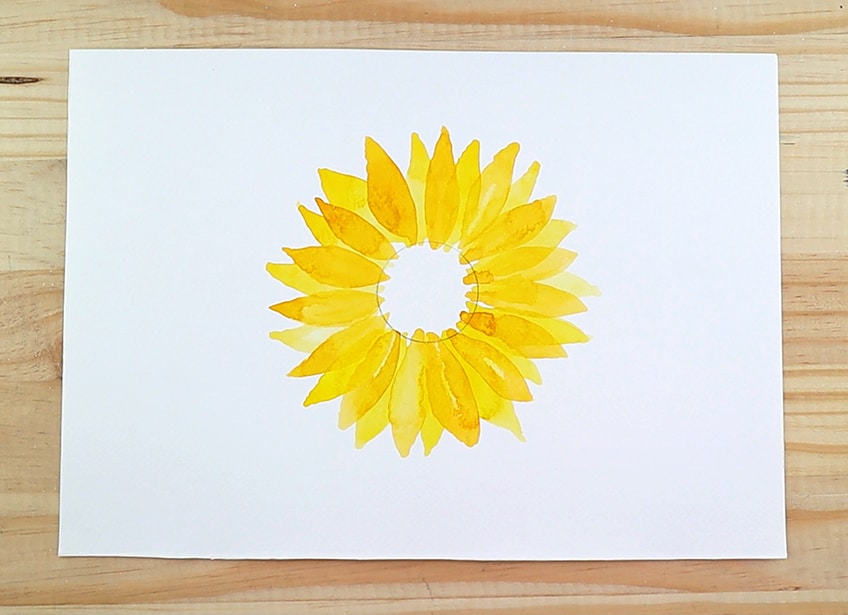
This characteristic is distinct from watercolor and contributes to the artwork’s beautiful and interesting attributes. Ensure the points of both ends of the petals come to a tip and the middle of the petals are thick, like a surfboard. Another useful suggestion is to create this layer of petals between the first layer that was created. Once more, we want to ensure that our petals are evenly distributed so that there is a well-balanced array of petals all around the circle.
Nevertheless, don’t be too concerned about making them flawless, as some petals would naturally be a little bit longer than the rest.
Step 4: Creating the Pistil’s First Layer
When our petals have dried completely, we can begin painting the pistil. We start by applying a thin layer of water to the pistil with our paintbrush. The goal here is to paint water onto the pistil, using the pistil’s rounded form to assist the distribution of water.

Start applying a few beads of brown with your paintbrush while your pistil is still slightly damp. We would like a light brown combination of brown that we can use to add points to the wet pistil. While the pistil is still slightly damp, we will go ahead and add some black to it. We want the black and brown paints to blend together, creating a nice texture in the pistil once it has fully dried.

As compared to becoming a single flat color, this will start giving the pistil detail and depth. While the coat on the pistil is still slightly damp, we will now twist some paper towels into a sharp point. We will use that tip to blot onto the damp coating in the pistil to make some negative markings.
Once more, this is simply to add some more texture to the sunflower pistil to help it not appear too flat.
Step 5: Creating the Pistil’s Second Layer
Now we can start to add some more details to the pistil by drawing small lines all around the pistil’s edge. Start painting black marks around the sides of the pistil with a small-tipped paintbrush. These strokes should resemble small black lines extending from the pistil in the middle into the empty spaces located at the base of the petals.
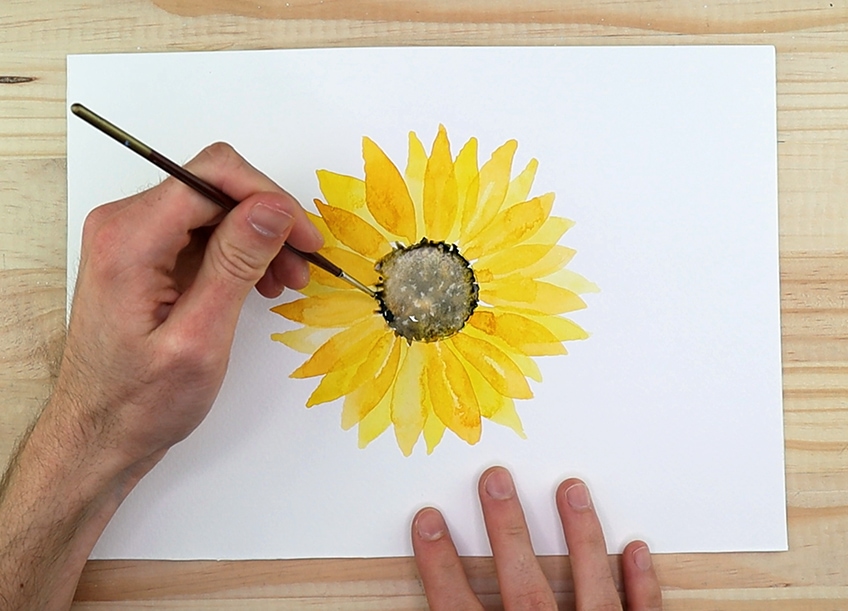
Make these small motions all around the pistil until you’ve gone entirely around it. These small strokes make the pistil appear to be linked to the petals themselves. We can also add even more details after the black color surrounding the pistil has dried completely. The middle of a sunflower contains a variety of small blossoms that very often supply food for assorted insects, most notably bees.
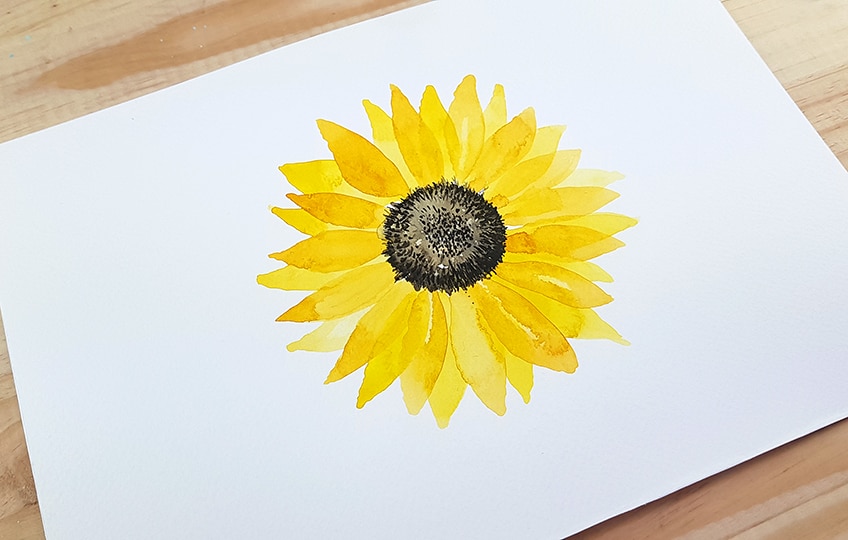
This middle portion, or pistil, can be depicted by drawing a multitude of small dots and lines around the pistil’s rim. You should use a thinner and smaller paintbrush to start making motions of lines all around the edge of the pistil, followed by some black paint. These lines should distribute around the core, having followed the contour of the pistil.
Retain some space between a cluster of particles in the pistil’s middle and these line segments around the edge.
Step 6: Creating the Pistil’s Final Layer
Once the tiny dots and lines have fully dried, we can then start to add the final features to the pistil. Depending on what type of sunflower you want to portray, the pistil can have a variation of appearances. They can, nevertheless, be represented by a sequence of small lines and splodges. We will use white paint to add the final details to the pistil here.

We accomplish this by painting fine lines with a thin brush. What we want to do this time is start to add a wide range of rows in the pistil that abides the rounded form of the pistil with our white color. It is a good idea to make these spots more visible or bigger on one edge of the pistil. This could serve to develop an illusion of complexity and dimension in the pistil.
Another good tip is to avoid making too many points; we don’t want to overburden the pistil with points so that all of the layered paint can be seen.
Step 7: Creating the Sunflower’s Leaves
It is easy to portray the leaves and stems of a sunflower. To start, we make a brown and green paint mixture. We would like our green leaves to have an earthy feeling, which the brown paint allows us to achieve. Let us start by painting outwards from the points of our petals once we have our color mix. The form of the leaves can differ, as is very often the situation with sunflower leaves. Let us create a triangle shape that is contoured downward to make a leaf that appears to be folding over. This creates the illusion of motion in the leaves.
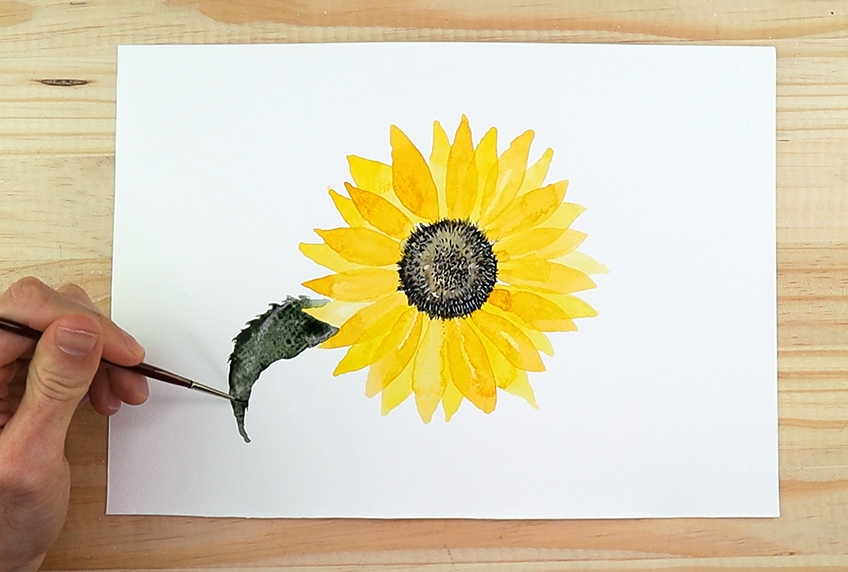
Once we’ve determined the form of the leaf, we can work quickly by making small brushstrokes with a thin paintbrush along the sides of the leaf while it is still slightly damp. We want to use the paintbrush to draw the wet green paint around the corners of the leaf, constructing little jagged edges. This enhances the realistic appearance of the leaf.
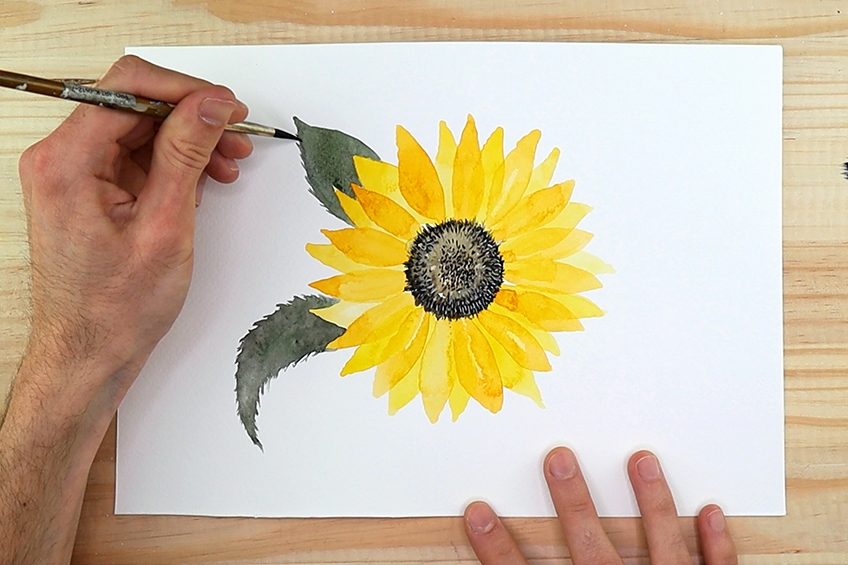
Because not all leaves can be seen from the very same viewpoint, we can alter the structure of the next leaf slightly. All of these leaves must be painted as if they are resting behind the bloom. Behind the blossoms, we can start to create a more spear-shaped leaf. When going to paint near the petals, take care not to smear the yellow color. You can add more texture and definition to this sunflower by adding a dry paintbrush stroke onto the leaf as you color it with green paint. This will raise the paint and create a distinct texture on the leaf.
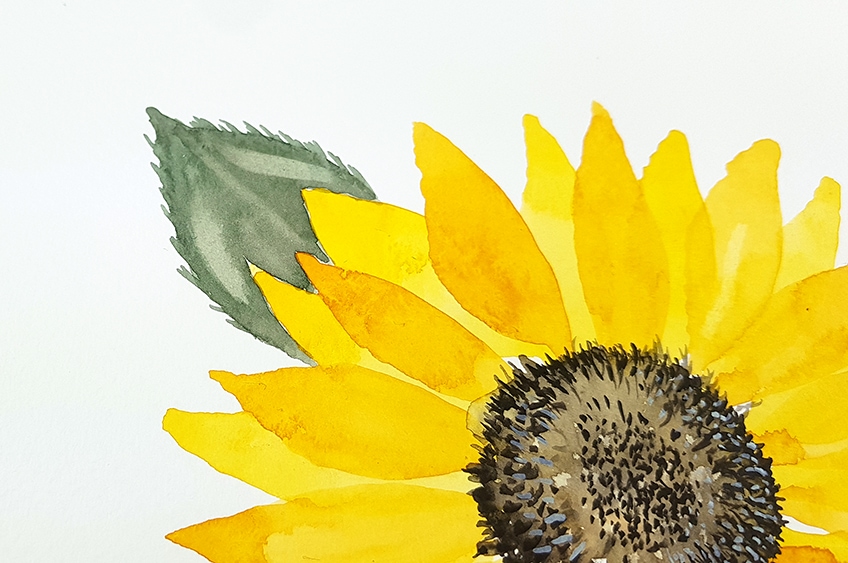
We can now create yet another leaf; having three leaves just makes the sunflower look more finished. Spread your leaves out around the flower so they aren’t too near each other. Let us just try a more contoured spearheaded shape for this one.
Keep in mind to use a thin paintbrush to add some pointed tips along the sides of the leaf.
Step 8: Creating the Sunflower’s Stem
This is the final step in which we will start to depict a stem. This is a really easy part; we begin by creating a single brushstroke down the canvas directly under the sunflower. The stem of a sunflower can be colored in the very same green color as the foliage; in fact, the stalks of a sunflower are frequently green. Now add a small straying branch to portray a stem attached to the leaves.

Tips and Tricks to Keep in Mind
Because there is no need for a reference image, this is an incredibly easy sunflower painting tutorial. This simple sunflower watercolor painting is a practice in mark-making designs that will help you improve your abilities. It is always ideal to use a simple process when starting to learn how to paint watercolor sunflowers as a novice. When painted sparsely, sunflower watercolor paintings are a lot of fun. It is enjoyable, and it gives the image a painterly look that appears more natural for a sunflower watercolor painting. In any case, this sunflower painting tutorial offers many unique tricks and tips that can make you better your cumulative sunflower watercolor painting abilities.
- A layering technique is used in a sunflower painting guide. Always start with the lightest parts of the artwork and make your way to the darkest sections of the artwork.
- Washing your brushes is necessary when creating a sunflower watercolor painting. Always remember to keep a couple of jars of water close by; one jar for a preliminary rinse and the second jar for another rinse to ensure that no color remains on your paintbrush.

- You should not need a reference image to gain knowledge on how to paint watercolor sunflowers. You can, nevertheless, use one for assistance if you believe it will be beneficial.
- While doing this easy sunflower painting tutorial, take time to carefully wash your paintbrushes before applying new paint.
- You do not really need to tape your page down when creating a flower because it aids to keep moving your page around for more precise mark-making in your own sunflower watercolor painting.
So, there you have it! An easy-to-follow sunflower painting guide. Having to learn how to paint a sunflower is rather simple when broken down into eight steps. This particular sunflower painting tutorial is one of many different manners to portray a sunflower, but it is a simple and enjoyable method. Sunflower watercolor painting does require some exercise, so don’t be concerned if you don’t get it correctly the very first time. Sunflowers are not hard to portray; they simply require the proper stages to help you understand every step.
Frequently Asked Questions
How Do I Create Loose Watercolor Sunflowers?
It is simple to paint loose sunflowers in watercolor. To start, draw a ring on the page that will serve as the flower’s bud. Then, having started from the bud and moving your way outwards in a surfboard-like shape, we start creating brush strokes. We create a series of these motions around the bud to characterize the flower’s petals. We will let that dry completely before adding new spots in the empty spaces of those petals, creating the second layer of the flower’s petals. You can add as many as you want because no two flowers are ever the same. We then paint the bud with darker colors, which we can then fine-tune after it has dried completely.
How Can I Create Sunflower Petals?
When painting petals, we must use the appropriate brush. The best brush for this is a round-shaped one. A round brush is one with a slightly pointed tip and a thicker body. This enables you to create a surfboard shape that reflects the quality of a petal. Start near the bud with a thin brushstroke from the point of the paintbrush, pressing down as you color the petal progressing outwards from the flower’s bud. As you press down, gradually soften your touch as you make your way toward the petal’s tips by coloring with the thin point of the paintbrush. So, you gently push your paintbrush, then push down for a thicker stroke, and finally, slowly lift your paintbrush to make the head of the petal thin. This is the general concept behind painting a petal.
How Do I Create Sunflower Leaves?
A few of the more common methods of drawing leaves that are commonly found on flowers include drawing the spear-headed shape with your color choice and then adding small details in a variety of ways. One of these methods is to lift the paint, which results in these light moments in the leaves. Another method is to paint directly on the leaf while it is wet, resulting in a seamless mix of colors on the leaves. The spearhead shape, on the other hand, is achieved by painting a circle and then adding a pointed tip to indicate the top of the leaf.
Matthew Matthysen is a multidisciplinary artist. He completed his fine art degree, majoring in History of Art and Contemporary Drawing Practice at the University of Witwatersrand, South Africa. Before joining acrylgiessen In 2020, Matthew worked part-time as an art teacher at Reddford Blue Hills High school. Matthew creates drawing and painting tutorials for acrylgiessen and captures them not only photographically and in written form. He also records the creation of his works in his own creative studio as in video format, from which later with a voiceover and a video editor also drawing tutorials for the Youtube channel of acrylgiessen are created.
Learn more about Matthew Matthysen and about acrylgiessen.
