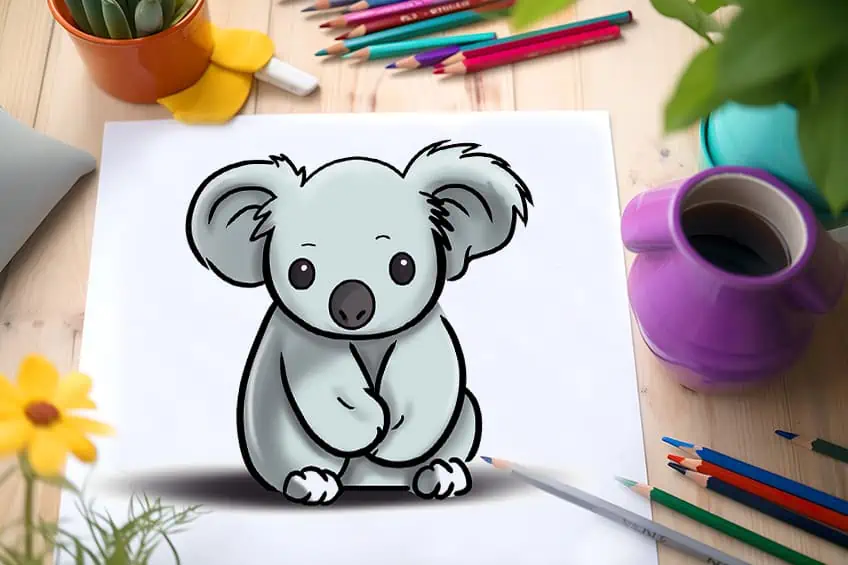
Koala Drawing – Create a Cute and Cuddly Koala Bear
This post may contain affiliate links. We may earn a small commission from purchases made through them, at no additional cost to you.
Koalas are not only cute and cuddly, but they’re also fascinating creatures! These marsupials are native to Australia and spend most of their time sleeping in eucalyptus trees, which are also their primary source of food. Interestingly, they have a special digestive system that allows them to break down the toxic compounds found in eucalyptus leaves. Koalas are also known for their unique vocalizations, which can range from snores to bellows and grunts. Unfortunately, these adorable animals are considered vulnerable species due to habitat loss and disease, so it is crucial to protect them and their habitats. Grab your drawing kit and let’s learn how to draw these adorable koalas step-by-step today!
How to Draw a Koala in 16 Easy Steps
If you’re about to learn how to draw a koala, get ready to have some fun! Koalas are adorable creatures with distinct features, such as their round, fluffy ears, big nose, and distinctive markings around their eyes. When drawing a koala, you’ll want to start with the head, which is round and slightly flattened at the top. Then, you can add in the ears, nose, and mouth, which are all very prominent features on a koala’s face. Don’t forget to draw in the koala’s eyes, which are often half-closed, giving them a sleepy appearance. Once you’ve finished with the head, you can move on to the body, which is typically round and furry. Lastly, add in the koala’s arms and legs, which are short and stocky. Remember, don’t worry too much about getting everything perfect the first time – practice makes perfect, so just have fun with it!
Check out the below step-by-step collage you will follow to achieve an amazing koala bear drawing!
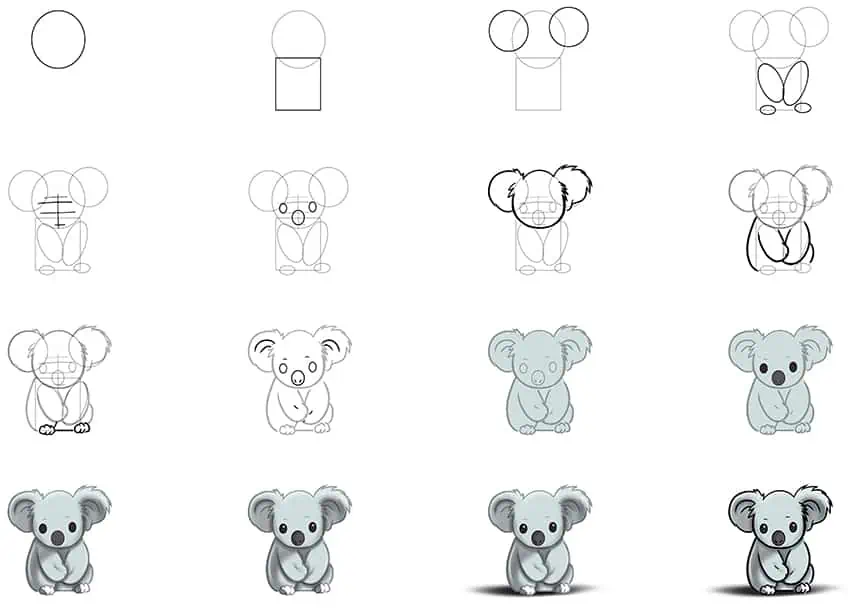
Step 1: Draw the Head
To start your koala bear drawing, begin by drawing an oval shape representing the head of the koala.

Step 2: Draw the Main Body
Overlapping the previously drawn oval, draw a rectangle to represent the main body of your koala sketch.

Step 3: Add the Ears
In this step, draw two smaller circles to represent the ears of the koala. Make sure that they overlap each side of the koala’s head.

Step 4: Draw the Arms
Within the main body, draw the overlapping oval shapes representing the arms, and smaller oval shapes representing the paws.

Step 5: Add the Guidelines
Within the koala’s head, draw a center vertical line and four horizontal cross guidelines. This will aid you in drawing and positioning the facial features.
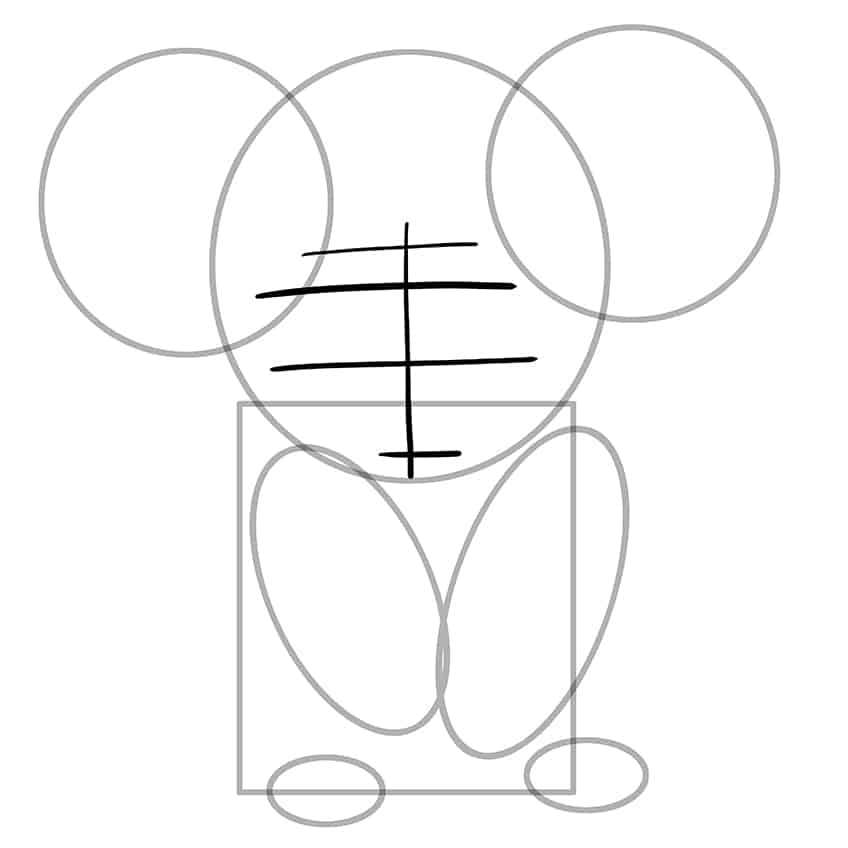
Step 6: Draw the Eyes and Nose
Between the second and third horizontal guidelines, draw two oval shapes representing the eyes. Crossing the third and fourth horizontal guidelines, now draw an oval shape for the nose of your koala drawing.

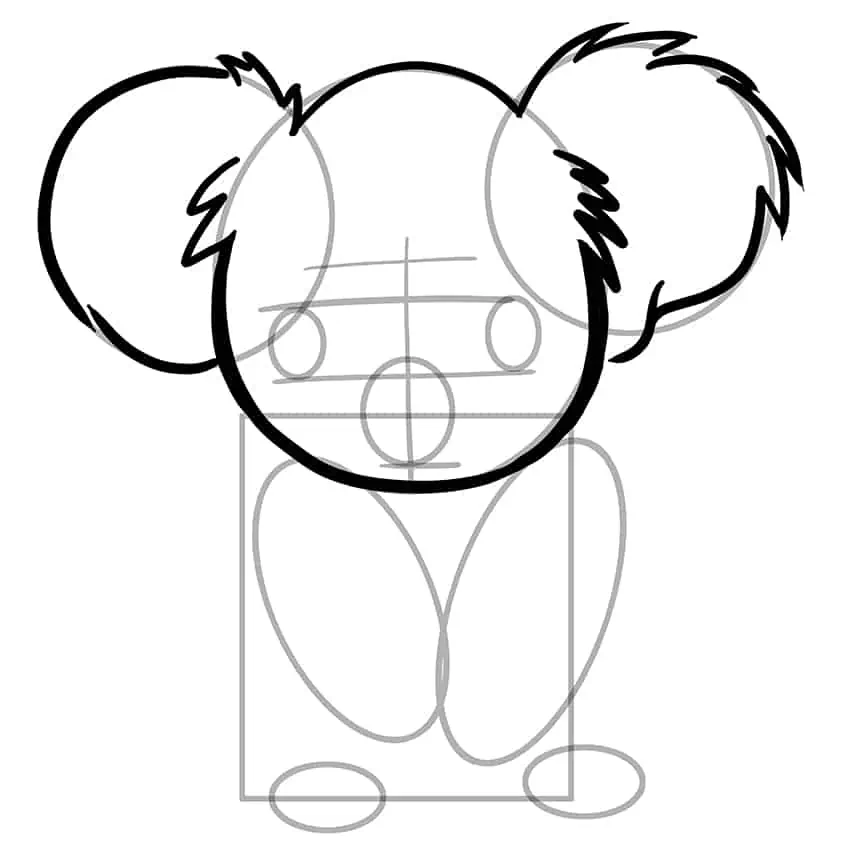
Step 7: Outline the Head
Use the previously drawn construction lines to aid you in outlining the furry head and ears of your koala drawing.
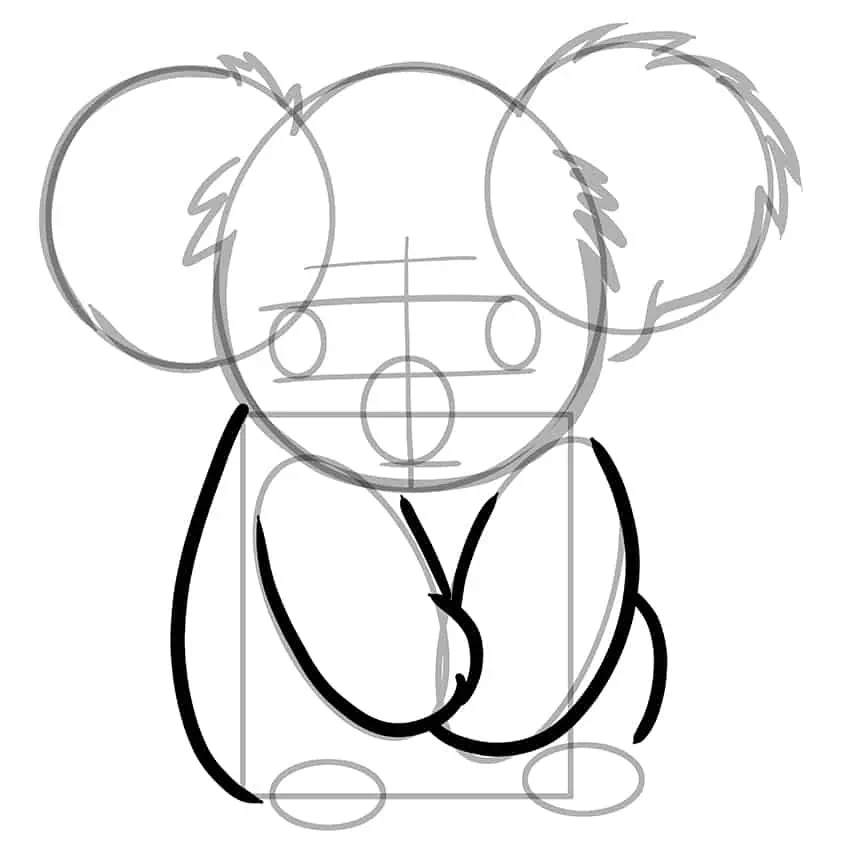
Step 8: Continue to Outline Your Koala Sketch
In this step, continue to outline the main body of your koala sketch, including the arms. To do this, use the previously drawn construction lines to aid you.
Step 9: Outline the Feet
Begin to outline the feet of your koala. Once you have completed this step, you may erase any visible construction or guidelines that are no longer needed.
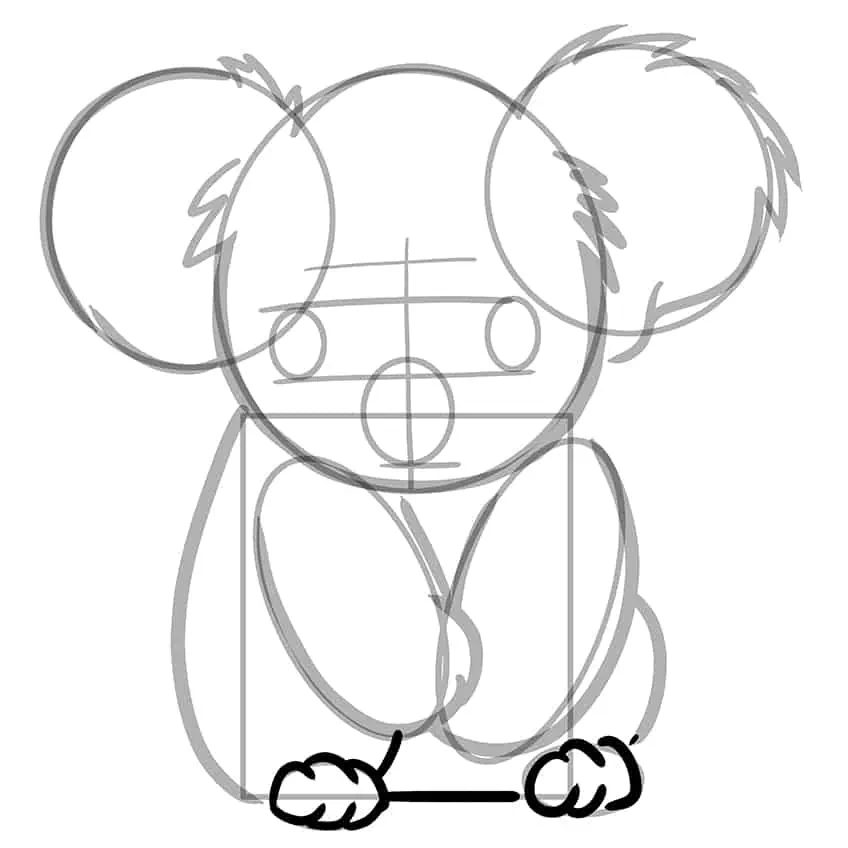
Step 10: Continue to Outline the Facial Features
Use the previously drawn construction lines to aid you in outlining the eyes, nostrils, eyebrows, and earlobes. Complete the step by drawing several curved short lines within the hands of your koala bear drawing.

Step 11: Apply the First Color Coat
Select a fine, sharp brush and a shade of light green, and evenly coat the entirety of the koala.

Step 12: Color the Facial Features
Use the same brush as previously and switch to dark brown paint, and evenly color each of the eyes. Repeat using a slightly lighter shade of brown to color the nose.
Complete the step using a darker shade of brown to paint the nostrils on your koala bear drawing.

Step 13: Shade and Highlight the Koala Drawing
With a small, soft brush and black paint, add soft shading within the earlobes, beneath the face, and surrounding the edges of the main body. Continue using white paint, and add a soft highlight along the edges of the head and ears, the arms and side body, and within the feet. Use a blending brush to soften and blend the highlights with the first color coat.

Step 14: Continue to Shade Your Koala Drawing
Begin by using a soft brush and a dark shade of brown paint, and add shading to each of the eyes. Repeat softer shading onto the nose. Switch to a fine, sharp brush and white paint to add a fine circle within each eye.

Step 15: Apply a Ground Shadow
In this step, fill the gap between the koala and the surface, using a thin brush and black paint. Switch to a blending brush to spread and soften the edges of the shading.
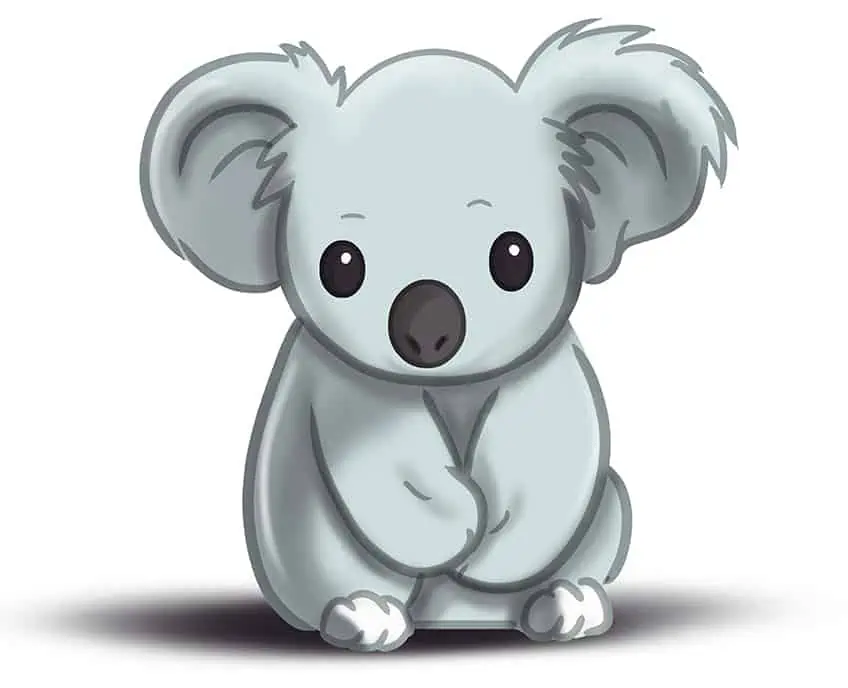
Step 16: Finalize Your Koala Bear Drawing
With a fine, sharp brush and black paint, trace the outlines and any inner texture lines of your koala sketch.

Well done on finishing your koala drawing! You’ve captured the essence of these lovable creatures, from their round ears and fluffy fur to their sleepy eyes and cute button noses. Now that you’ve learned how to draw a koala, you can start experimenting with different poses and angles to make your drawings even more dynamic and interesting. For instance, you could draw a koala hanging from a tree branch, snuggling up in a ball, or munching on some eucalyptus leaves. Keep in mind that there’s always room for improvement, so don’t be afraid to keep practicing and refining your techniques. Whether you’re drawing for fun or as a professional artist, mastering the art of drawing koalas is a great accomplishment that will bring joy to both yourself and others who see your work!
Frequently Asked Questions
How Do You Get the Proportions Right When Drawing a Koala?
To get the proportions right when drawing a koala, it’s important to pay close attention to the size and placement of each feature. Start with a light sketch of the basic shapes – the head, body, arms, and legs – before adding in the details. Pay attention to the size of the head with the body, and the length and thickness of the limbs. The ears and nose are also important features to get right, as they help give the koala its characteristic look. Remember to take your time and adjust as necessary until the proportions look just right!
What Are Some Tips for Drawing the Fur on a Koala?
Drawing the fur on a koala can be a bit tricky, as it is thick, fluffy, and has a distinct texture. One tip is to start with light, sketchy lines to create the basic shape of the fur, and then gradually add more detail as you go. Pay attention to the direction of the fur, which typically grows downwards on a koala’s body and upwards on the ears. Use small, short lines to create a fluffy texture, and be sure to vary the length and thickness of the lines to create depth and dimension. You can also use a blending tool, such as a blending stump, to smooth out the lines and create a more realistic look. Practice makes perfect, so don’t be afraid to experiment and try out different techniques until you find what works best for you.

IzzyBll is a digital artist and content creator from Israel and currently residing in South Africa. Originally coming from videography, Izzy then turned to digital graphic art. He specialized in using digital drawing software such as Photoshop and Procreate. Drawing and photo editing has always been a sort of second nature for Izzy. In doing so, he can now look back on 5 years of experience in the industry, completing commissions for various well-known brands such as Audi.
Learn more about IzzyBll and about us.