How to Draw a Face – Achieve Realistic Proportions and Details
This post may contain affiliate links. We may earn a small commission from purchases made through them, at no additional cost to you.
A crucial drawing talent to master is understanding how to draw a face. Your sketching abilities will improve as you gain knowledge of facial proportions and the development of a face drawing, giving you a greater understanding of how to depict the proportions of the face by locating the features in their proper locations. You’ll gain other abilities by learning how to draw facial proportions, such as an understanding of symmetry. It’s also excellent practice to master drawing face proportions because it can be used in different painting and sculpting genres. Portraiture not only involves learning how to draw a face properly, it also enhances your observational skills and drawing precision. Whatever your motivation, mastering the proportions of the human face will help you improve your artistic abilities.
Our Face Proportion Guide
Due to the fact that we often only see the end product, face drawing can frequently appear to be quite tough. When you know how to employ guidelines that assist you in drawing the proportions of the face, creating a face is not that tough. In this lesson, we’ll look at how to precisely design facial proportions by following a few rules for drawing face proportions. Consider it a face proportion guide that will help you better grasp how to build a face. You can design various faces more confidently if you use this lesson as a face drawing reference.
This technique may also be applied to the creation of your own faces without the aid of a face sketch reference.
Instructions for Creating Proportions of the Face
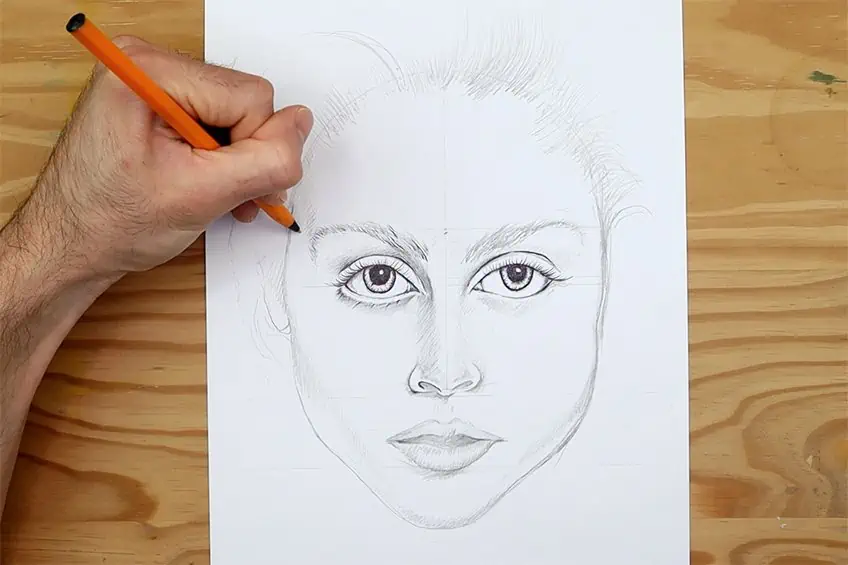
Learning how to sketch a face with the correct facial proportions is a really basic process. First, utilizing a few tools as our guides, let’s look at the fundamental approach to creating face proportions drawings. We’ll look at how to use these tools to make rules that control the way we draw. We must establish a set of rules that define the regions for the various parts of the face in order to achieve the proper facial proportions. Then, we’ll start drawing the various facial characteristics.
By following the rules, we will be able to locate the various face characteristics accurately. Any frontal picture of a face will do while working with this lesson. You may also draw an imaginary face using only the rules, however, having a face sketch reference image will be much more useful if you are just starting out. We will proceed to the final step, which defines the overall shading procedure for drawing face proportions after we are pleased with our pencil drawing. Now that we know what lies ahead, let’s begin.
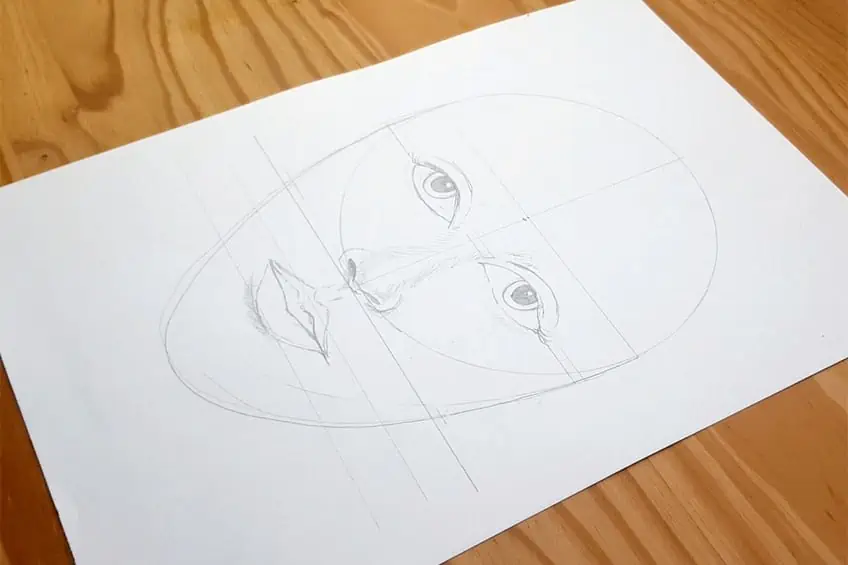
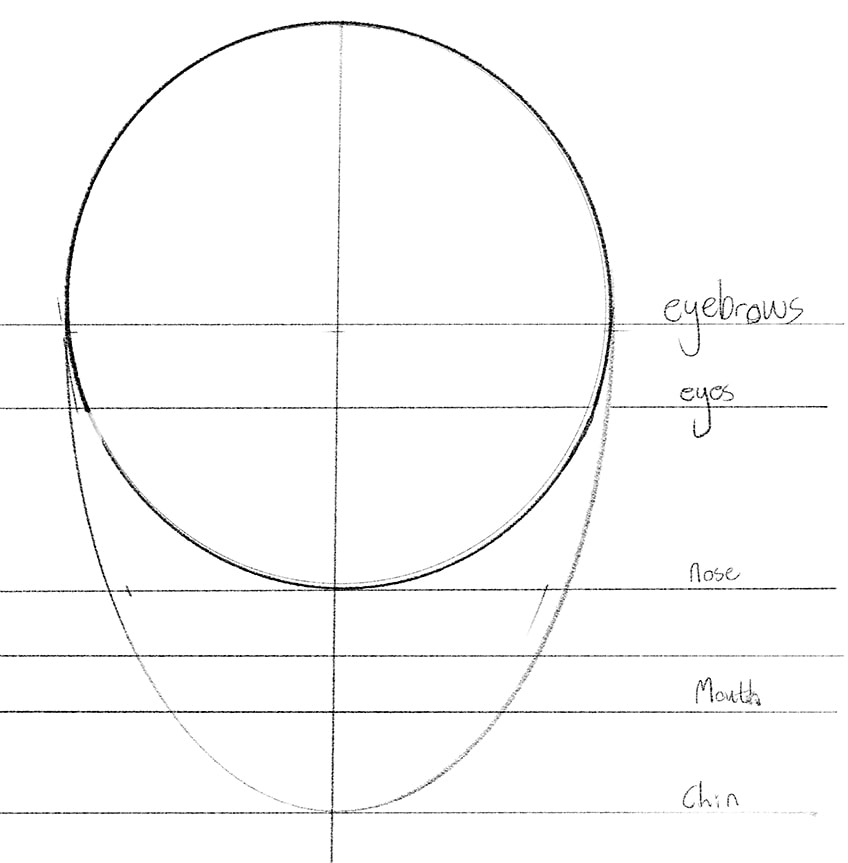
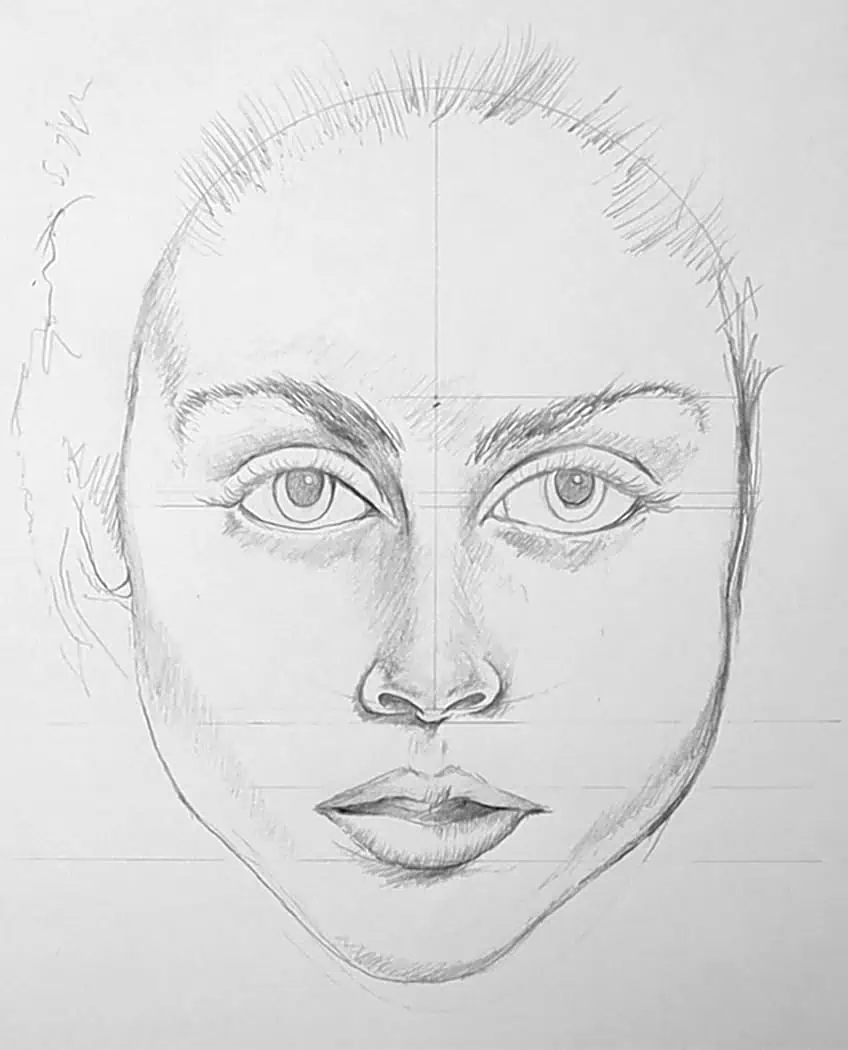
Step 1: Creating the Shape of the Head
Start by tracing a circle onto the paper. So that your circle is as precise as possible, feel free to use a compass or a bowl-shaped item. This is entirely up to you and largely depends on how large you want your drawn face to be on the page.
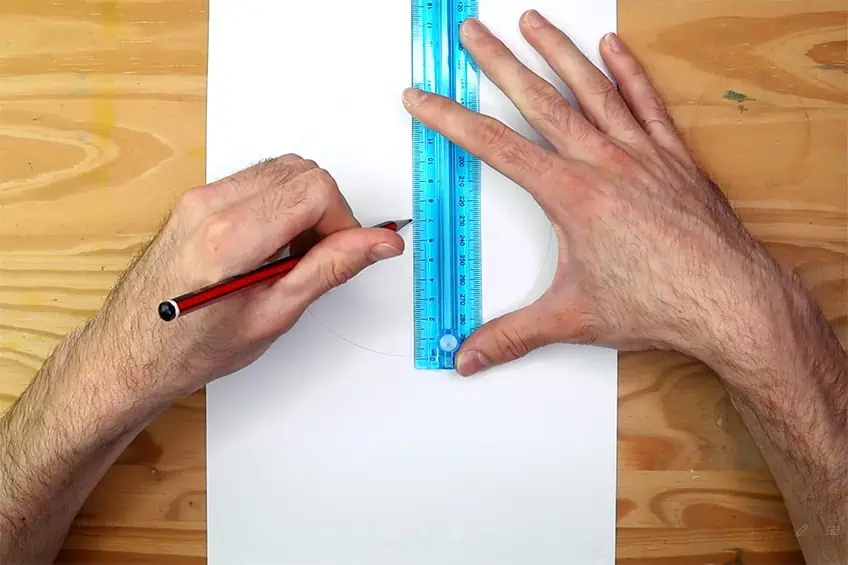
Finding the circle’s center is the next step after drawing the circle. We’ll be able to demarcate the first rule by locating the circle’s center. Measuring the circle’s length and breadth will reveal the location of the circle’s center, which is where the two points connect. From there, we may draw a vertical line across the circle’s center, which will help us build a symmetrical face.
The arch that develops around the bottom of the circle will be drawn in the following step. This will serve as a definition for the bottom third of the face and a benchmark for the jawline. You may represent this form by drawing an upside-down spearhead that extends from the left side of the circle to the right side.
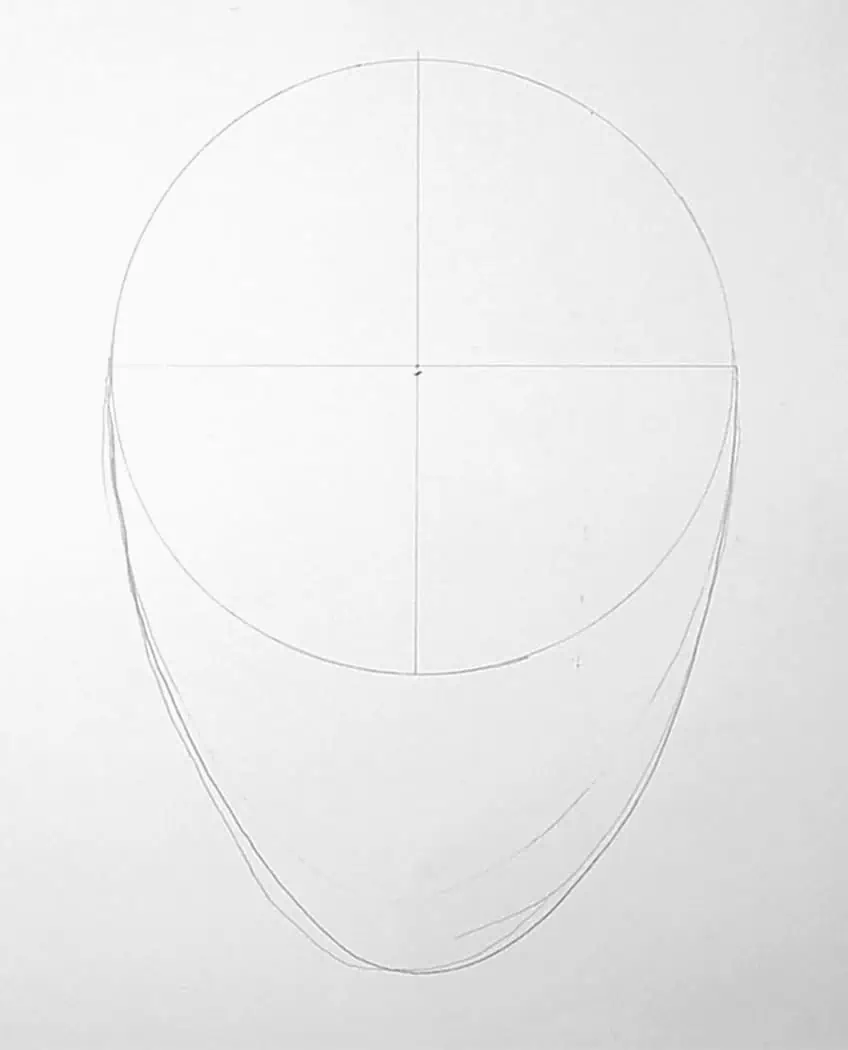
Step 2: Creating Our Guidelines
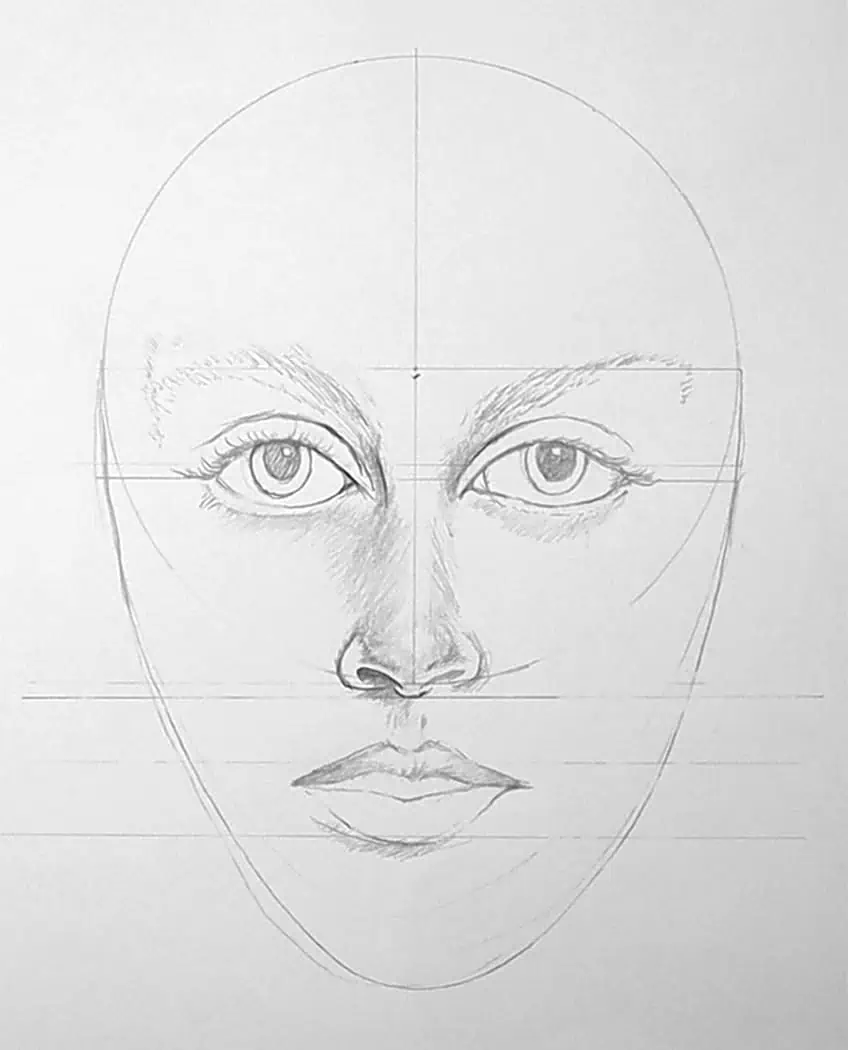
The instructions that specify where each facial feature should be placed will be drawn from here on. Each of these lines will assist us in locating the various facial characteristics. But the purpose of these lines is to serve as a general guide. They won’t be an exact replica of the face in your reference picture, as individual faces all differ slightly. The initial horizontal line that denotes the axis on which the eyebrows will be positioned is drawn first. This is the line that encircles the circle at its center.
You may then leave a distance of around 3 cm and draw a second horizontal line that is parallel to the first one and lies beneath it.

The bottom of the circle should now have a horizontal line drawn across it. This means that at this time, there ought to be three horizontal lines. The eyes and brows are defined by the upper two horizontal lines. The nose’s lowest horizontal line will serve as its boundary. Next, we’ll draw two more horizontal lines beneath the bottom one. This time, though, we want to leave only around 2 cm between them. The mouth location is indicated by these two below the line that goes along the lowest point of the circle.
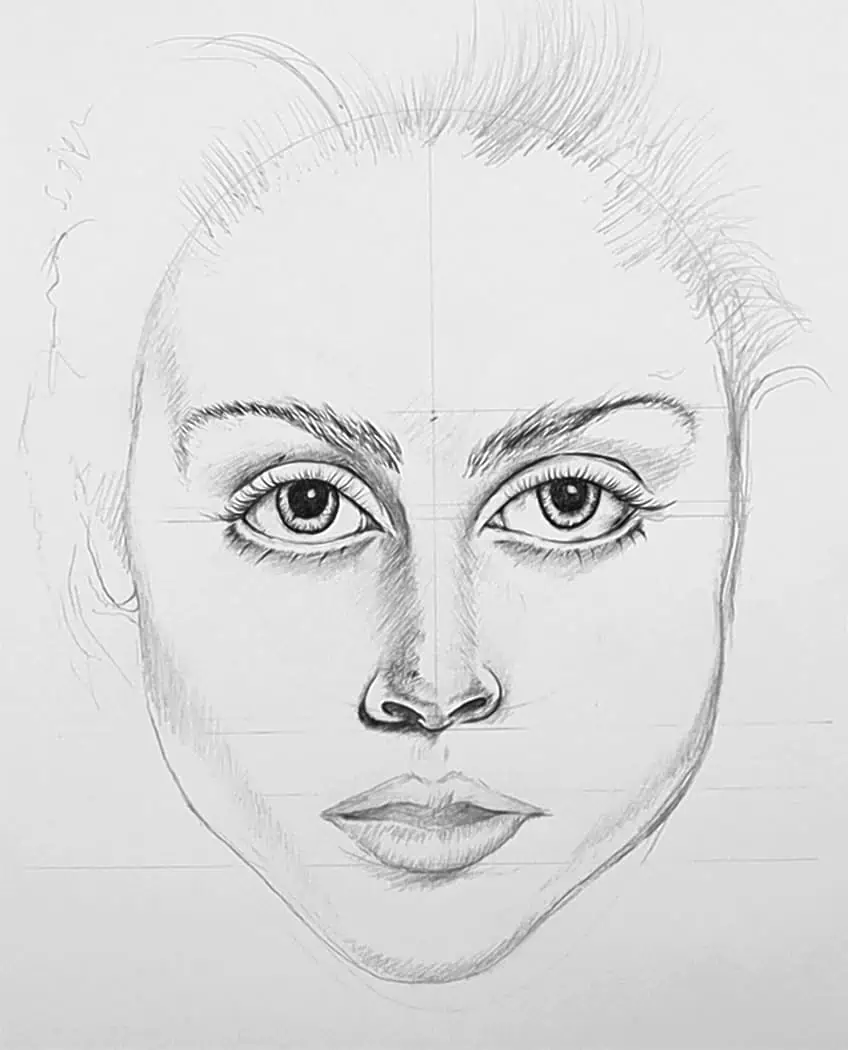
There should be five horizontal lines running across the face at this point. The placement of the eyes and brows will be determined by the top two. The middle one, which indicates where the nose will stop, is positioned much lower. The location of the mouth is shown by the bottom two horizontal lines. The top two are separated by 3 cm, while the lower three are separated by 2 cm.
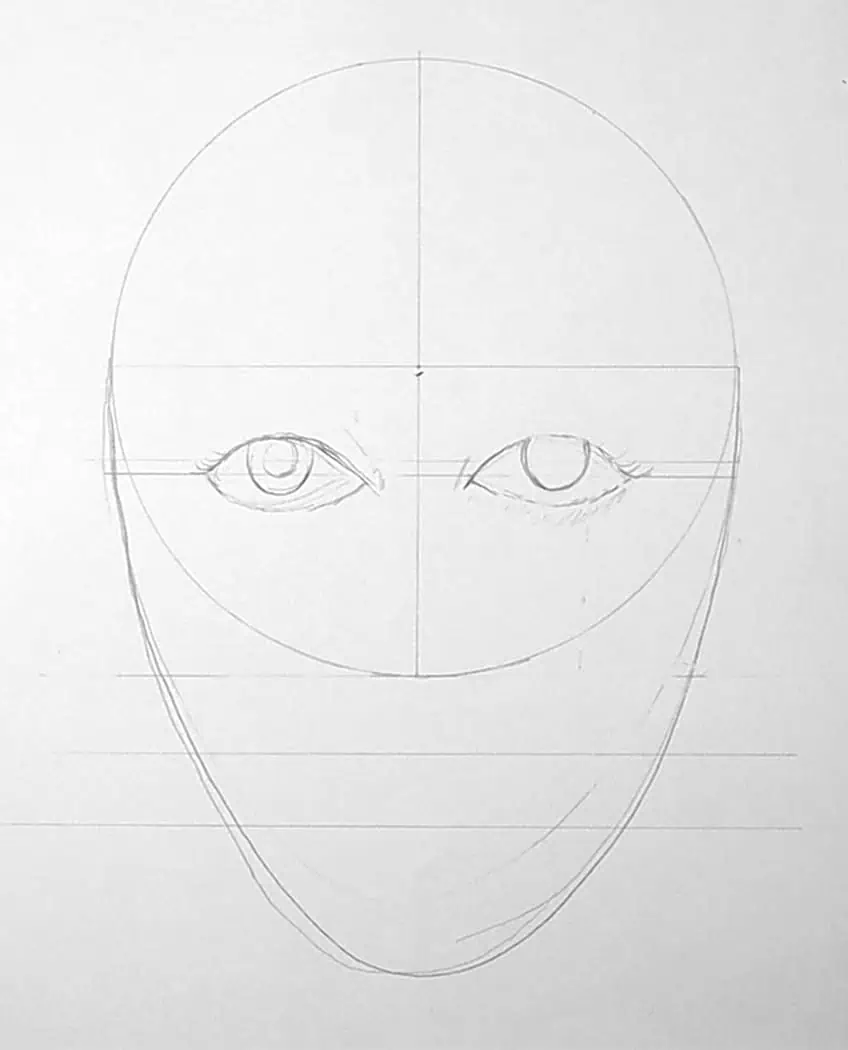
Step 3: Creating the Eyes
We can now add the facial characteristics to our face design after setting up the grid lines. We begin by focusing on the eyes. Try to start by focusing on the eye’s inner corners in whichever face sketch reference image you are utilizing. The second horizontal line down from the top should meet the eye’s inner corners. The proportions of the face in your reference photograph will determine how far apart the corners of the eyes should be drawn.
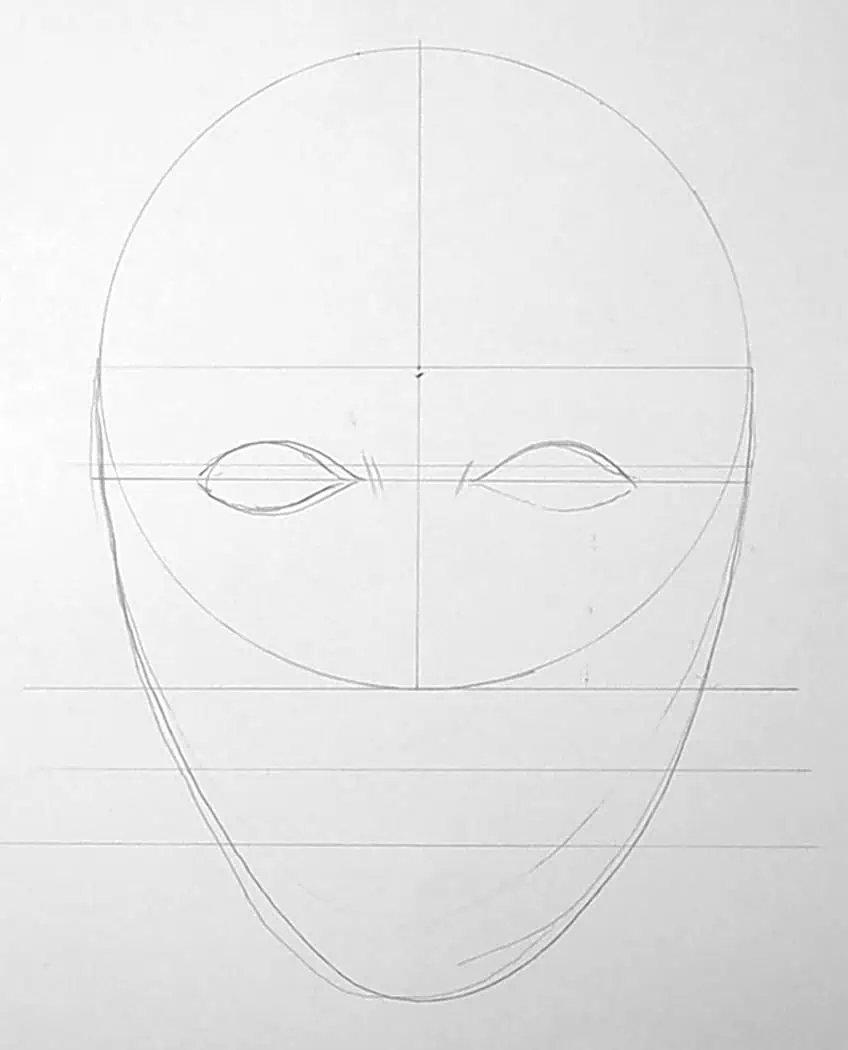
Visualize a third eye between the two on the forehead to get a fair idea of the distance. Spend some time drawing the eyes, frequently consulting your reference image for direction. They may be adjusted until they appear to be the same size as the source images by using an eraser and a light HB pencil.
They should be alright as long as you’ve located them correctly on the horizontal line.
You’ll discover that perfecting the eyes’ shape and form takes time. At this stage, we’re not aiming to make them incredibly detailed; instead, we just want to retain the eyes as a simple contour. All we need is for the eyes to mirror those in our reference pictures. Analyze the eyes’ form using your reference photograph. Simply put, the guidelines are intended to assist you in putting things in your face.
Step 4: Creating the Nose
Now we may start sketching the nose. Again, the contour of the nose will depend on the source images you are using. But the horizontal middle line is where the nose is placed. The bottom of the nose should continue upwards along the vertical center line.
The vertical line will to assist you to position your nose in the middle of your face.
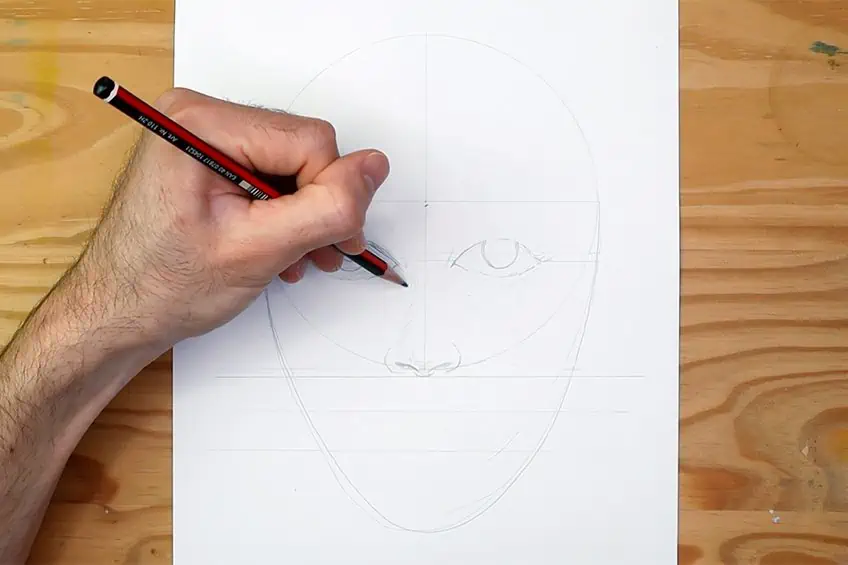
After you have created the nose and ensured that it is as symmetrical as possible using the vertical line, you may add some light shading to show how the nose flows towards the eye sockets. Once more, use the vertical line to help you sculpt the nose, ensuring that the curvature is the same on both sides of the line.
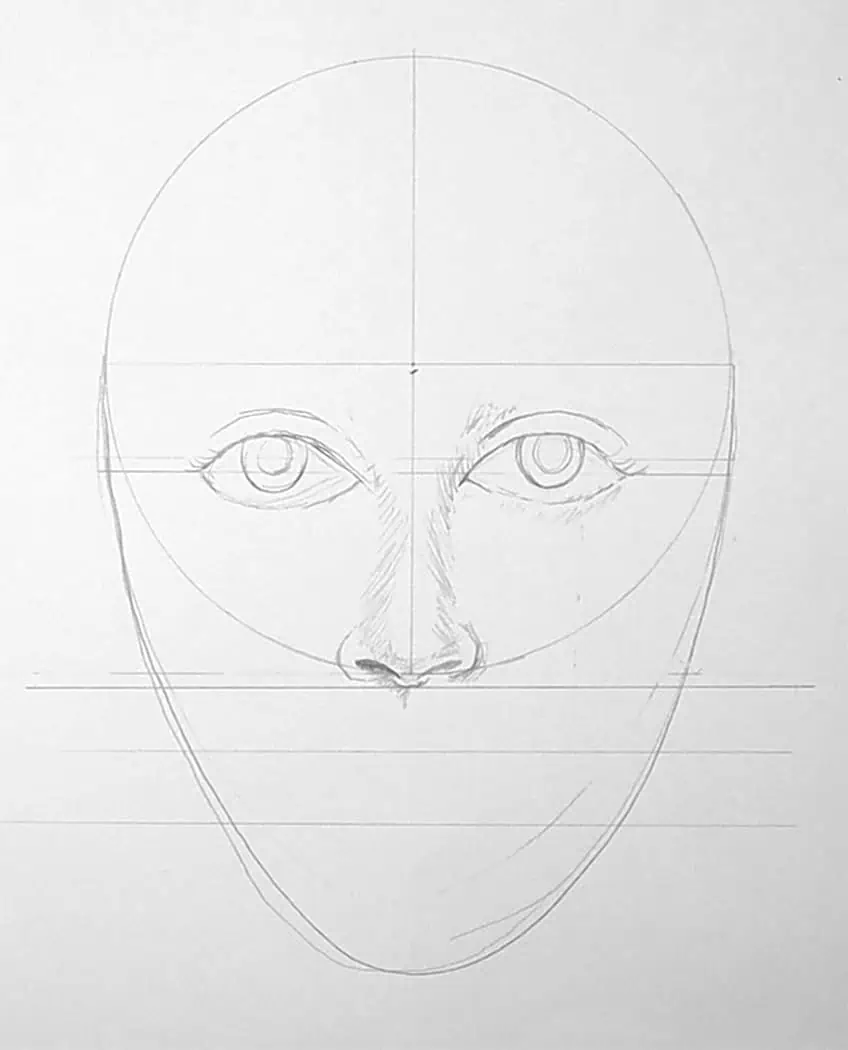
Keep returning to your reference image to assist you through the drawing process. The nose should have a shape that flows towards the inner corners of the eyes. Take your time modifying and fixing it until it appears to be properly positioned on the face. Keep your pencil traces light so that you can easily remove any mistakes.
Step 5: Creating the Mouth
The mouth for our facial drawing will now be added. The mouth is drawn in the bottom space between the final two horizontal lines. Although the top lip may extend slightly beyond the second final horizontal line, the depression between the nose and upper lip should be positioned in the second spacing of horizontal lines from the bottom.
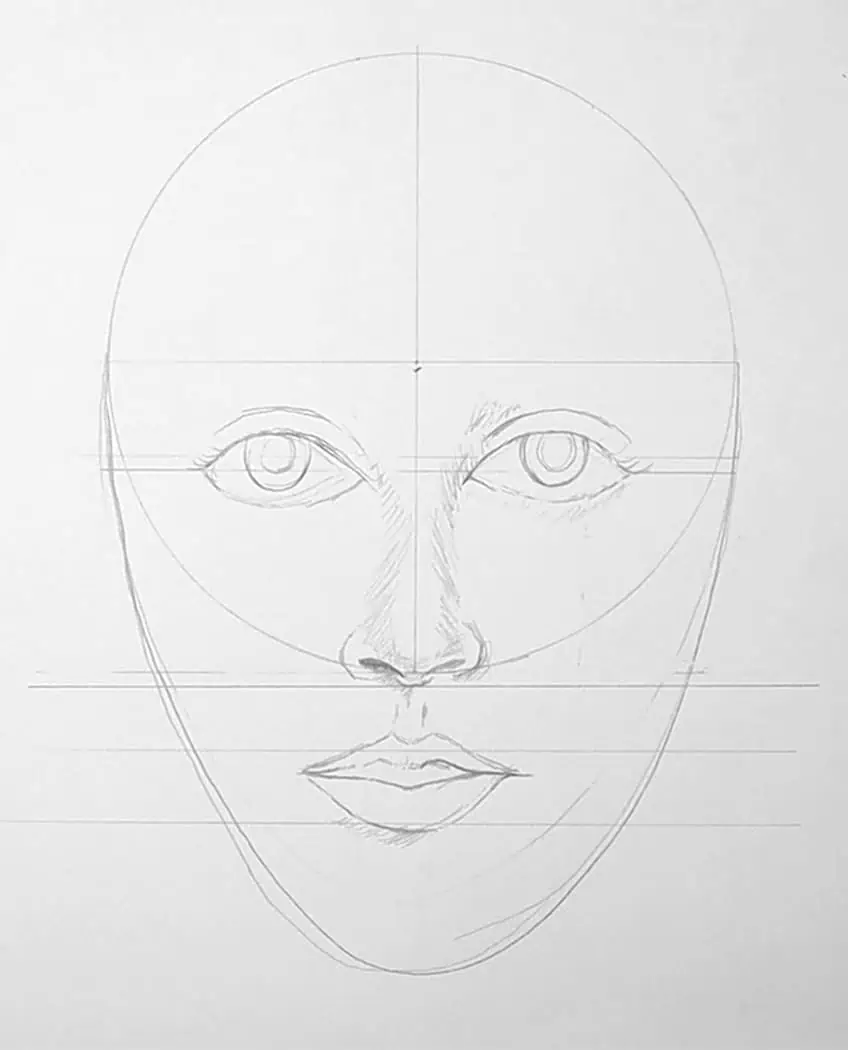
The bottom lip should be aligned with the lowest horizontal line, preventing the lips from lying too far down the face. It is not uncommon for beginners to overestimate the distance between the mouth and nose. Again, utilize these recommendations to help you position facial characteristics. However, you should alter and fix them till they mirror the distinctive shape in your original image. Spend time on the lips, ensuring sure it is kept inside the lines.
Step 6: Creating the Eyebrows
The brows are a highly distinct element of the face; they are quite character-defining and add a distinctive depth to the face. Using your references, draw the brows, trying to keep them within the top horizon line. They may continue slightly beyond the top horizon line, which is OK because some brows extend to a high arch.
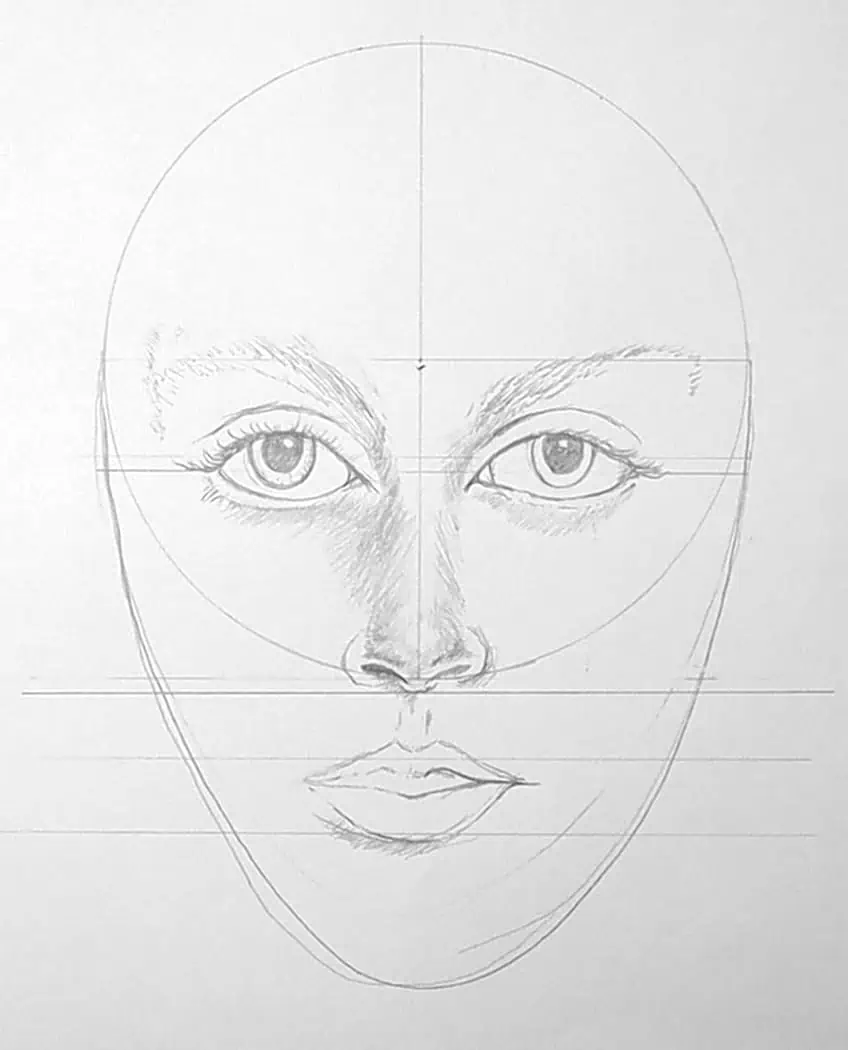
Where the brows meet above the eyes, they attach to the top of the nose, where it becomes the forehead. Consider how the brows reach toward the middle of the face on either side of the nose. The goal is to get a symmetrical contour that runs up along the edges of the nose into the temple and into the brows.
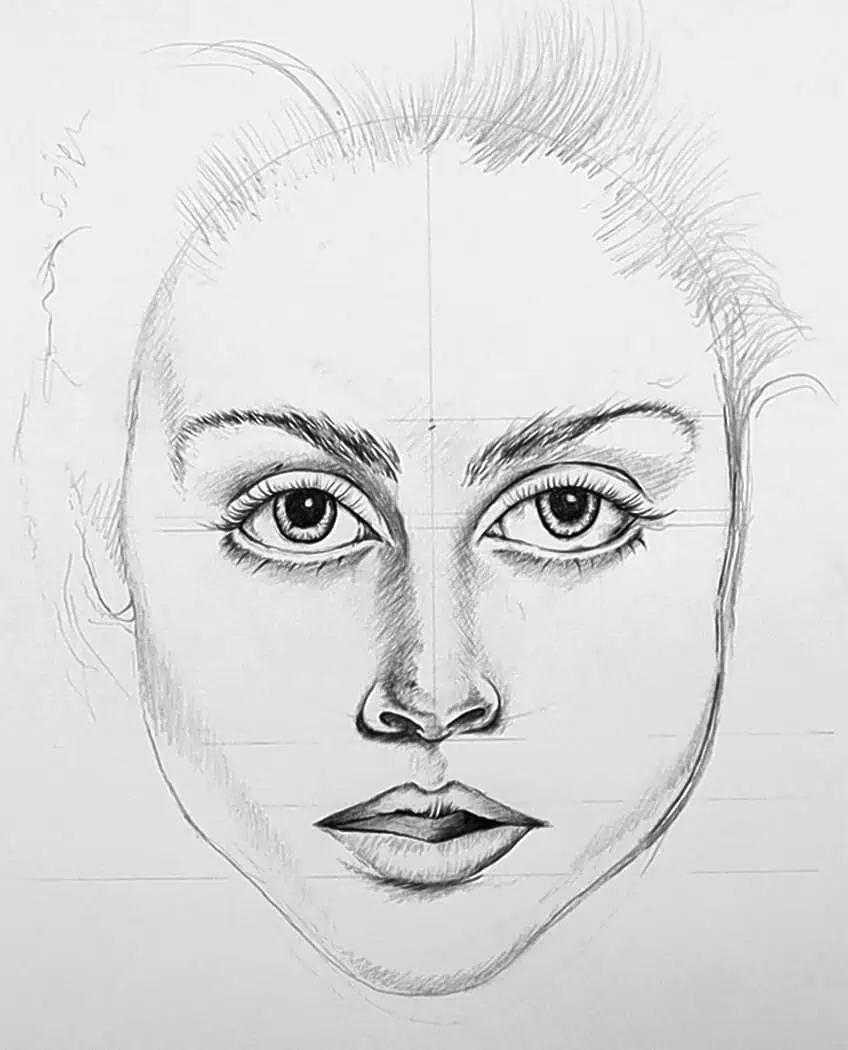
Step 7: Creating the Structure of the Face
Refining the face structure is the next step in defining facial proportions. Using our reference image as a guide, we examine how the lines surrounding the face’s features are created. The distance between the chin and the bottom of the lips should be noted.
What is the distance between the eyes and other features to the sides of the face?
You may start adding some lighter shading with our pencils once you have a firm understanding of the facial anatomy. By doing this, we want to give the cheekbones, the nose, and other facial bone structures some structure. Simply use shade to further improve your face drawing from this point on.
You should give careful thought to how the structure of the face defines the face as you shape it. A face’s distinctiveness can also be attributed to its facial structure, as each person has a particular facial structure. Look very closely at your source image to ensure that you understand the structure of your model’s face.
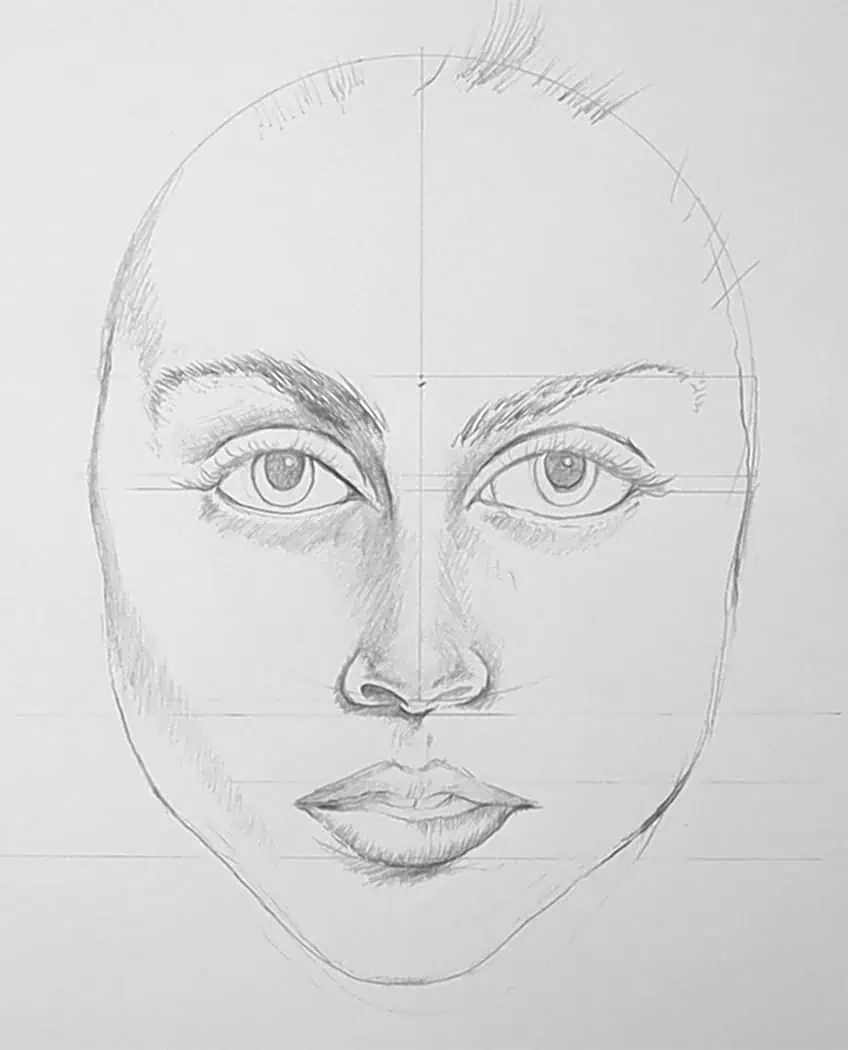
You can now begin to indicate the location of the hairline. There are several ways that hair develops and flows from the face. It would assist you to shape the facial form a bit more by adding suggestive markings that represent the hairline to your face drawing.
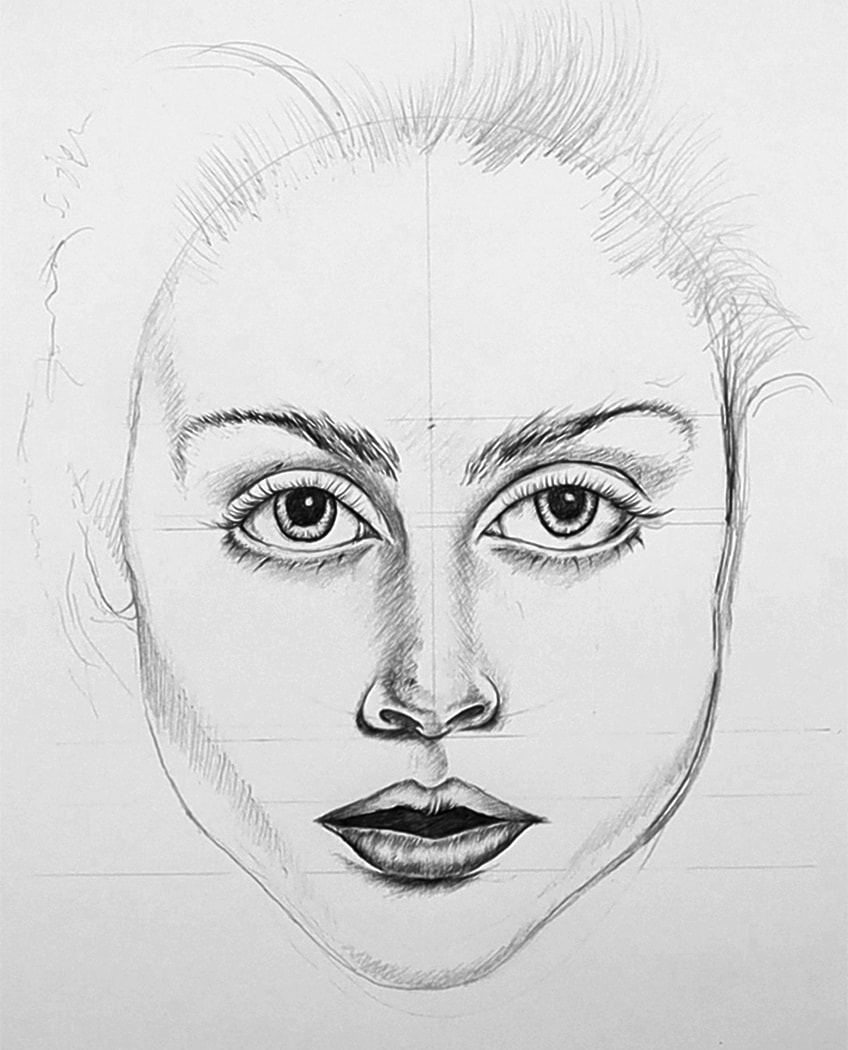
Step 8: Realistic Effects Through Shading
These are the fundamental stages for drawing a realistic face. You can more properly arrange various face characteristics by using the grid lines. However, your shading will decide whether or not to give your face a more realistic appearance. Using a ballpoint pen is an excellent idea since it releases ink sparingly and gives you greater control over how much ink is released.
Your detailing will be more organized and precise if you use a pen.
You will shade the face in the same way that you draw your face. This indicates that you should begin by drawing the face’s eyes. Your face painting will have more depth if you concentrate on the eyes, how the eyelids are shaped, and the various little shadows around the eyes. Spend plenty of time shading the eyes, paying attention to the details on and around the eyes.
Additionally, shading helps to give the face more shape. Different facial characteristics will be highlighted more as a result of the shading. It also aids in enhancing the face’s symmetrical features. This is especially true for the nose’s ridge and how it merges with the ridges of the eyebrows. The definition of the bone structure’s protuberances is aided by shading.
When it comes to shading, the lips are still another distinctive feature of the face. Some lips are wet, producing a smooth gloss, while others are drier, producing tiny fissures in the lips. It’s crucial to concentrate on how you color the lips and how they seem in a reference picture. Lip skin is also just a little bit reflective. You should think about how the mouth you are sketching responds to light.
You will observe how shadow and light play a vital role in how faces seem as you shade in various facial characteristics. As much as the actual characteristics themselves, the way facial structures respond to light defines a person’s personality. This implies that you should constantly take the light source in your source images into account.
After developing the fundamental elements of the face, you should be sure to take all of them into account. You may work on altering the facial proportions to approximate your reference image after you have instructions to assist you to put your features. From that point on, it will take some time to develop your shading technique.
Useful Tips
- Give it some time. Faces are difficult to draw, so you have to take your time to consider the placement of the eyes, the width of the nose, and other features.
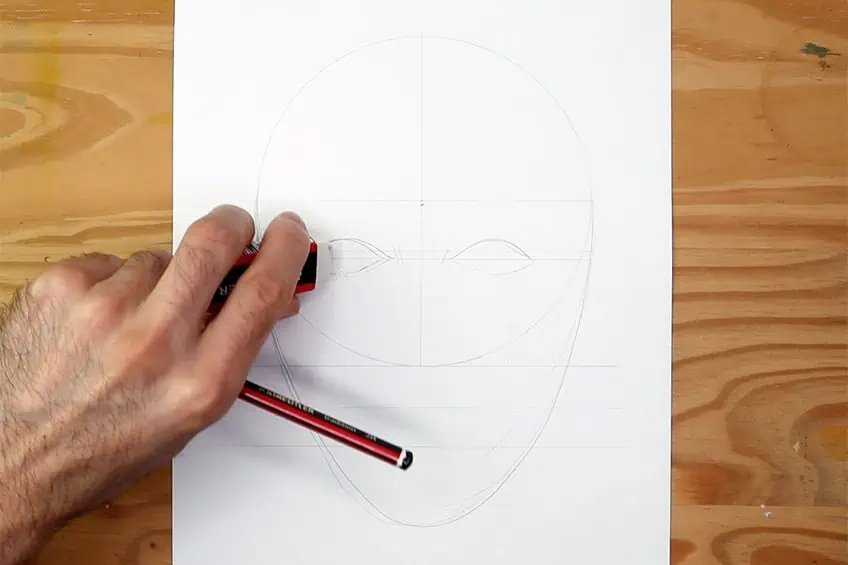
- Lighten up. Keep your drawing simple; it’s easy to make blunders while capturing the face’s proportions. Avoid leaving behind black traces since they will make it simpler for you to fix any errors.
- The minor tweaks count. This implies that when working on facial proportions, each detail’s placement in relation to other elements of the face should be tweaked incrementally until it looks right.
- Utilize the eraser. You will make mistakes when creating facial proportions, but you can also shape and fine-tune each individual feature of the face using the eraser.
- Scale comparisons between features. Comparing features is usually a smart idea. Consider whether the nose is noticeably bigger than the mouth. Or do the eyes appear to be larger or smaller?
- Use a model as a reference to help you. Using a reference image to direct your sketching process after you have sketched the guidelines may be incredibly beneficial.
- Use this material as a guide while drawing faces. This lesson serves as a reference for face proportions, illuminating the proper positioning of various facial features.
- Have a fantastic time. It’s a fun activity to practice drawing faces. Enjoy the process, take a rest, and take your time leisurely!
You will need to put in some experience sketching faces. When sketching a face with proportions, you should take your time fine-tuning and softly retouching little details. This is due to the fact that the more often we utilize a source image as a point of reference, the more correctly we will begin to detect the minute features.
Take a look at our face drawing webstory here!
Frequently Asked Questions
How Do I Draw Facial Proportions Properly?
Drawing facial proportions should be achieved with a light pencil and drawn slowly and deliberately once your grid lines have been established. Always compare the individual elements that make up the face as well; doing so will help you comprehend scale much better. Use a reference photograph to help you determine the scale and sizes of various facial features.
What Are Good Tips for Creating a Face Drawing?
Be patient; sketching is a talent that must be honed, so it will take some time to do it perfectly. This face sketch guide will help you to improve your face drawing abilities. Comparing features is usually a smart idea.

Matthew Matthysen is a multidisciplinary artist. He completed his fine art degree, majoring in History of Art and Contemporary Drawing Practice at the University of Witwatersrand, South Africa. Before joining acrylgiessen In 2020, Matthew worked part-time as an art teacher at Reddford Blue Hills High school. Matthew creates drawing and painting tutorials for acrylgiessen and captures them not only photographically and in written form. He also records the creation of his works in his own creative studio as in video format, from which later with a voiceover and a video editor also drawing tutorials for the Youtube channel of acrylgiessen are created.
Learn more about Matthew Matthysen and about acrylgiessen.