Cat Drawing – An Easy and Realistic Guide for Beginners
This post may contain affiliate links. We may earn a small commission from purchases made through them, at no additional cost to you.
Cats make for great drawings because of their visual versatility of being able to fit into different spaces and landscapes. A drawing of a cat can also be a beautiful artwork that can easily stand on its own as a single focal point due to its visually pleasing qualities. The process of learning how to draw a realistic cat is also a great exercise because of the various species to choose from. It also teaches us how to represent unique features such as patterns within fur, which can be utilized for other animal drawings. We are also provided with the challenge of color exploration and how to represent various tonal values through the layering process of different colors. There is a lot to learn from a cat drawing, aside from just learning how to draw a cat itself, which makes it a great drawing exercise for various reasons.
An Easy Guide on How to Draw a Cat
A drawing of a cat can seem quite complex as a subject matter due to its unique exteriors, making it seem like a difficult task. However, we will find that the process is quite digestible when broken up into a few easy steps. Learning how to draw a realistic cat is not as complicated as they appear, and as we construct our cat drawing through various layers, we will see how it unfolds into a realistic drawing of a cat. If we are patient and take our time with each step, we will slowly work our way toward a beautiful cat drawing.

Step-by-Step Guide on How to Draw a Cat
There are many ways to draw a cat, however, in this tutorial, we will break up the process into two parts. We will first start with the head, as the head often has a more complex arrangement of features. We will work out the general color palette, using a brinjal cat as inspiration for our drawing. we will learn how to establish the different colors within the face, that will serve as the color palette for the rest of the body. We will then work in refined line work and details over the base colors for the head, and then proceed to apply the same process to the body of our cat drawing.
Now that we know what to expect, let’s go through the drawing process.
Step 1: Shaping the Head
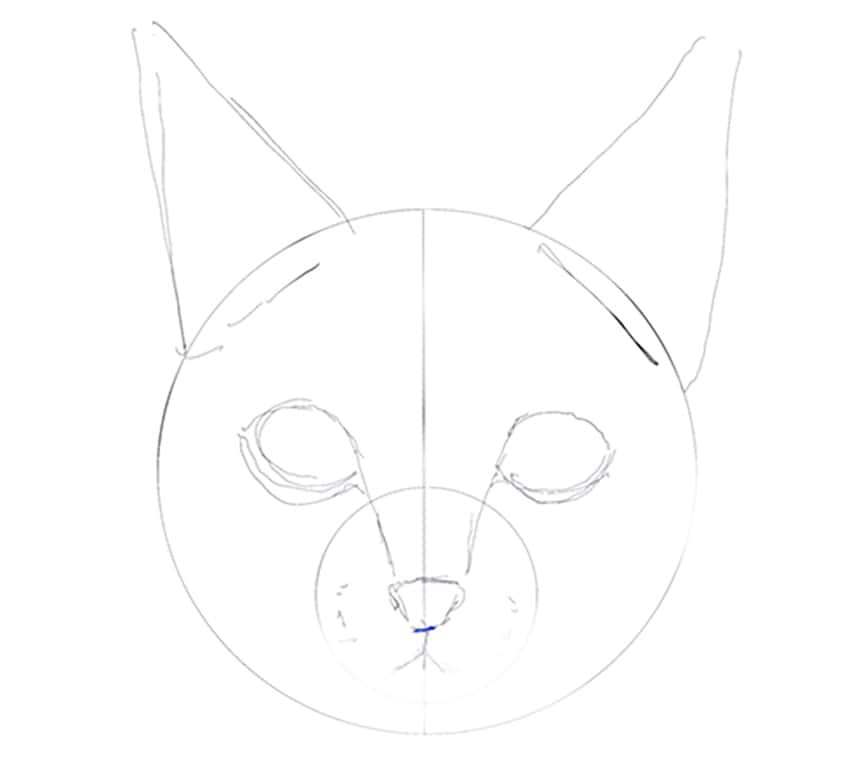
We are going to start by drawing the head of the cat as this part of the cat does require a lot of detailing. We want to start by establishing the head in its basic shapes, which we can do by drawing a circle.

Once we have established the larger shape for the head, we can then establish a smaller circle for the snout. This smaller circle is to position the placement of the mouth and nose of the cat drawing.

We can then start to lightly sketch in some shapes of various features to further define the head. The ears are triangular and can be drawn directly above the eyes.

The nose of the cat is quite small in shape and has an upside-down triangular shape that can be positioned at the top of the smaller circle. The mouth will form from the bottom of the nose, and the ridge of the nose will flow into the eyes.

We can then draw in the eyes as a circular shape with subtle shape edges near the outer corners of the eyes. From here we can lightly erase the face of the cat to use the ghost lines for further refining of the cat drawing.
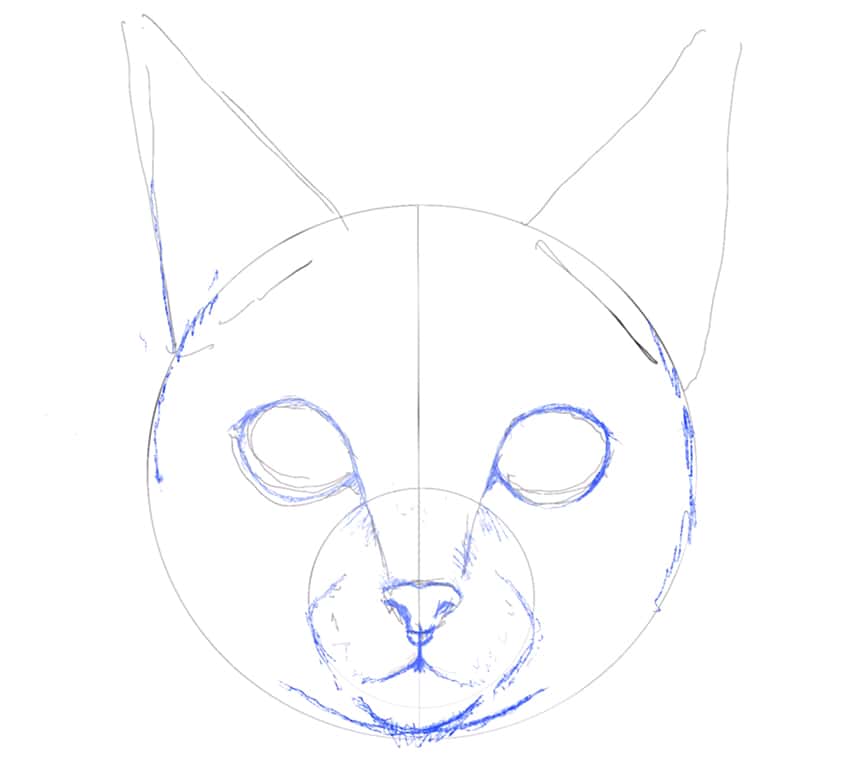
Step 2: Refining the Facial Features of the Cat
Using the ghost lines to assist, we can now start to refine the features by giving them a more realistic shape through a light sketch. Utilizing a reference image at this point is a good suggestion to accurately represent the various features.

Take your time working through the features, making sure you capture their shape and scale as best you can. It’s important to make sure that you capture the proportions as accurately at this stage while your sketch is still light.

We want to make sure that the snout and mouth stay quite small and remain within that circle shape. We also want to make the ridge of the nose flow into the upper eyelids, seamlessly merging into the brow area.

Once we have worked out all the general features we can proceed to lightly erase the sketch, again leaving some light ghost lines to assist us in our coloring process.
Step 3: Adding Color to the Face
We can now start to integrate the unique coloration within the face. With Brinjal cats we will find that there are variations of color around the facial features that are light and dark.

At this point, we can start to add pinks near the ears and work in darker browns for the stripes along the sides of the face. These base layers will provide a good foundation for line work that we can add later on.

Again, with brinjal cats specifically, some stripes form down the head and alongside the face. We want to build up these layers of color to define these unique patterns.
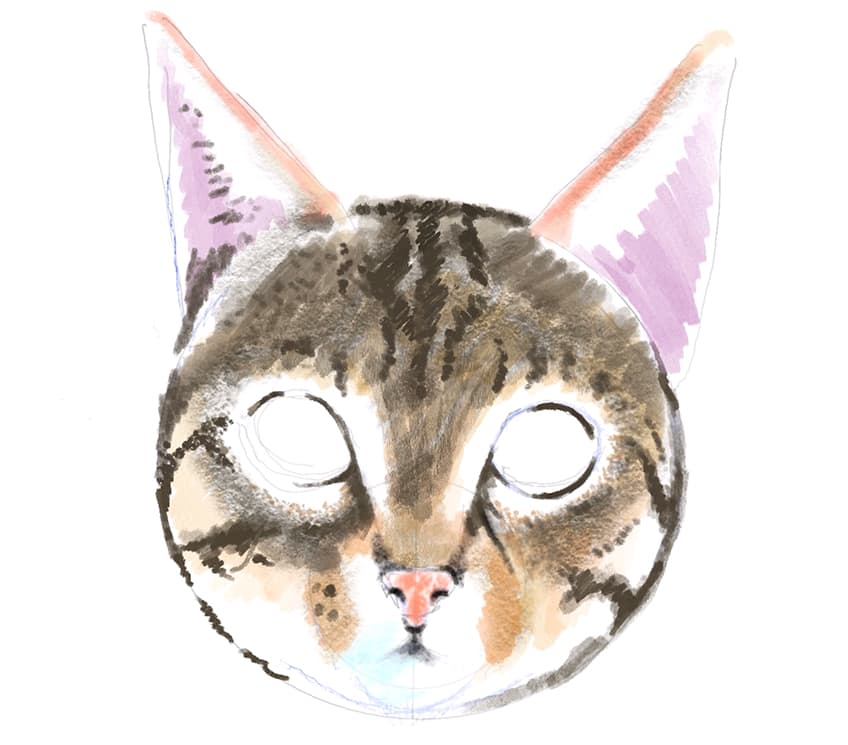
We can also start to integrate some coloration into the eyes, in this case, we can work with a variety of tonal values between oranges and yellows. This will provide a realistic base for the eyes of the cat.

Step 4: Working in Line Work and Shading for More Detail
To emphasize these features we want to start integrating line work and some finer detailing. Starting with the eyes, we want to start working on some more subtle features such as the pupils and some line work into the iris.
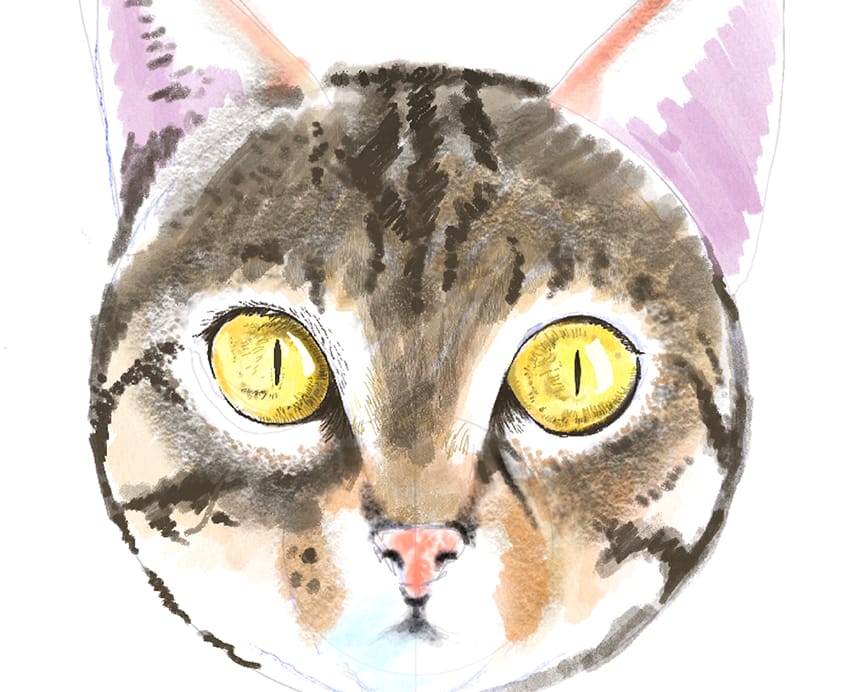
The idea is to work with different colors, using the existing base colors to assist you in where to add more line work and shading. We want to work on some lines from the nose that move uniformly up the nose and then arch around the eyes.

The idea is to also build up layers of lines with darker and lighter colors, however, we want the base colors to define the placement of darker and lighter line work. As we add some refined line work to the patterns and features, we will start to see how it emphasizes these details.

This process will take some time but it is important to remain patient. Allow yourself to take breaks as well so you don’t get too fatigued during this process. As you build up more of these layers with line work, we will see that the line work starts to enhance the quality of fur in our cat drawing. Again, work with both lighter and darker line work around the features that have light or darker tonal values.

Step 5: Shaping the Body of the Cat
In this case, we will draw the cat sitting in an upright position, using the head as a reference for scale. The head of the cat is quite large but not larger than the body, so we want to take our time with the shape of the body.

Take your time with the shape of the body and consider looking at some references to assist you in the drawing process. You want to know that the body is in the correct proportions to that of the head.

Step 6: Adding Base Colors to the Body of the Cat
Again, the brinjal cat has a set of stripes that run through various parts of the body in different sizes. The idea is to start with establishing the patterns with some lighter mar-making.

We can then start to work on some darker marks to define the features a little further, making sure we contextualize the pose of the cat. The front legs should be upright with the cat sitting on its hind legs in a horizontal position.
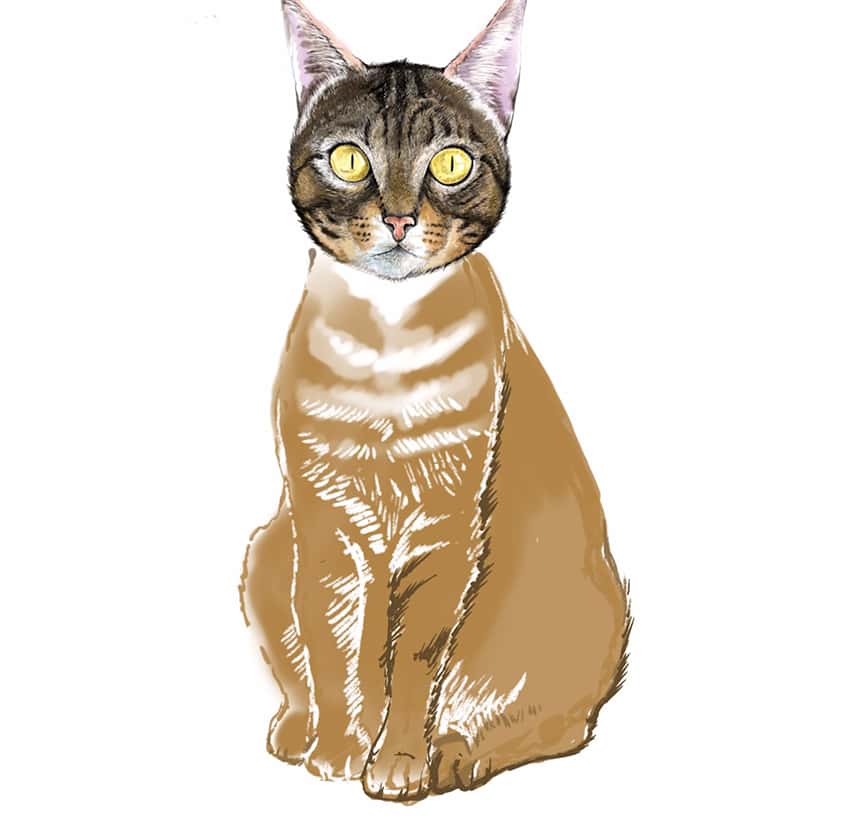
We can then start to work on some darker marks to define the horizontal formations of the patterns that run through the cart from its upper body to its paws. We can be quite loose with our marks at this stage, just establishing placement.

Step 7: Adding Details and Line Work to the Body of the Cat
We can now start to integrate line work to emphasize the patterns and quality of fur. Again, there are many ways to draw fur, but in this particular tutorial, we are exploring the effectiveness of lines and their ability to represent the quality of fur.

Again, the idea is to integrate line work from the upper body and work our way down through to the paws. You always want to try and keep your lines quite uniform as this is often the case of how a cat’s fur sits on its body.

As you continue with this process, a good suggestion is to allow the base layer of color to define where darker or lighter lines should be placed. The idea is to build up your lines from lighter tonal values and then integrate darker tonal values.

We want to think about it as a layering process, where we go through the entire body more than once. Again, line work can be quite time-consuming, so remember to take breaks so you don’t get fatigued.

As you layer and work your way through the body a couple of times, the lines start to look more dense and compact. Remember to look at some references of some brinjal cats to get a sense of their patterns and coloration.

Step 8: Drawing the Tail of the Cat
At this point, we should have a well-established drawing of a cat, from head to paws. However, we now want to just add a tail as a further contextualizing detail to give the cat draw a more finished quality.

We can approach the tail of the cat through the same sequence of steps that we did for the head and the body. The idea is to build up the base layers of color, and then refine those colors with some line work and detailing.

Again, we want to build up our layers of lines that flow along the different colors to define the pattern within the tail as well.

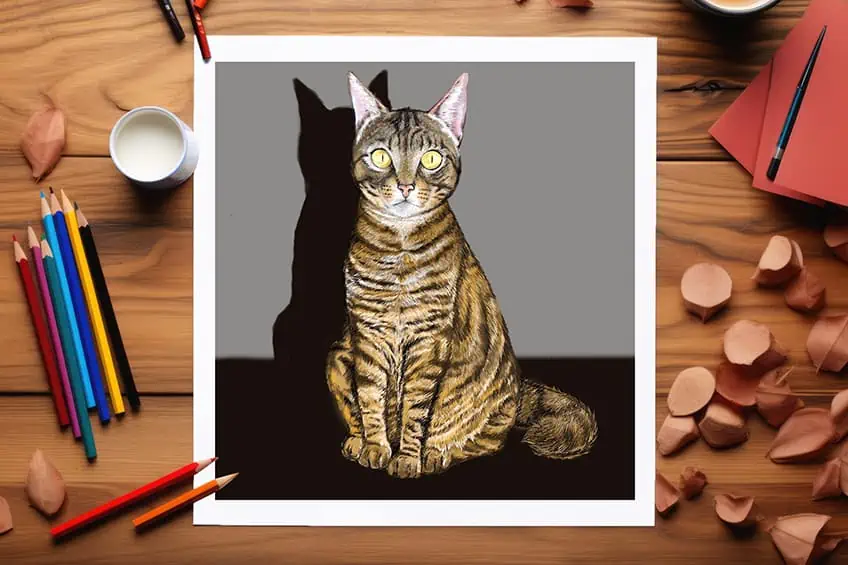
Continue with this process until. You have worked through the entire cat drawing and then we should be done. There you have it- a few simple steps on how to draw a cat realistically. Remember, to go through your cat drawing one last time, make sure you spend some time on the base layers of color and the line work within the head and body. Most importantly, take your time and be patient.
Tips and Tricks to Remember
- Work in segments. A good suggestion is to break up the drawing process between the head and the body of your cat.
- Establish base layers of color. Work in some simple mark-making to establish the base colors for your cat drawing.
- Refine the features with line work. Once the base colors are established, you can then refine them with line work to achieve the quality of fur.
- Build up your lines through layers. Work your way through the head and the body multiple times to create density in your line work.
- Take your time. The more time you take, the better the outcome of your cat sketch, so try to be patient.
Cat drawing, easy and simple as it may seem, still requires attention to detail and patience. The process of creating a more realistic cat drawing will require some time and patience. Allow yourself to have breaks in between the drawing process so that you don’t get fatigued.
Frequently Asked Questions
How Do You Draw Fur on a Cat?
There are many ways to approach a drawing of a cat, especially the fur. In this tutorial, we look at how the use of color as a base and line work layered on top can achieve the textural quality of fur within the cat sketch. Fur is many hair fibers that are densely placed together. With this concept in mind, we can approach the process quite literally by integrating line work. However, we want to first establish the base colors and pattern shape with some simple mark-making, which we can then enhance with line work to create a more fur-like texture. As we take our time to integrate lines into our cat sketch, we will find that it will result in a realistic representation of fur. The more lines we work in, playing around with both lighter and darker tonal values, the more realistic it will appear.
How to Draw the Face in Correct Proportions on a Cat?
The facial proportions of a cat are quite compact and the head is quite small. Cat drawing, easy as it may seem requires some guidelines for assisting in proportions. The best way to draw the features on the face so that they are proportionally correct is to start by establishing some guidelines. We can start by drawing a circle, with a smaller circle inside the bottom area of the larger one. The smaller circle is going to define the snout, which includes the nose, mouth, and whiskers of the cat. From there, the nose should flow into the eyes of the cat, which can be of various sizes depending on how wide the eyes are open. The ears can be drawn from the top of the circle, with each ear directly above the eyes, which are used to position the ear’s placement. From there, you can slightly tweak the features to suit the type of cat you are trying to draw.

Matthew Matthysen is a multidisciplinary artist. He completed his fine art degree, majoring in History of Art and Contemporary Drawing Practice at the University of Witwatersrand, South Africa. Before joining acrylgiessen In 2020, Matthew worked part-time as an art teacher at Reddford Blue Hills High school. Matthew creates drawing and painting tutorials for acrylgiessen and captures them not only photographically and in written form. He also records the creation of his works in his own creative studio as in video format, from which later with a voiceover and a video editor also drawing tutorials for the Youtube channel of acrylgiessen are created.
Learn more about Matthew Matthysen and about acrylgiessen.