How to Draw Ears – An Easy-to-Follow Human Ear Drawing Tutorial
This post may contain affiliate links. We may earn a small commission from purchases made through them, at no additional cost to you.
Ears are a part of the body that many artists avoid, often covering the ears with hair when sketching a portrait. But, drawing ears doesn’t have to be an extremely complex project to undertake! Once you learn the general rule of light and shadows, the art of drawing ears will be easy! The human ear drawing experience can be intriguing because of the ear’s unique layers and complex structure. In this how-to-draw ears tutorial, you will learn the concept of shading to accentuate shadows and lighting to define the human ear drawing and bring it to life!
A Guide to Human Ear Drawings
Before we begin this how-to-draw-ears tutorial, you should study the reference image so that you have a better idea of what you will be required to do for this drawing. You have a choice of either printing the source image and placing it beside you as a constant reference, or, you could use an iPad or tablet, this will enable you to zoom in for the finer details.
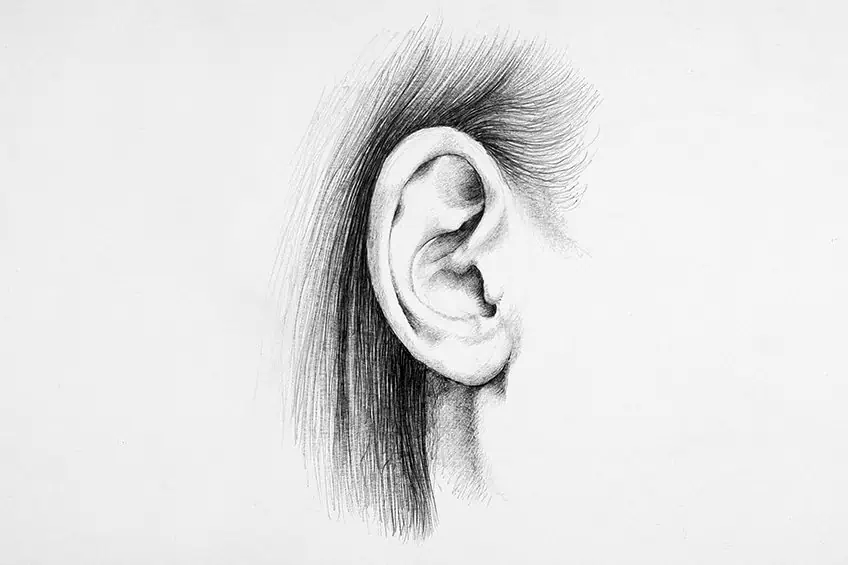
As you progress in our how-to-draw and ear lesson, we will be focusing on creating the ear to be a focal point with strands of hair behind it. The main reason for doing this is that we want the ear sketch to look realistic and anatomically correct. An ear drawing floating around on your page will look a little odd, so the strands of hair tucked behind it are a great addition and help make your sketch appear more natural. Drawing an ear is an excellent exercise for all artists, enabling one to learn about shadow and light in an interesting way.
Let’s get started with learning how to draw ears!
Step-by-Step Instructions on How to Draw an Ear
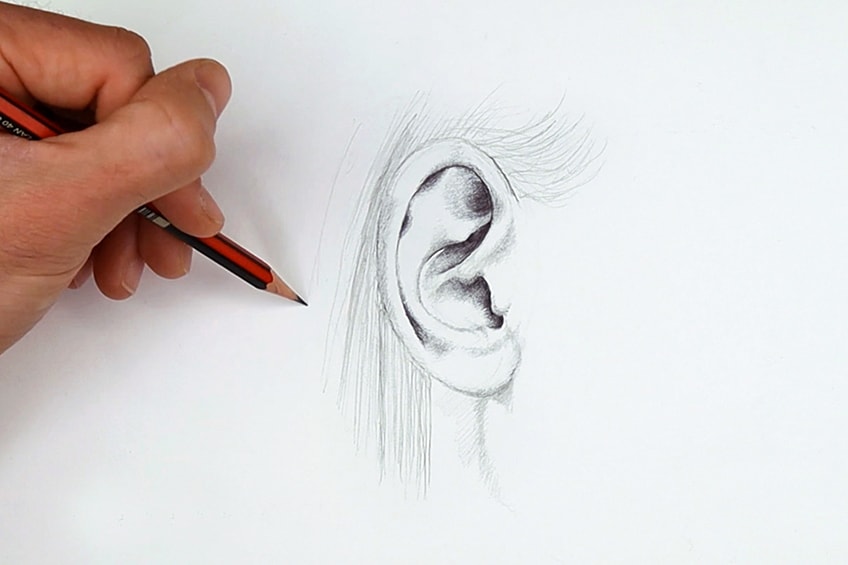
Before you begin this how-to-draw-an-ear tutorial, you will need to gather a few simple supplies. We recommend a basic sketch pad or a sheet of paper taped onto a surface so that it does not move as you draw. You will also need a pencil, an eraser, and a ballpoint pen. Find a comfortable spot to work, have your reference image at your disposal, and put on some music or the television for some background noise if you wish.
Step 1: Creating the Shape of Your Ear Drawing
The finished ear drawing will eventually be shaped like a kidney bean. However, your foundation lines will start with a more circular! Gently draw an oval shape using your pencil. You will be using this shape as a reference to develop an actual human ear within your rough oval shape.
As you can see in the reference image, the shape you will draw in the beginning must be gestural rather than defined. This is because it will evolve as you move along. Next, you can start to redefine the oval shape as you shape the upper and bottom areas.

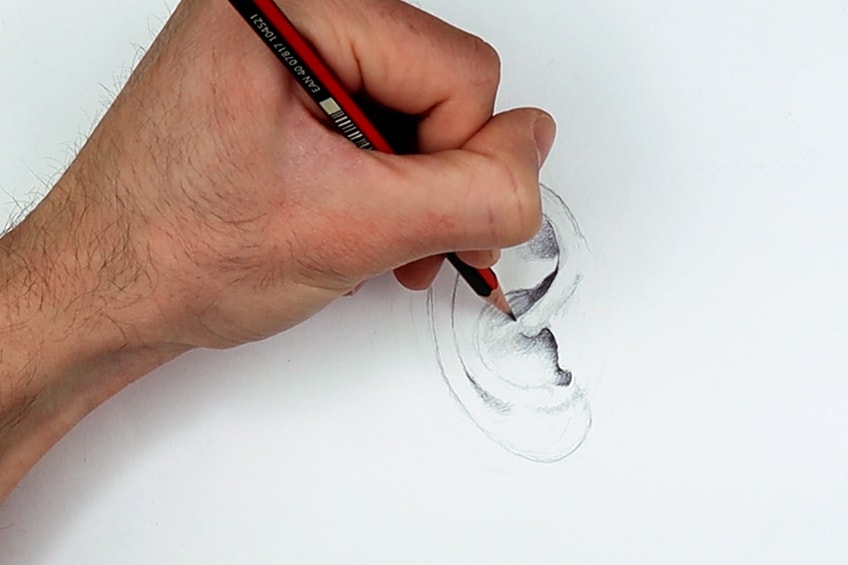
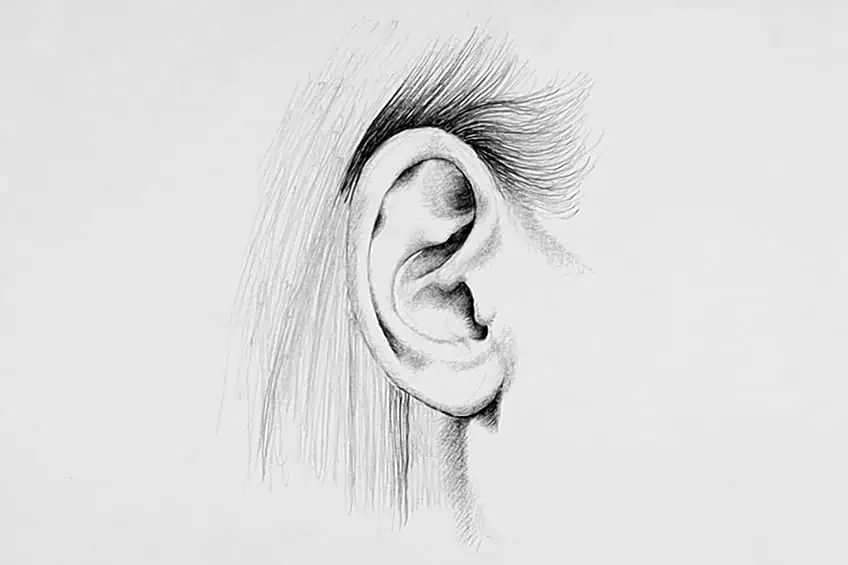
To develop the ear shape, you can begin to draw the ear cartilage area, use your pencil and gently create depth. Define the outer shape, and then shade in the inner cartilage area. Note how the light falls on the ear shape and shadows for definition.
Try to ensure that your human ear drawing is of similar size to your source image. This will help you with proportions, especially if you are a novice. Next, you can continue building the inner ear structure. The ear has layers, and you will use shadow to emphasize certain areas where the ear folds.
As you add shading to the inner parts of your ear sketch, you should notice the indentation of the upper ear and how each fold develops. The inner ear fold reaches the outer part of the ear.
Using small and short pencil strokes, gently begin building the shadow of the inner ear. To continue creating a realistic human ear drawing, you must take note of how the shadows fall on the ear and how this affects the ear sketch as a whole.
In other words, some shadowed areas will be darker than others.
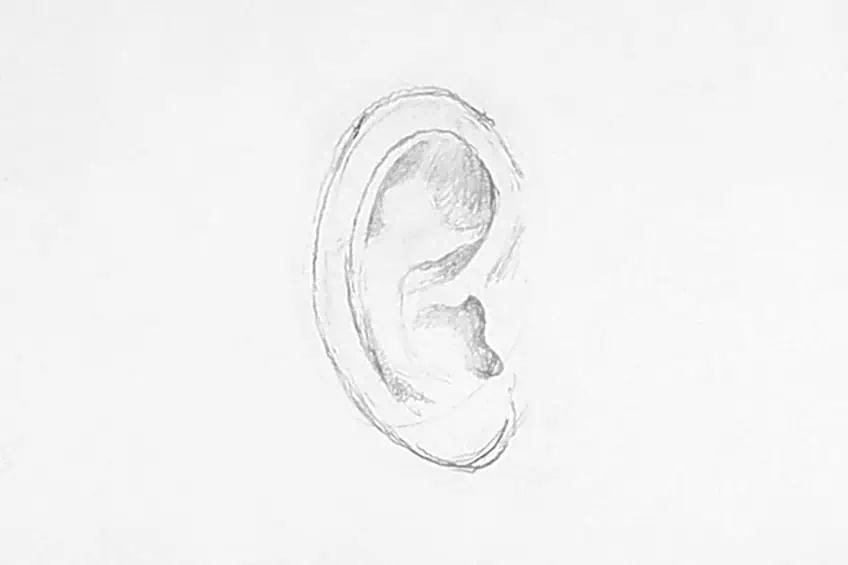
Step 2: Using a Pen to Add Shading to Your Human Ear Drawing
By now, your ear drawing should be looking satisfactory and you should be ready to begin adding some pen to define your ear sketch. Using your ballpoint pen, you can start shading the darkest areas of your ear drawing. Focus on the inner ear. From this point, you can move to the top part of your sketch and continue adding pen lines.
Use your ballpoint pen to add layers to the shadow areas of the inner and upper ear. You want to work your way slowly and gradually through building the shadows and bringing highlights to your ear sketch. Also, remember to use curved lines and work gently. You always want to build the layers because you cannot erase a pen line.
As you use your reference image to guide you through your how-to-draw-ears tutorial, continue shading the darkened areas with your ballpoint pen and focus on the inner ear to the center of the ear. Concentrate on the inner ear folds and color the deep inner folds with dark shading. As the ear folds become less pronounced, make your shading lighter and lighter, working outwards.
Continue this shading technique and use the source image to refer to the placement of the shadow of the inner ear and the ear cartilage. The inner fold of the upper ear will have a darker area. Gently add layers to your drawing.
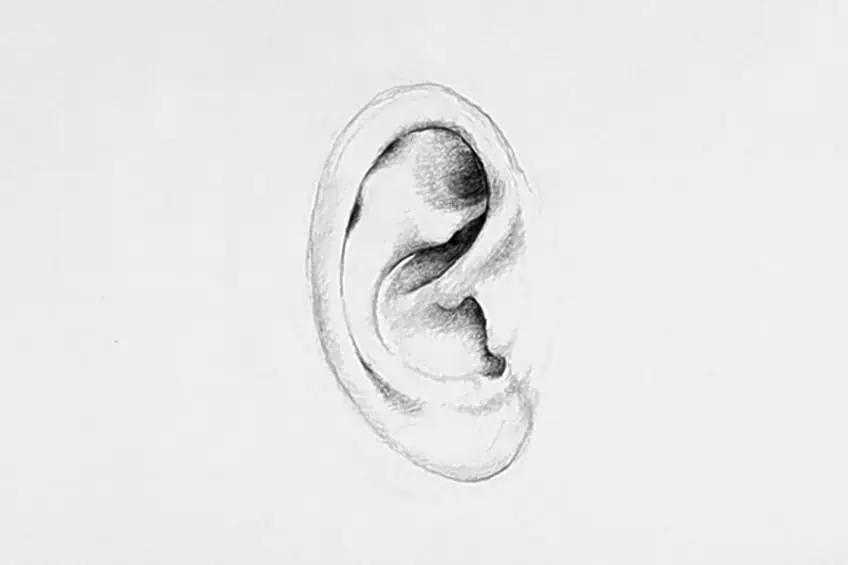
Step 3: Adding Hair to Your Ear Sketch
In step three, you will begin to add hair to your human ear drawing. You are adding hair because you must define the ear itself and not have it seem as if it’s floating alone on your page. Hair may seem like a mess of lines clumped together, but drawing hair takes a little skill! Using your pencil, begin drawing the hair flowing from top to bottom.
While you are adding the hair lines to your ear drawing, it is important to acknowledge the shadows and dark areas of the hair around the ear line. As the hair falls behind the lower ear area, see how the shadow becomes darker around the bottom under the earlobe. Keep using your source image to guide you.
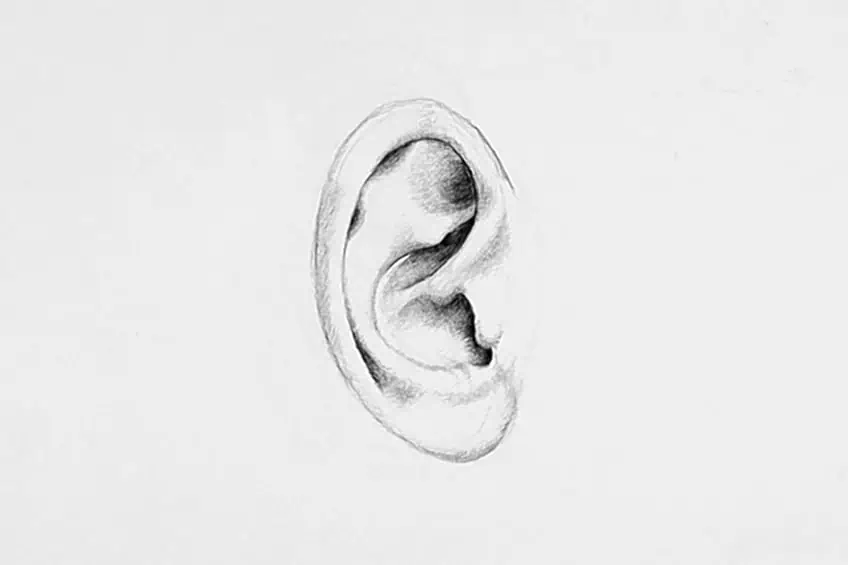
Step 4: Completing Your Ear Drawing With Pen
At this point of your drawing, you will trace over the hairlines you made with your pencil and define the ear drawing with your ballpoint pen. Start at the hairline sideburns and gently follow the gravitational flow. Remember to make a mixture of thick and thin lines to show authentic depth.
In your reference image, you will see how there are lighter areas and darker areas of the hairline. Using your ballpoint pen, continue using small lines to make the area around the ear darker. Do this gradually and don’t rush!
To make the ear seem like it’s in front of the hair and pulled forward in view, you must add a slight curve at the top of the hair area. Imagine the hair tucked behind the ear. Those of us with hair that falls over the ear may know the tucking-away actin well! Once you have completed the hair shadow, you can shift your shading to the shadow cast on the neck by the ear.
Look at the reference image to see where the darkened area must be around the hair and the top of the ear. The hair clumps tightly together. This should be kept in mind when creating depth to your ear drawing. Again, take your time and move slowly as you draw. It will have a positive effect on your ear sketch!
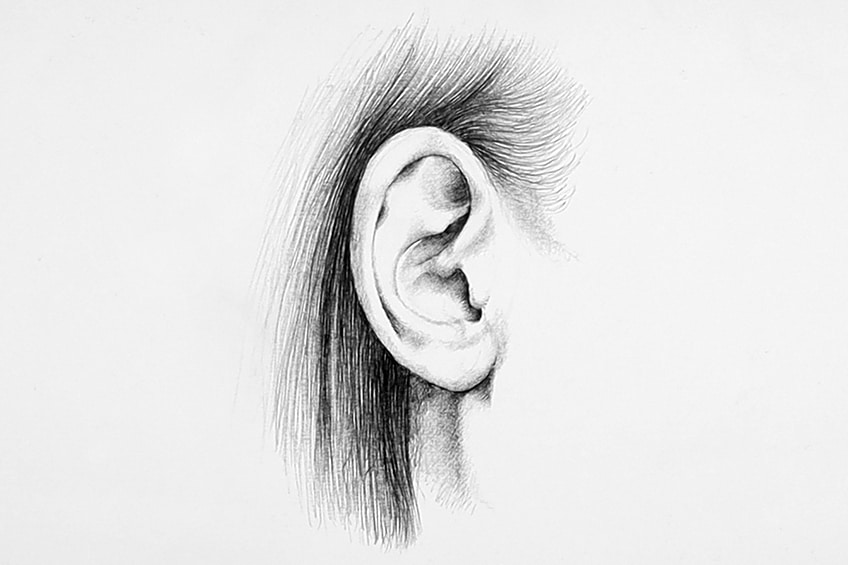
Your human ear drawing should look quite realistic and just like your reference image! You have reached the final step of your how-to-draw ears tutorial, and you should be using this final stage to tidy any loose ends and finalize any attention to the shadow on the hair and ear.
Continue until you are happy with the finished product.
Helpful Tips for Drawing Ears
Ears are unique to each person, almost like a fingerprint! This means that each ear is going to be different, having its own unique challenges. Here are some of our top tips to keep in mind when learning how to draw an ear.
- Identify how the light falls on the subject and follow this as a guide for shading.
- Use a pencil first. Once you are confident, you will be able to move on to using a pen to complete your human ear drawing.

- You cannot erase the pen lines! Therefore, when using a pen for your shading and shadows, it should be done slowly and steadily.
- Focus on detail when drawing hair behind the ear, and try to create a mixture of thick and thin lines to make the hair seem realistic.
Well done! You have completed your human ear drawing! With the help of our easy-to-follow step-by-step instructions, you will have learned the basic steps on how to draw ears. We are sure you have learned that ear sketches can be tricky. Hopefully, you will continue to explore drawing different areas of the human body. No matter how tricky a drawing may seem, it is never impossible! The key to a successful image is to focus on the unique structure and layers of the human ear. Learning how to draw an ear is a seemingly simple task when you have a little help! Happy drawing!
Frequently Asked Questions
What Is the Easiest Way to Draw an Ear?
Ear sketches can be easy or difficult, it all depends on how you structure the original outline of the ear sketch. The foundation lines of any drawing are crucial! Our tutorial will teach you to create a foundation line in a circular shape and then make a few definitive outlines to imitate the human ear structure. Next, we will explain how to shade the nooks and crannies of the human ear.
What Is the Best Way to Draw an Ear From an Angle?
For this how-to-draw-an-ear tutorial, it is best to use a side-angle view because it shows the most detail of the ear’s shape in its entirety. By using shading to create shadow, you will be able to create depth in your ear drawing, allowing it to look far more realistic.
Can I Create a Realistic Human Ear Drawing?
The key to any realistic drawing project is shading! Learning how to identify light and shadows in your subject matter is what will make or break your realistic drawing. In this how-to-draw-ears guide, you will be challenged with learning the rules of shadows and light.

Matthew Matthysen is a multidisciplinary artist. He completed his fine art degree, majoring in History of Art and Contemporary Drawing Practice at the University of Witwatersrand, South Africa. Before joining acrylgiessen In 2020, Matthew worked part-time as an art teacher at Reddford Blue Hills High school. Matthew creates drawing and painting tutorials for acrylgiessen and captures them not only photographically and in written form. He also records the creation of his works in his own creative studio as in video format, from which later with a voiceover and a video editor also drawing tutorials for the Youtube channel of acrylgiessen are created.
Learn more about Matthew Matthysen and about acrylgiessen.