How to Draw a Face From the Side – Realistic Side Profile Drawing
This post may contain affiliate links. We may earn a small commission from purchases made through them, at no additional cost to you.
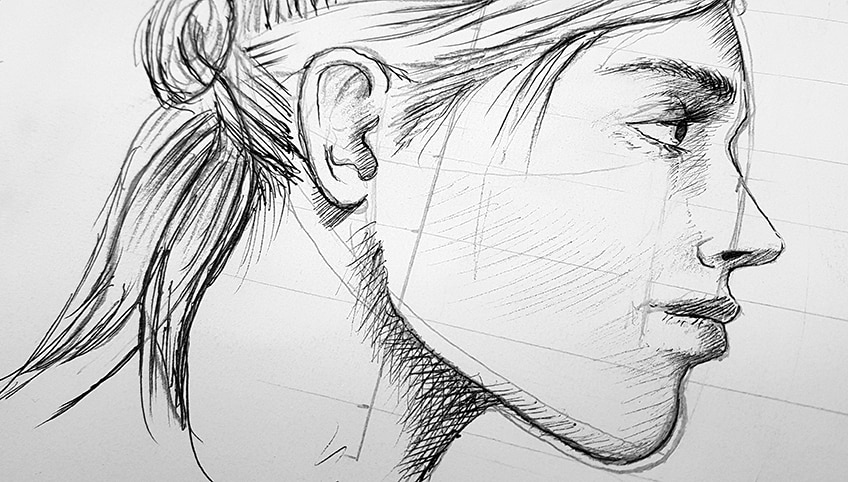
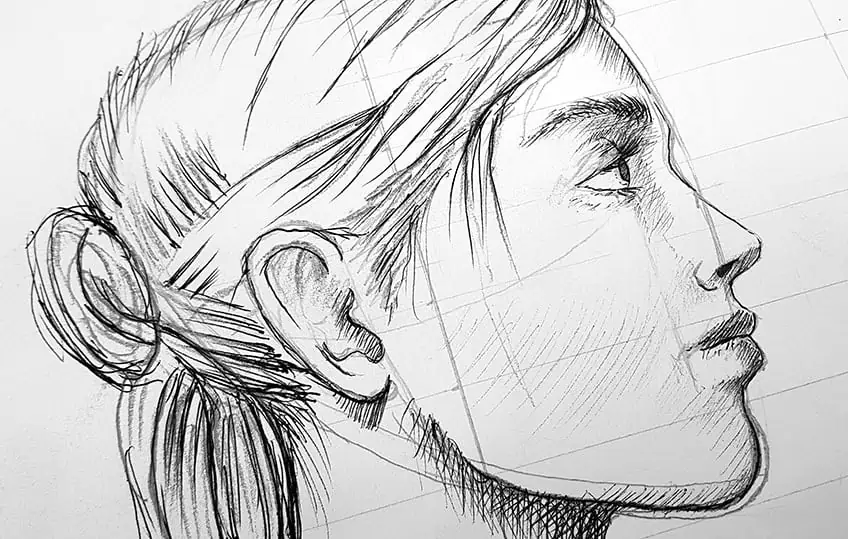
Creating faces can be tricky since the technique varies greatly based on the perspective you are using. But if you know how to use instructions as a guide, creating a realistic side face drawing need not be challenging. A side profile drawing highlights the anatomy of the head and face in very precise ways, making it an excellent method for capturing the face’s individuality. It’s useful to be able to depict faces from several perspectives in a single piece of artwork, thus learning how to draw a face from the side is also a nice ability to have. There are many different possibilities for face-side-profile drawings, particularly in works of art with many figures.
Our Tutorial on Creating a Side Profile Drawing
Because it is possible to create a face accurately by following a few straightforward rules, learning how to draw a face from the side is relatively easy. This lesson will outline the fundamental steps in applying straightforward principles to outline the face side profile as precisely as feasible. Both female and male heads may be produced using the same basic method. Nevertheless, we’ll be sketching a female side face drawing in this lesson.
After breaking down realistic side face drawing into a few manageable parts, we will notice that the technique is actually fairly simple.
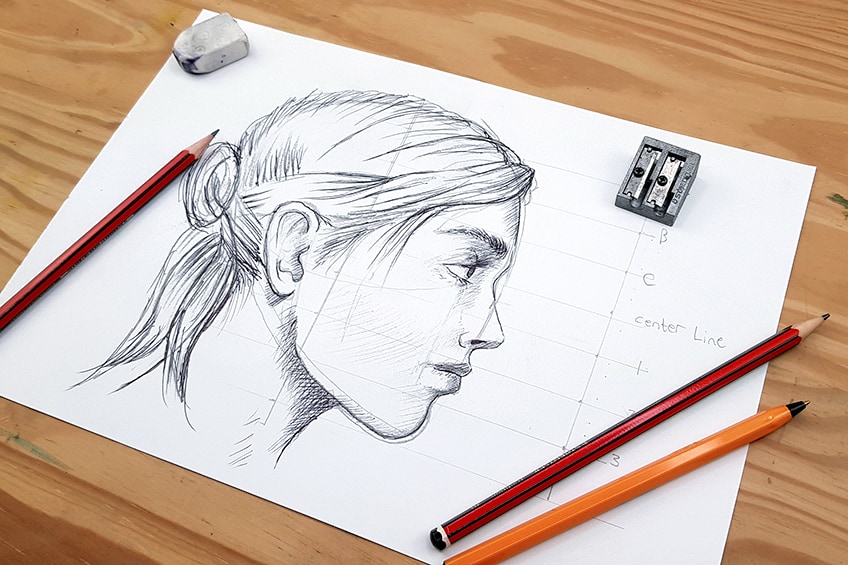
How to Draw a Face From the Side Step by Step
We will especially design a view of a feminine side-profile drawing in this face-side profile lesson. We will discover how to establish a basic framework and series of measurements, which will make our side face drawings much easier to lay out. We will utilize our gridlines to position various features on the face once we get them.
We’ll practice drawing each feature to size and with accuracy.
The feature may then be given greater contrast by experimenting with how to create shadows and details using our ballpoint pens. After sketching the characteristics in pencil first, we wish to add a bit more definition to them using our ballpoint pens. Let’s proceed with this lesson on how to draw a face from the side perspective now that we are aware of what to anticipate.
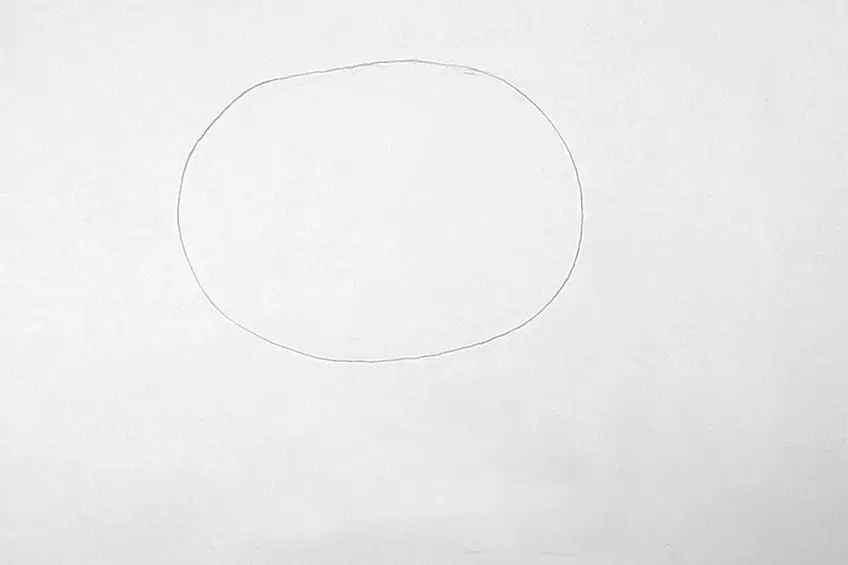
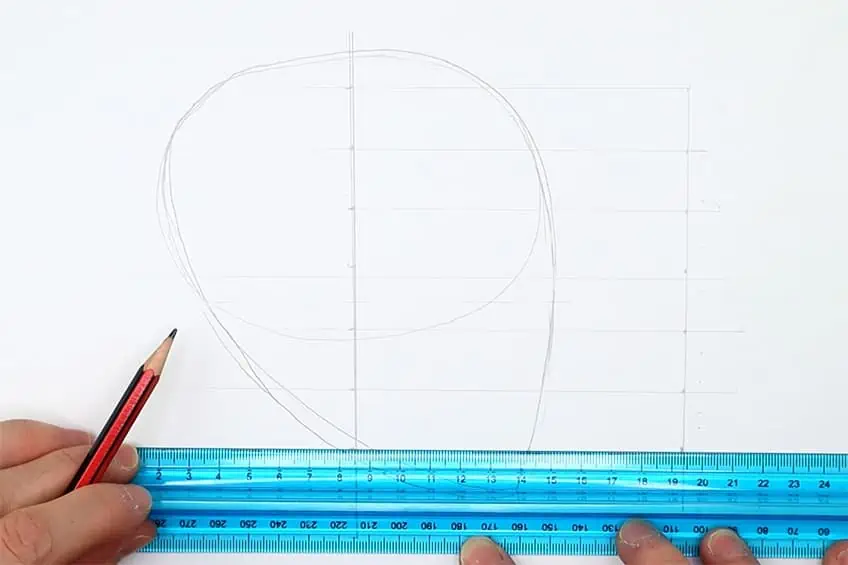
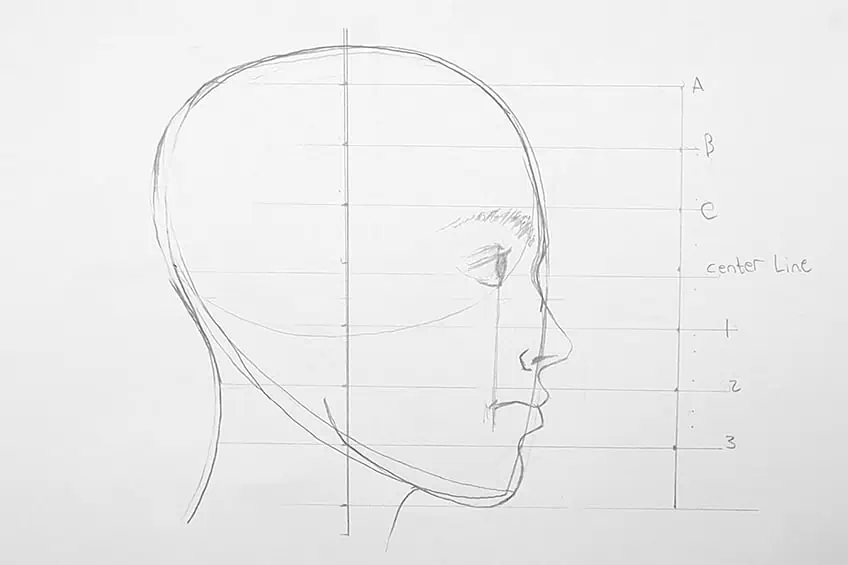
Step 1: Creating the Head’s General Shape
To begin, we should sketch a straightforward oval form. This might be as big as you like based on how large we want to make our illustrations. We will use our pencils for this part.
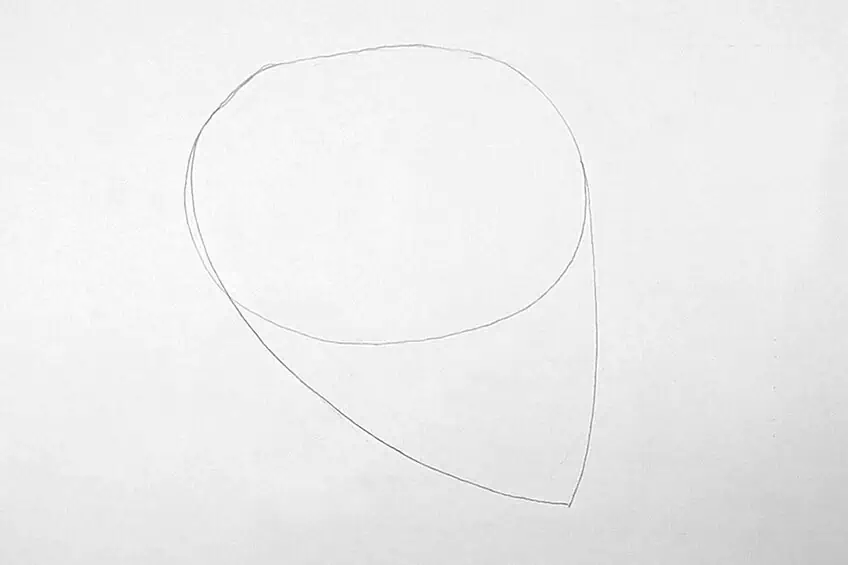
The next step is to sketch a downward-pointing triangle beak form. Make careful to begin drawing vertically down our canvas from the right-hand side of the oval so that you may modify your position afterward.
We may expand the line to the left-hand side of the oval after we reverse direction.
Step 2: Setting Our Gridlines
We’ll start by creating a few grid lines right away. Create a vertical line right along the middle of the oval form using your rulers and pencils.
The placement of the beak form along either side of the vertical line should be irregular. On the right-hand side of the line, the triangular beak form should have a larger surface area. The location of the jawline in the sketch will finally be determined by this.

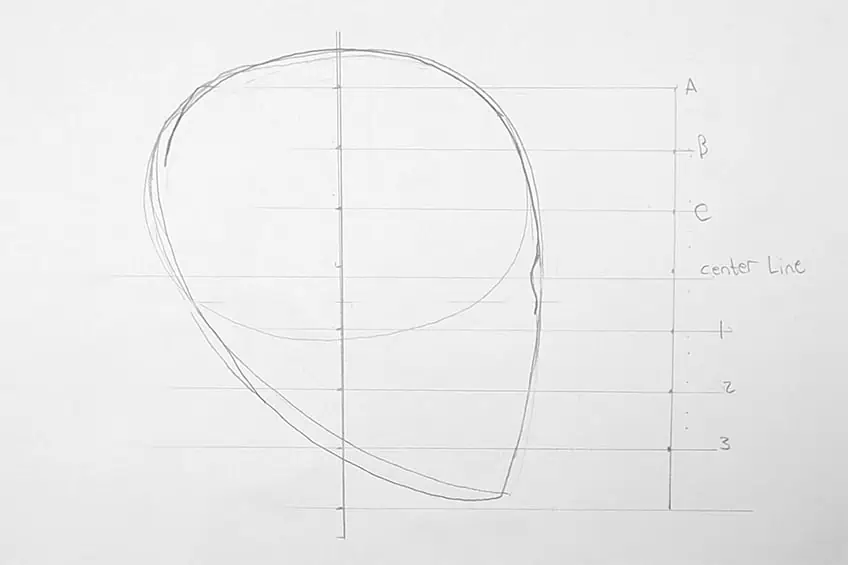
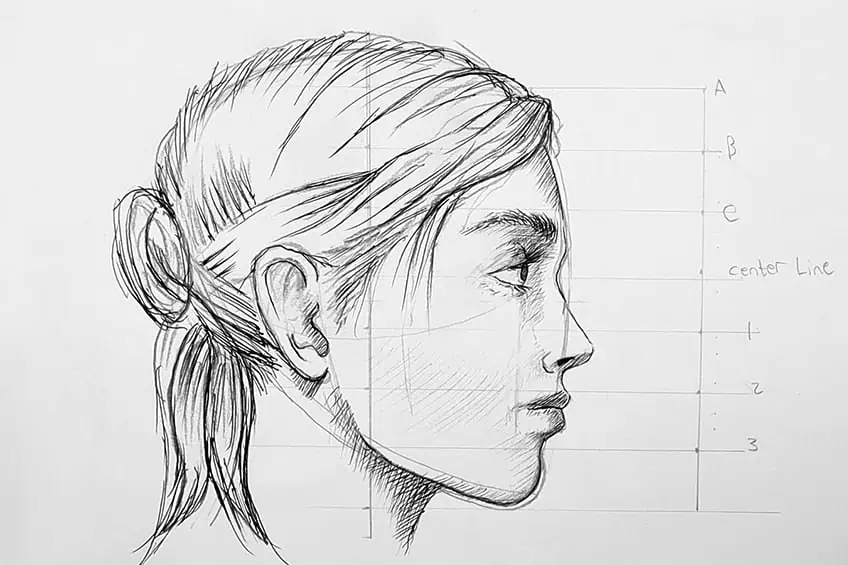
We need to partition the vertical line into equal-sized rows starting from this point. There must be an even number of seven lines and six rows running from the peak of the head to the lowest part of the jaw. Your skull’s shape will decide how big it is.
The bottom and top of the head must be separated by seven lines and six rows.
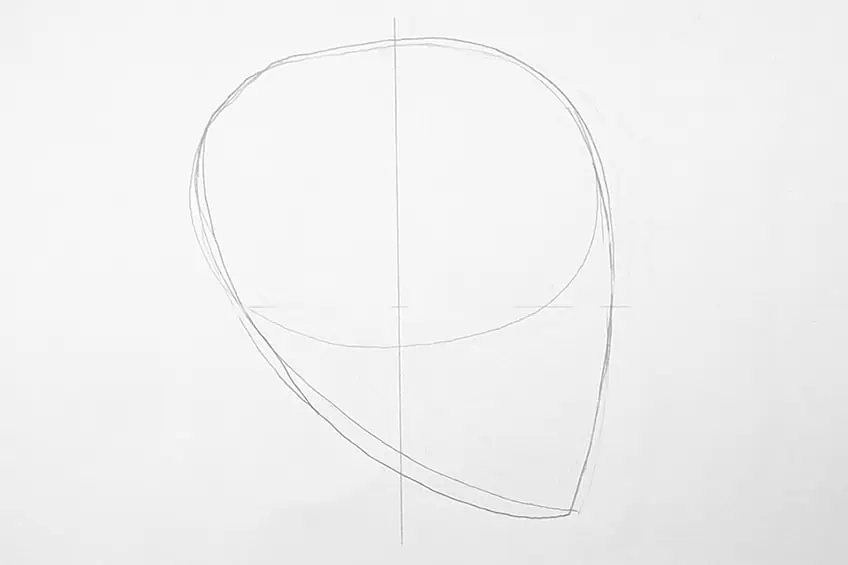
The key areas should be located between the tip of the head and slightly underneath the jawline. The initial line should be drawn through the skull’s middle, as a nice guideline. This may be directly above the oval’s base.
The rows can then be divided into six equal sections, each with a centerline and three additional sections along either side of the horizontal line. A, B, and C will be written in capital letters along the upper section’s centerline.
Then we can label these”1″, “2”, and “3” from top to bottom beneath the middle line.
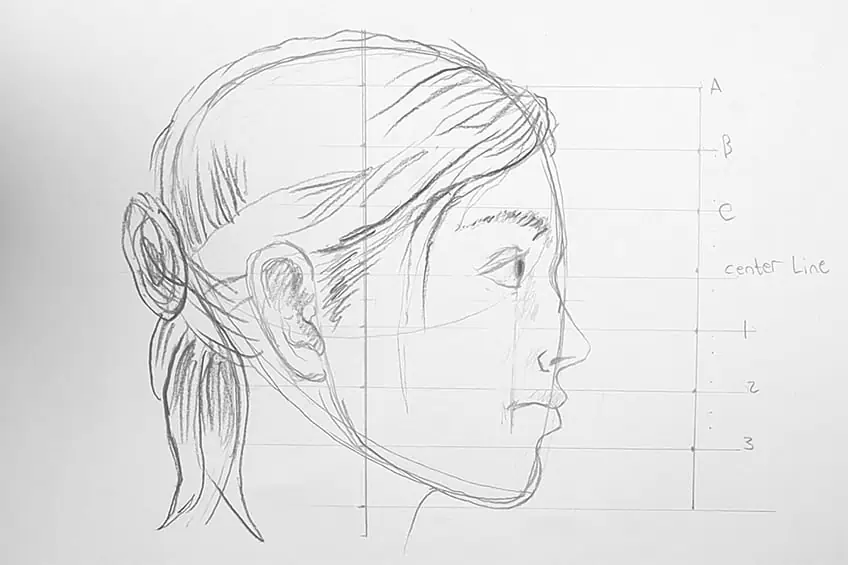
Step 3: Creating the Lips and Nose
The nose and the eyebrow ridge can now be drawn. The ridge between the brows will be shown as a minute depression in the face. This will be inscribed exactly on the face’s midline. The nose shape that will appear between lines one and two may then be formed from this indentation.
You may experiment with how long you want your nose to be and how far you want the nose’s ridge to extend. The top lip will then expand into the lower part of the nose, falling on line number two. Between lines two and three, there should be the upper and lower lip.
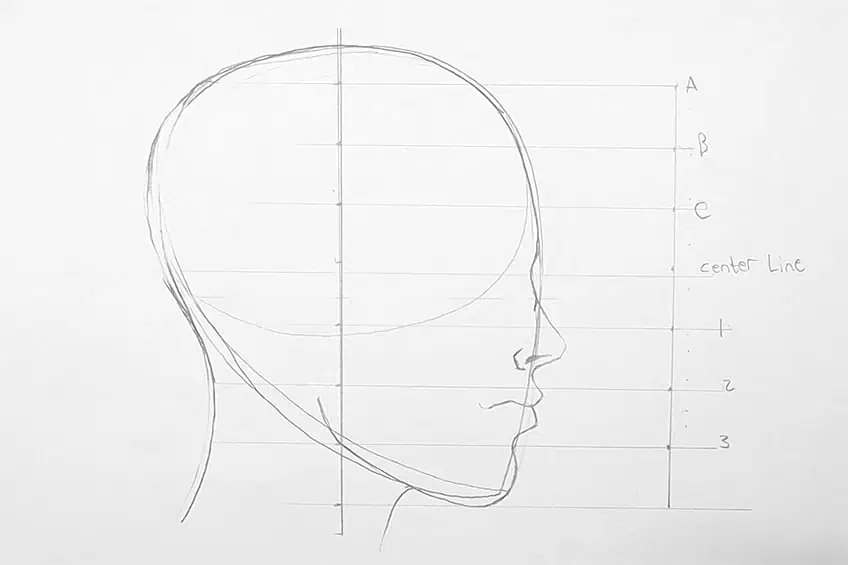
Remember that the top lip is always marginally smaller than the lower lip when drawing a single line horizontally to separate the two lips. The bottom lip will continue into the chin, which should not extend too far and sits below line three.
The chin should be somewhat below or parallel to the bottom lip.
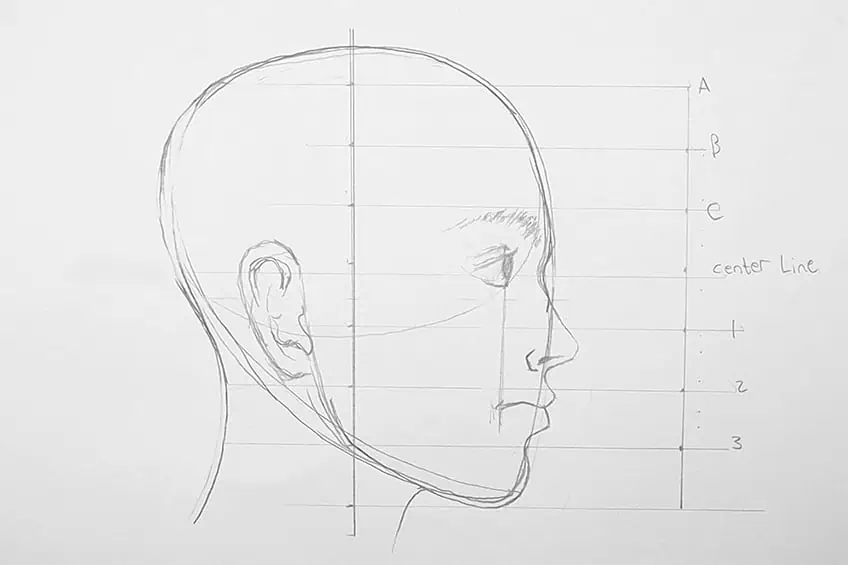
Step 4: Creating the Eyebrows and Eyes
We may start by locating the eye on the centerline as we design it. It would be wise to recommend that you create a vertical line from the mouth’s corner all the way up to the centerline. The lip’s corners and the eye should line up. It must be positioned on the centerline as well.
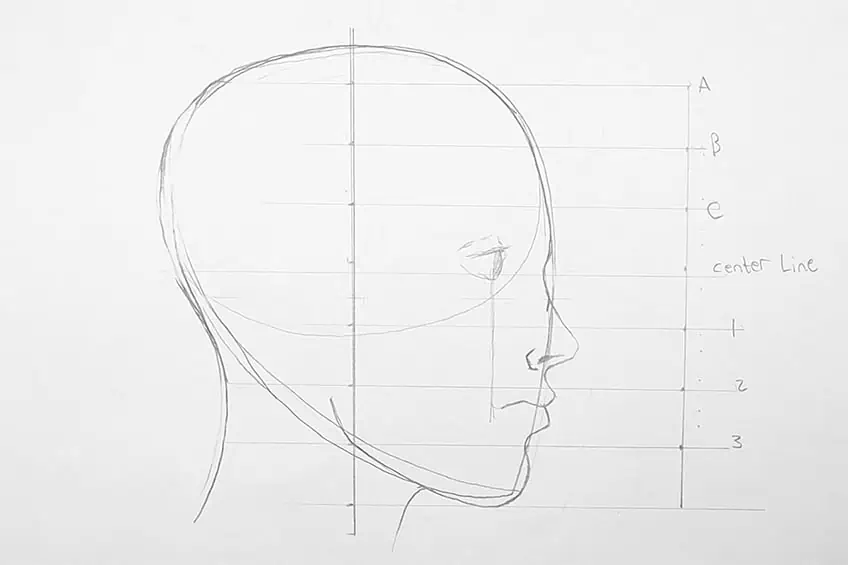
You may picture the form of the eye as a triangle on its side, with the base facing the front of the head. From there, we can merely curve the flat surface to further define the eyeball’s form.
Drawing the eyebrows precisely above the eye while keeping them beneath line C is possible from this point. Between the midline and line C, the eyes and brows should be positioned. You may shape the brow whatever you wish.
This indicates that it is entirely up to you whether it is straighter or bushy.
Step 5: Creating the Ear
The jawline, which should start beneath line three and continue through the head past the vertical center line, should reach the ear. Along the horizontal axis, the tip of the ear should also be at eye level. Between lines one and two, the lowest part of the ear should be visible to the viewer.
Step 6: Creating the Hair
We’ll now move on to sketching the hair on the female profile’s head. Although hair is really quite subjective, it’s crucial to keep in mind that it’s not sketched inside or on the top of the head. Instead, the hair should be volumized and pulled over the head. This allows us to draw it just above the skull’s peak.
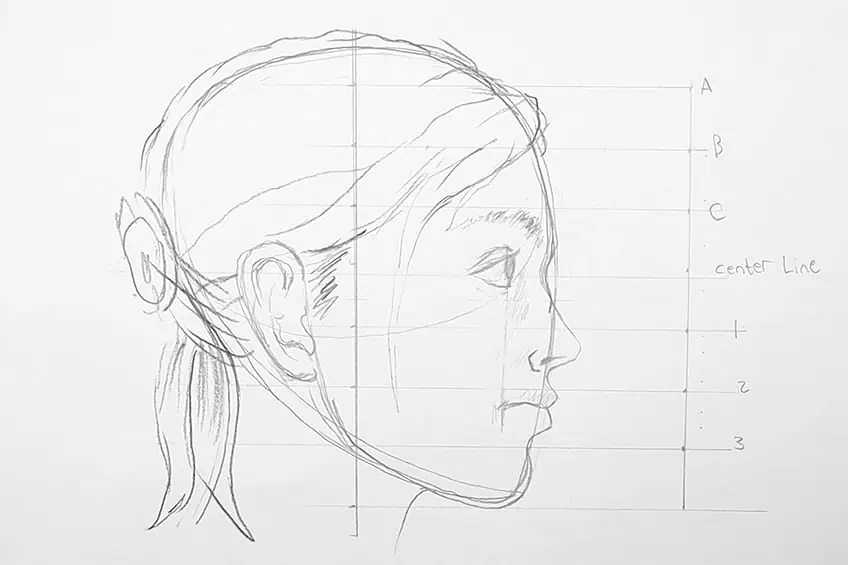
Play around with various styles as you sketch the hair. Make sure to visualize a wrap or covering that extends from the top of the head to the rear of the head. It’s also important to keep in mind that sideburns should hang in front of the ears. It’s crucial to continue to make sure the hair surrounds the head and it has some thickness by being drawn just over the skull’s lining.
In addition, you may experiment with the hair’s style and formation.
Step 7: Light Shading Additions
Now that we’ve added some light shading around the nose, eyes, and mouth using our pencils. Make careful to shade beneath the brows around the eyes to convey the idea that the brow ridge throws a shadow close to the eye. Additionally, we may slightly darken the lips to imply a distinct skin tone.
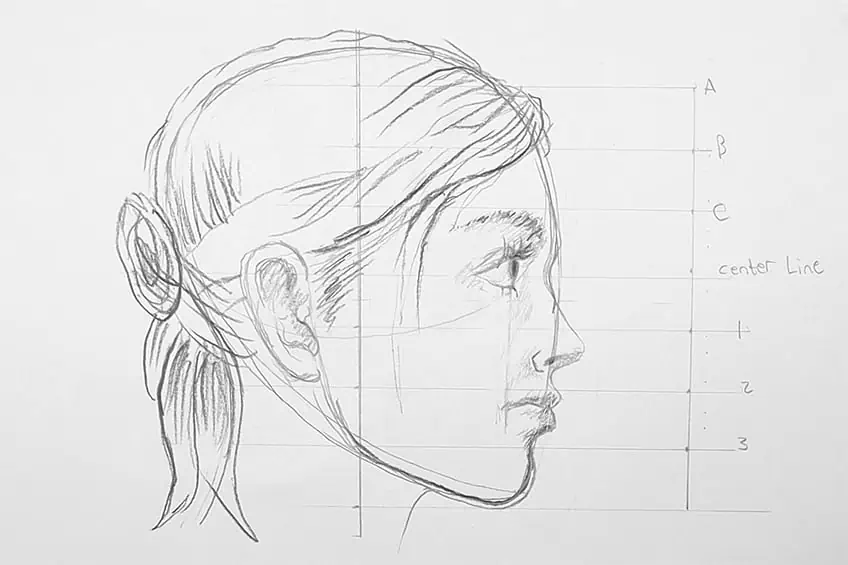
Step 8: Creating Darker Shading With Pen
Taking our ballpoint pens, we can now add some deeper line work and shading to the basic drawing. Utilizing our ballpoint pens, we can begin by reviewing our line work. The shadows in the lips and the region surrounding the nose can also be covered with shading.
Giving the female profile’s eyelashes greater length is a clever idea since it makes the profile appear more feminine. The lashes will only become darker and more vibrant if you use a pen. We may continue by erasing the pencil smudges under the brow. After accomplishing this, we may discuss the brow’s defining lines.
We just want to go over all of the features and the picture in general with the pen.
By doing so, we highlight the characteristics of the face more clearly. Using darker markings helps to clarify the characteristics and makes them pop out more. Another excellent suggestion is to add some shading under the jawline. Again, this will emphasize the jawline and reflect the shadow created by the jaw on the neck. To get a similar look near the ear, we may also add some shadowing beneath the ear.
We may also go over the hair and apply some simple strokes to assist define the flow and texture. To show the effects of contrasting and darker markings within the facial drawing, we just add some basic strokes. Simply take this time to comb over all of the details in your face drawing to clarify the characteristics you’ve sketched.
This is an example of how utilizing darker markings may help to define a face a bit more.
Useful Tips
- Allow yourself plenty of time. Before sketching the face-side profile, double-check your dimensions.
- Examine photos for feature references. Although this approach of sketching a face from the side may be done without a reference photograph, glancing at faces helps to capture characteristics more precisely.
- The eyes are never drawn bigger than the nose. This is a typical error, so do not forget that the eye should never be drawn bigger than the nose from the side profile of the face.
- Don’t stress about doing it right the very first time. This is a useful resource that can be accessed at any time, and the techniques are intended for practice.
- The shape of the head is oval. Don’t draw a circle while constructing the side face sketch since the oval shape is more precise and comparable to that of the skull.
That’s all there is to it! A short instruction showing how to create a realistic side face drawing in a few easy steps. We hope that you are feeling more confident in your ability to draw a face from the side. Play around with different faces using the tricks and talents you’ve learned.
View our Side Profile Drawing web story here.
Frequently Asked Questions
Is It Difficult to Learn How to Draw a Face From the Side?
At first, creating a side profile drawing might seem very daunting. Yet, there are a few easy steps that you can take to make the entire process much easier to complete. Simply use our grids and measurements to help lay out your facial features with the correct proportions and symmetry.
What Is Important to Remember When Creating a Realistic Side Face Drawing?
When creating the face side profile, avoid drawing a circle since the oval form is more exact and comparable to that of the skull. Look through photographs for feature references. The eyes should never be drawn bigger than the nose.

Matthew Matthysen is a multidisciplinary artist. He completed his fine art degree, majoring in History of Art and Contemporary Drawing Practice at the University of Witwatersrand, South Africa. Before joining acrylgiessen In 2020, Matthew worked part-time as an art teacher at Reddford Blue Hills High school. Matthew creates drawing and painting tutorials for acrylgiessen and captures them not only photographically and in written form. He also records the creation of his works in his own creative studio as in video format, from which later with a voiceover and a video editor also drawing tutorials for the Youtube channel of acrylgiessen are created.
Learn more about Matthew Matthysen and about acrylgiessen.