Step-by-Step-Tutorial for Resin Geode Egg
This post may contain affiliate links. We may earn a small commission from purchases made through them, at no additional cost to you.
In this blogpost, our guest author Danielle Desantis reveals the secret of her unique Resin Geode Eggs. In a detailed tutorial, she will show you step by step how she creates a sparkling Resin Geode Egg and which supplies you should use to make your artwork a success. Have fun trying it out!
How did I get to Create Resin Geodes Eggs?
I have always admired and collected crystals. In recent years I have learned to replicate them using resin and molds of crystals from my very own collection. I love being able to incorporate them into my art. I have been able to replicate most of my favorite crystals with the exception of one large geode. So when I came across a large plastic egg in a craft store my imagination kicked in. This project can take several days to complete due to drying times. Each step doesn’t take much time it was able to work on it a little each night over the course of several days.
These Supplies I use for Resin Geode Eggs

- Specifically designed for art projects, excellent color stability
- Very easy to use with 1 : 1 mixing ratio, 100% solids, hard-shell finish
- High gloss and crystal clear, your all-seal solution, excellent air release
- Jumbo Hollow Egg, Polystyrene Egg or two hollow half foam balls
- Wax Paper
- Black Tissue Paper
- Iridescent Cellophane
- Sandpaper
- Mod Podge or Elmer’s Glue
- Epoxy Mixing Set with Cups and Mixing Sticks
- Instant Strong Super Glue
- Acrylic paint black and white
- Maya Gold
- Mirror Glass Nuggets
- Pebble Gravel
- Mica Flakes
- Glitter
- Natural Clear Quartz Crystal Tips
- Paint Brushes Set
- Mini Hot Melt Glue Gun
- Mini Hinge
- Nitrile Gloves
Step by Step Tutorial for Resin Geode Egg
Preparation
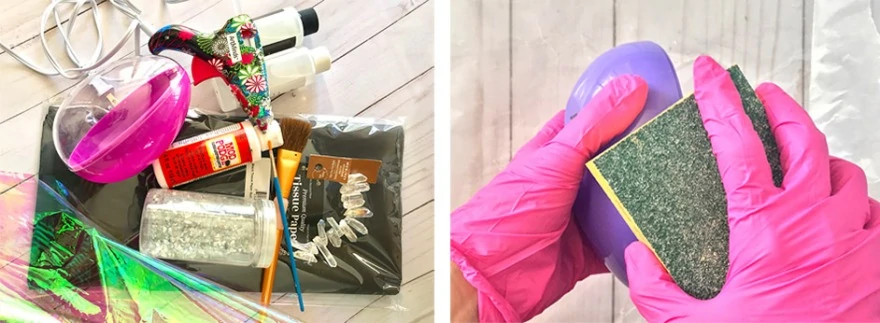
- Since this project will take a few days to complete, it is very helpful to use a small box or cardboard that is lined with Wax Paper. You can store eggs in it until it is finished. This makes it easier to move because wax paper doesn’t stick to objects. I always have a roll of wax paper at hand. I need the Sandpaper to grind the surfaces a little so that the resin or the materials adhere better to it. In general, it is highly recommended to always roughen the objects a little first when materials should stick to them. This helps ensure the items stick without any lifting. Don’t forget to give the inside of the egg a little sanding as well.
- One of my favorite materials is the use of Tissue Paper and Mod Podge. It can be used to create incredibly great textures. You can also use the simple white Elmer’s Glue mixed with some water. It gives you virtually the same effect as the Mod Podge.
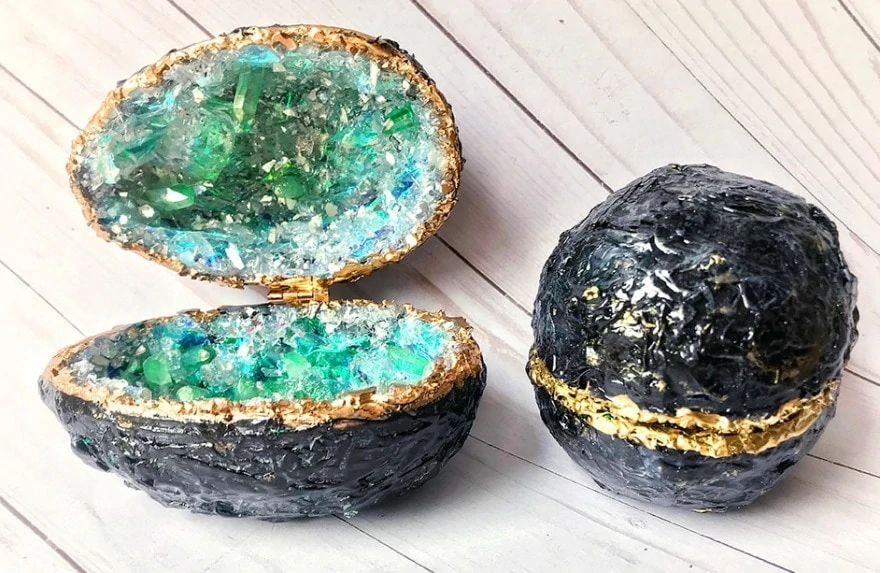
- Geodes come in a variety of colors and shades depending on where they are found. I decided to use Black Tissue Paper for my resin geodes egg because I wanted to achieve a dark look – similar to the geodes we find on the US East Coast. Of course, you can use any color of tissue paper, depending on the look you want to achieve. There are no limits to your imagination!
Structuring the Egg Outer Sides
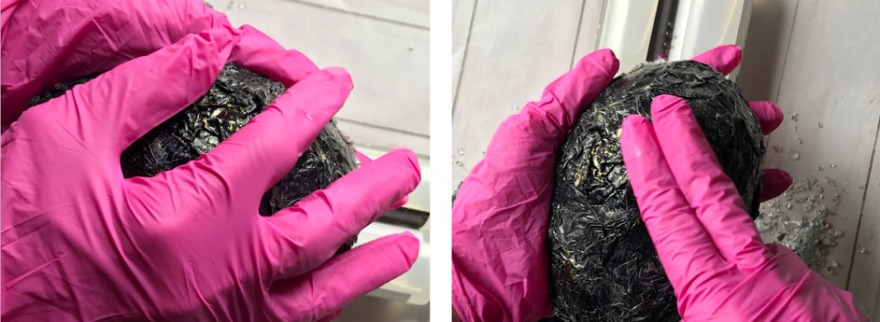
- Start by tearing the tissue paper into several pieces, and crumble them up a bit to wrinkle.

- Then paint each half of your Egg Blank on the outside with the Mod Podge using a paintbrush. Place pieces of crumpled up tissue paper over each half using your fingers to manipulate the paper to your desired dimension or texture. The best results are achieved by making two layers of tissue paper. If you feel that is not to your liking or not what you visioned you can simply keep adding more tissue paper and build up or shape to your liking.
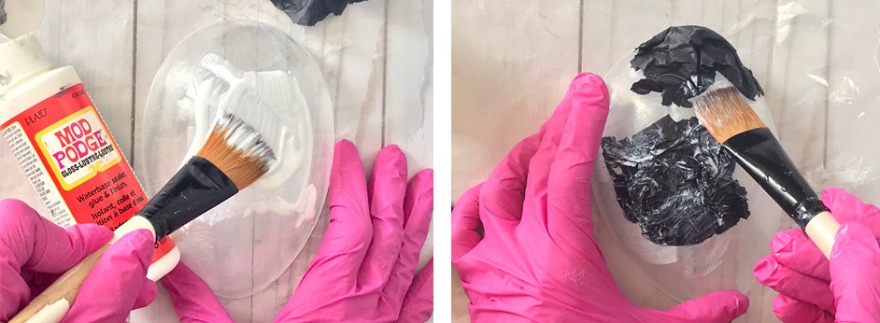
- Go with the tissue paper and the Mod Podge also a little over the edges of the egg halves. This is especially recommended for plastic egg blanks because the edges look less thin and more plastic. With eggs made of polystyrene, you can also do without it, because they already have a certain edge thickness. Excess tissue paper can be removed with scissors as soon as everything is completely dry.
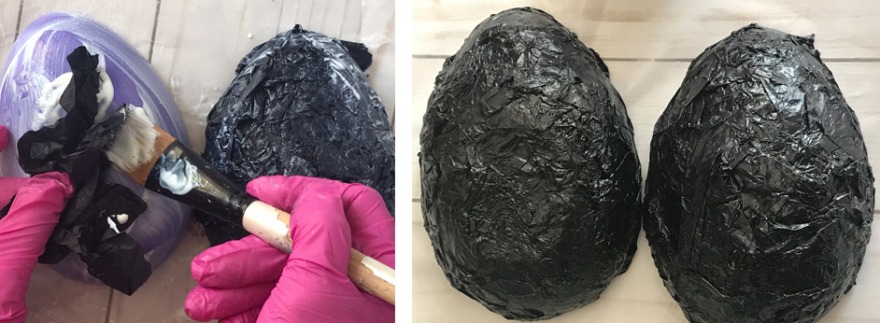
- For even more 3D effect and if it should look even more like stone, I mix white and black acrylic paint to the desired shade and paint the dry egg halves with a coarse brush rudimentarily. So the whole thing looks more plastic and you can give the cracks and columns more definition. Use a coarse brush for this process, otherwise, too much paint will be applied and the effect will not come into its own.
- In order to give the egg an even more noble appearance, I have added some highly pigmented Maya Gold with a small paintbrush. Alternatively, you can of course also apply golden or silver acrylic paint.

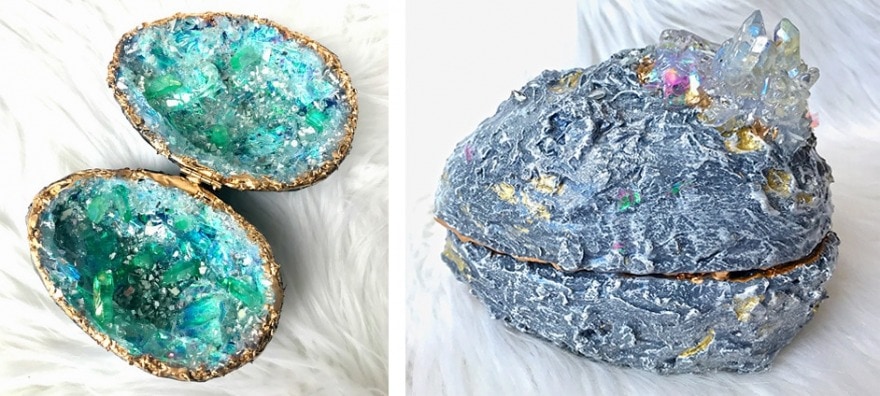
Designing the Egg Halves Inside
- If everything is well dried, you can turn to the inside. Paint the inside with dark acrylic paint. I chose black for my egg.
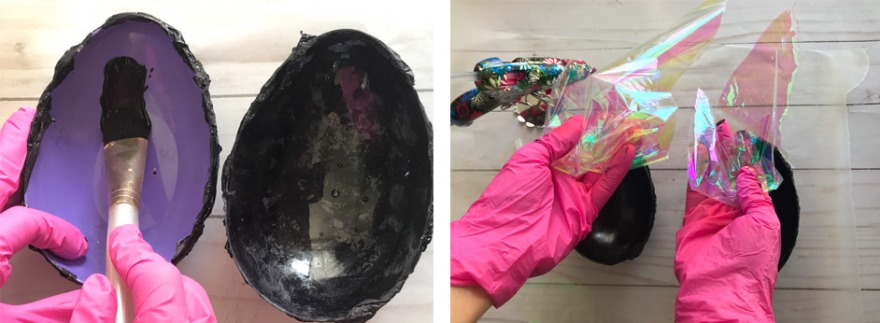
- Your regular Hot Glue Gun is your main tool for the step. Take a small piece of Iridescent Cellophane and crumple it like the tissue paper on the outside. Now use it to cover the bottom of your two egg halves by applying a few dots of hot glue to the inside. That doesn’t have to be perfect at all – the more wrinkles and creases your piece of iridescent cellophane has, the better and more natural it looks.


- Once that is set in place you’re going to want to get real messy with your hot glue and Glass Nuggets. Aimlessly shoot some hot glue all over the inside of the egg on top of your iridescent cellophane. Use plenty of hot glue – but make sure that the iridescent cellophane is not completely covered with the glue, so that the foil still shines through a little. Then you should quickly sprinkle the glass nuggets into the egg before the glue is solid. You can also add Pebble Gravel, Mica Flakes and Glitter instead of the glass nuggets and repeat the process as often as you like. Don’t worry if you have some glass or small pieces that are loose at the bottom and if you have exposed glue that will all we covered up on our last step. Even if the hot glue has pulled threads, this is no reason to worry, they will be removed later.
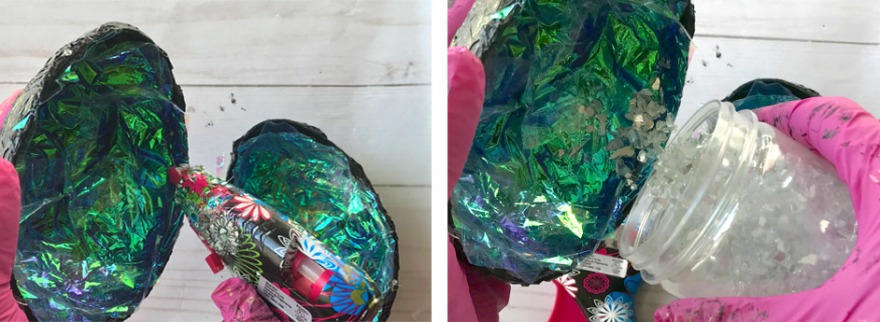
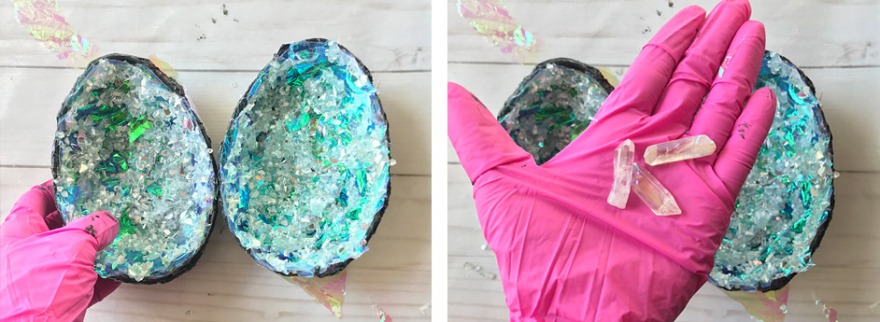
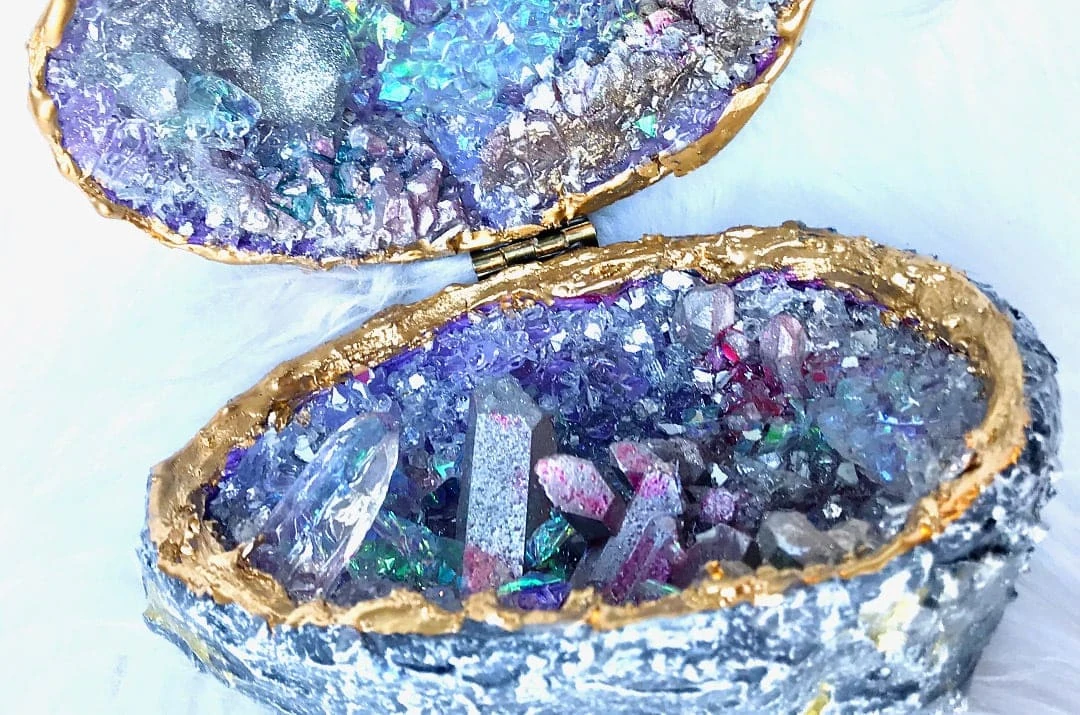
- For a particularly natural look, I recommend that you additionally glue in some real crystal tips. The best way to do this is to use the hot glue gun. So that the crystals do not slip and stand exactly as you want them, you should hold them until the hot glue has dried. This is the case with most hot melt adhesives within about 30 seconds to one minute. You can use glass crystals or real gems. Alternatively, you can create your own resin crystals from resin and silicone molds.
- During this step, you’re going to want to keep testing your egg by closing it together making sure you’re placing your crystals in spots that will not prevent your egg from closing.

- After arranging the inner life of the egg, you can use scissors and tweezers to start removing the glue threads, if any have formed. Make sure that no iridescent cellophane protrudes from the edges.
Finish the Outer Sides
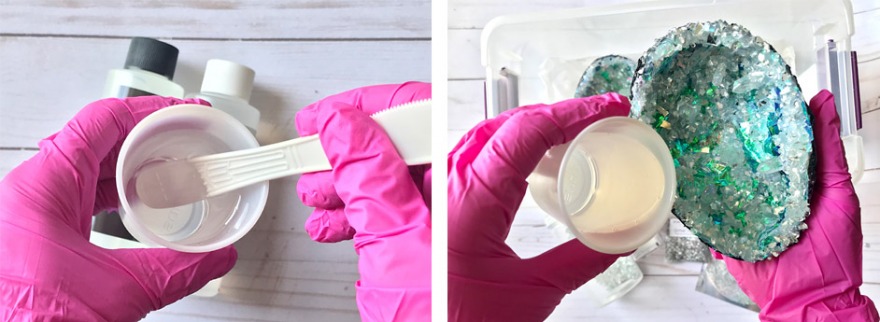
- Now that we have everything set in place we need to make it permanent using clear resin. You can use any resin you like, the important thing is that it is clear, high-quality resin. It is best to use a high-quality product such as ProArt Epoxy Resin. Cheap products may turn yellow or cloudy after curing.
- We will only need a tiny bit for this step just enough for a thin coat on the outside. Wearing Nitrile Gloves is an absolute must during this step (as always when working with resin). It is also recommended to wear respiratory protection.

- Pour or dab some of the resin over the inverted sides and rub and press it with your fingers or a spatula into the structure of the silk paper. Make sure that everything is completely covered with resin. Allow the halves to cure completely. For example, ArtResin is completely cured after 24 hours, for other products please follow the manufacturer’s instructions.
Seal Egg Inner Sides with Resin
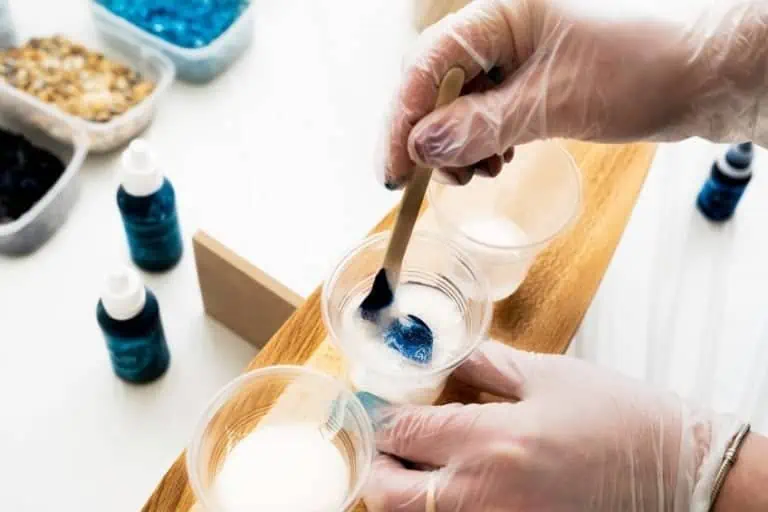
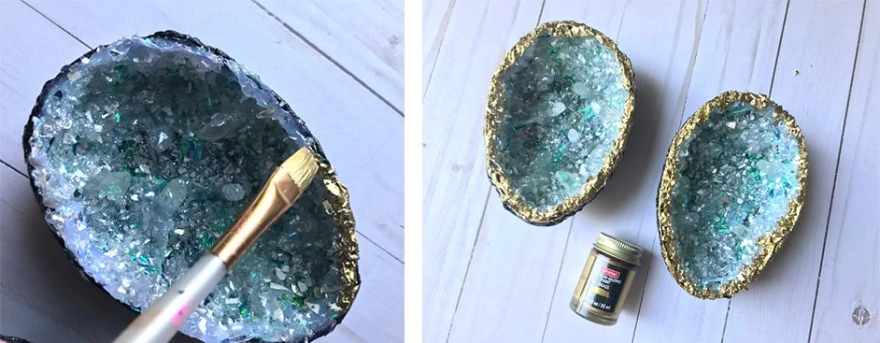
- Mix up a generous amount of resin. Enough to coat the inside of both halves, depending on the size of your egg. Better mix too much resin than too little resin. Now pour the resin carefully and evenly in a generous layer over the inside of the two egg halves.
- Make sure that the glass nuggets are covered with resin, but that the crystals are still clearly visible. Pour in as much resin as necessary, but as little as possible. It is not the end of the world if there is still some resin left on the shot and you have not used everything. Under no circumstances should you fill the egg completely with the resin, otherwise the natural geode effect will be gone.
- You can also add some of the glass nuggets and glitter after the resin has been poured in. Alternatively, you can mix the glitter directly into the clear resin. But be rather sparing with the glitter, so that not all stones and crystals are completely covered with it and therefore no longer come into their own. Less is more here! I used silver glitter and sprinkled that over the whole two half before letting it dry.
- Keep the halves slightly in motion during the drying process so that there is no accumulation of resin in the middle. Now let the two halves harden completely.

Finishing the Edges
- I used Maya gold to refine the egg edges. Of course, you can also paint the edges with gold or silver acrylic paint. It gives a nice pop.
Attaching the Hinge
- I would say the hinge is the trickiest part of this project. For this part, you’re going to need to prop the egg in place in an awkward position. I used a few rags and laid a piece of wax paper over them. I placed the egg on top matching my sides to my liking.
- Dab a small amount of regular Super Glue on each side and place the Hinge on top. Like I said this is the hard part so have some patients with this. Definitely the easiest way is to have one or two helping hands for this procedure 🙂
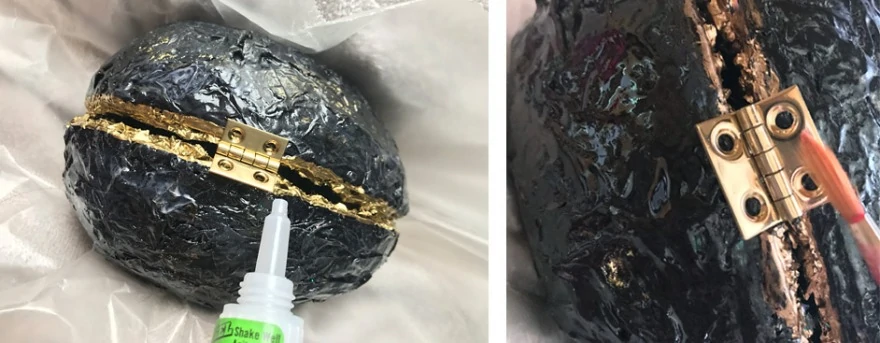
- As soon as the superglue is dry, use a small thin paintbrush and a tiny amount of resin and paint the hinge in place. You have to be real careful not to get any resin on the middle of the mechanism that allows the hinge to open and close. If by accident you have gotten a little in the middle take a Q-tip and some acetone nail polish remover and carefully swipe anything that may have gotten inside that mechanism.
- It is best to repeat this step after 24 hours – the more resin layers above the hinge the more stable the whole thing. It is definitely worth doing this so that you can enjoy your resin geode egg for as long as possible.
You are also addicted to geodes and want to know how to create a resin geode in a free form? We have written an extra article about this: Resin Geode Art DIY. If you generally want to know more about Resin Art Supplies, we also have a separate blog post for it. If you like to work with wood, you’ll find a tutorial about Epoxy resin for wood and about creating an epoxy resin river table.

Danielle Desantis is a mixed media / assemblage artist living on the US East Coast. She was born and raised on beautiful Long Island, New York. Since Danielle often finds it difficult to sit still, she has always filled her free time with an artistic hobby. Besides art, her great passion is collecting various unique objects. Thanks to her curiosity, Danielle is always trying new things in her art. A big theme in her artistic work is, among other things, working with resin. Most of her ideas are inspired by music, movies and other artists. A lot of what Danielle does is artistic experimentation. She wants to give the viewer of her art the feeling of a visual journey – a journey through a magical treasure chest of past and present.
Learn more about Danielle Desantis.