How to Draw Human Proportions – Scale the Figure Correctly
This post may contain affiliate links. We may earn a small commission from purchases made through them, at no additional cost to you.
Human body proportions are fascinating to depict since bodies vary in height, breadth, and ape index. Despite individual differences, there is a broad rule of thumb regarding human proportions, but it may be modified to fit particular human figures. Drawing the human figure in its proper human body proportions can be a simple process and a useful skill, because if you can comprehend how to replicate human body proportions, you can alter and adjust the factors to generate a variety of body forms. In this human body drawing tutorial, we shall demonstrate how to achieve the correct proportions of both the male and female figures.
Our Tutorial on Accurately Drawing Body Proportions
Figuring out the correct human body proportions with an easy-to-follow body sketch is a straightforward exercise that can be fairly enjoyable if you begin to comprehend and accurately capture the proportions. When you understand how the human figure is scaled in its many components, it opens up a world of possibilities for people drawing. Human anatomy drawing might appear complex at first, but it is relatively simple if broken down into its diagrammatical form.
Working with simple measurements and lines can assist you in precisely creating the human body drawing, which can then be modified and tweaked to your taste. In this lesson, we will sketch a general male and female body drawing to define the main scaling guidelines for each individual type of body. Using this knowledge as a human proportion drawing reference will allow you to generate a variety of body forms, making the task of drawing humans a bit simpler.

Instructions for Drawing Human Body Proportions
In this guide to human proportions drawing, we will begin by looking at how to create the male body drawing and figuring out the proper proportions. We will then repeat the process for female body proportions, concentrating on how they are developed.
We may then draw a comparison of the male and female bodies to illustrate how different sizes and shapes can be produced and contrasted with one another.
By doing so, we may compare our human proportions drawings and understand how to scale the female to the male body. That being stated, let’s get started with these people drawing tutorial’s steps, and you will have your own human drawing in no time.
How to Create a Male Body Sketch
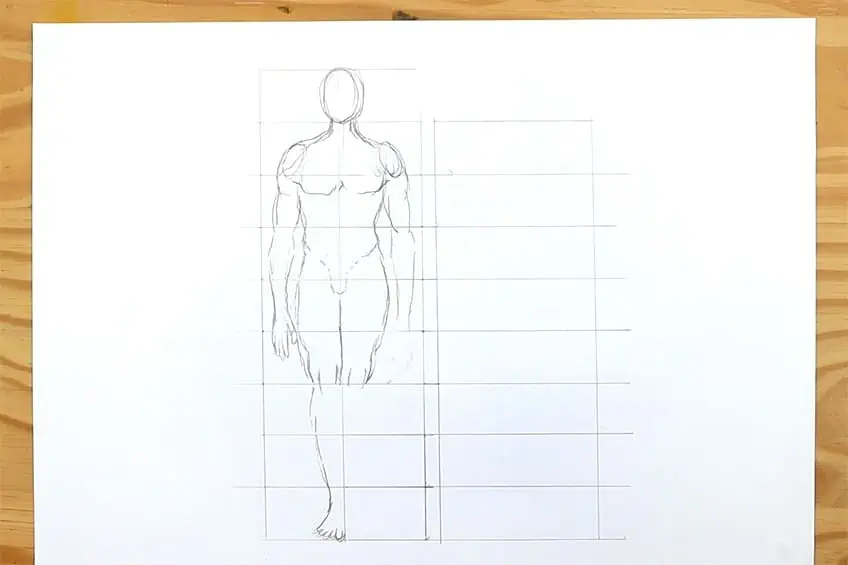
We’ll begin with a male body sketch to practice the overall concept of generating a figure of a man using a grid subdivided into eight equal pieces. This will be the guide to assist us in drawing both female and male human forms appropriately. We’ll use the grid to determine how tall and broad we want our human figures to be.
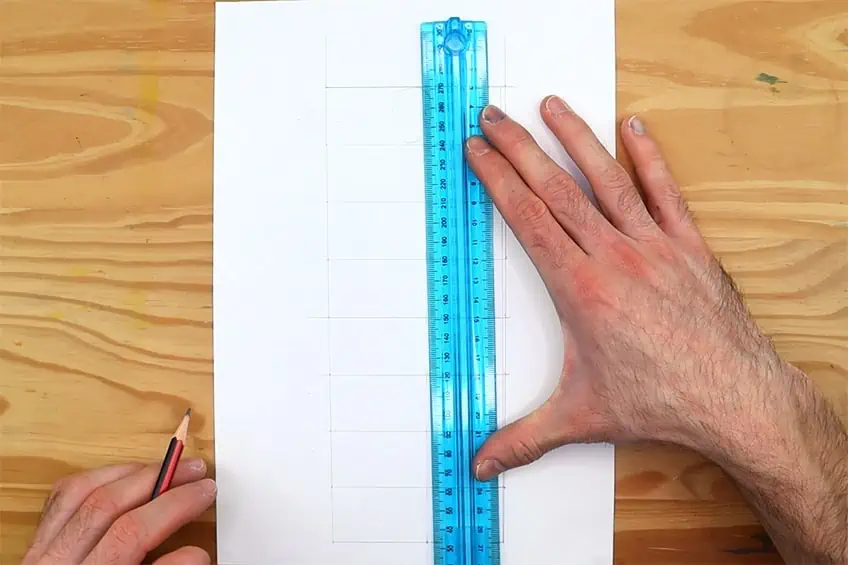
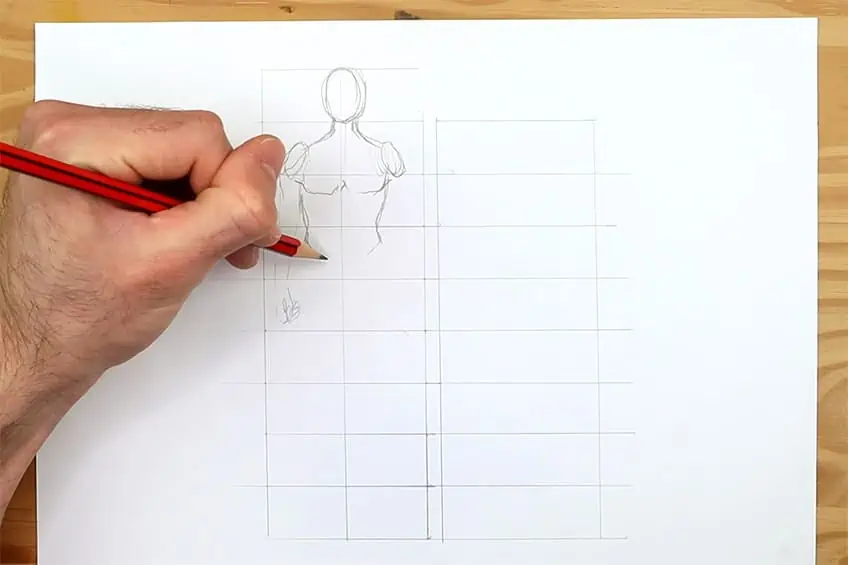
Step 1: Grid Creation
We can start by designing a vertical grid with two columns and eight rows. A vertical line will run down the middle of the grid, cutting the grid of eight rows in half, leaving us with 16 blocks. The grid may be as broad as you want it to be and as long as you want it to be. However, try to keep the columns and the rows the same width and height. With this method, we’ll be able to sketch our human figures as properly and symmetrically as possible.
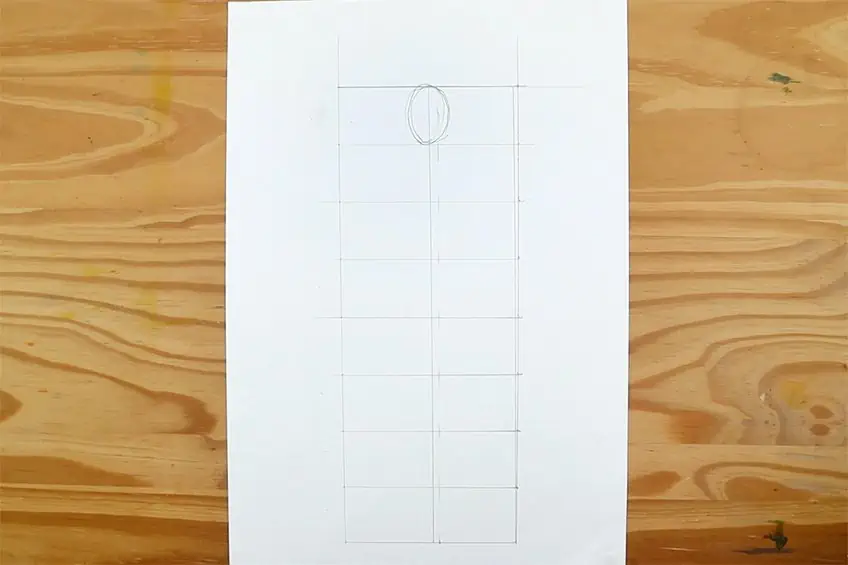
Step 2: Creating the Human Figure’s Upper Section
After we’ve built our grid, we can start with the head in the initial row at the top of the page. The center of the vertical line dividing the columns into two columns ought to be where the head should be placed. We would like to depict each bodily component equally. As we make our way down the body, we should do this on either side of the column.
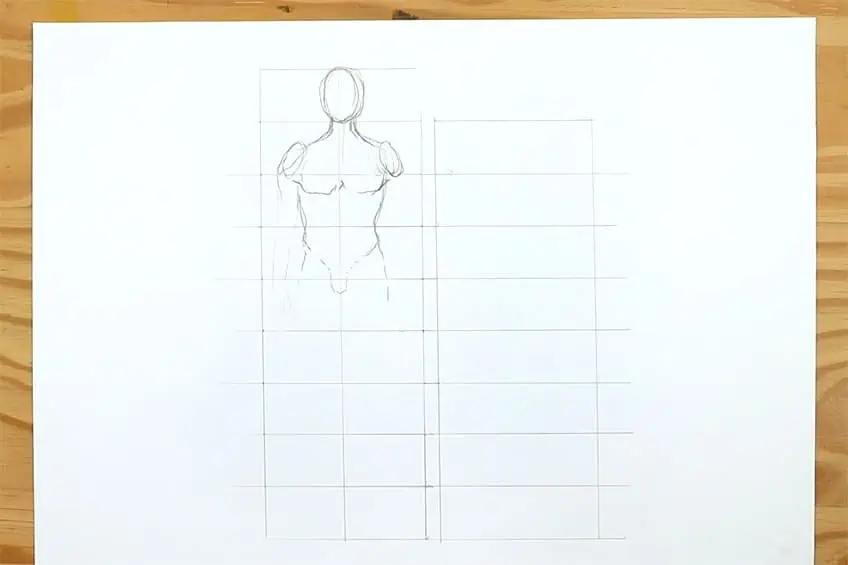
We may then begin working down the various rows, drawing the shoulder and chest. The lower chest stretches somewhat into the third row, where the ribs will be sketched. We may begin to sketch the hips of the human form at the bottom of the third column.
Step 3: Creating the Human Figure’s Mid-Section
The navel is located in the crotch and groin areas of the body between the fourth and fifth rows. We wish our hips to flow as symmetrically as possible towards the upper thigh area. Spend some time methodically working your way through the parts, modifying and fixing the form as you go.
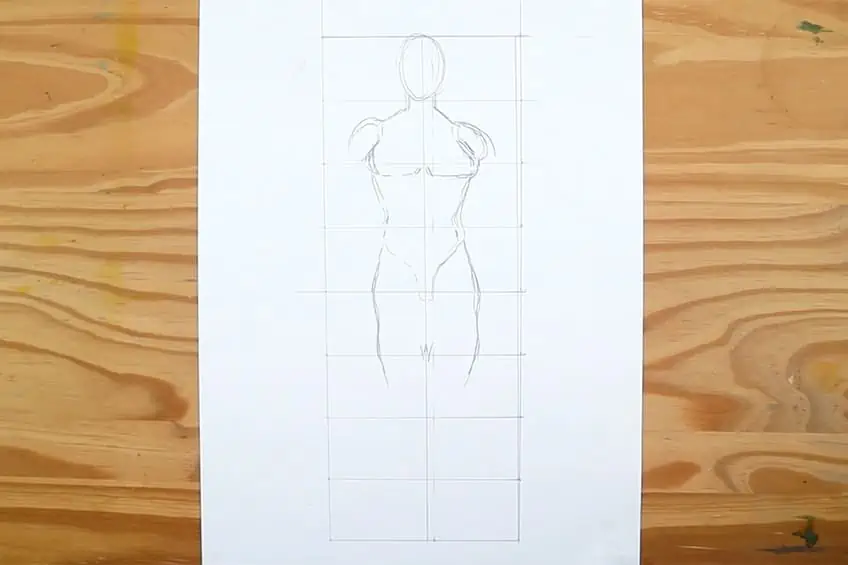
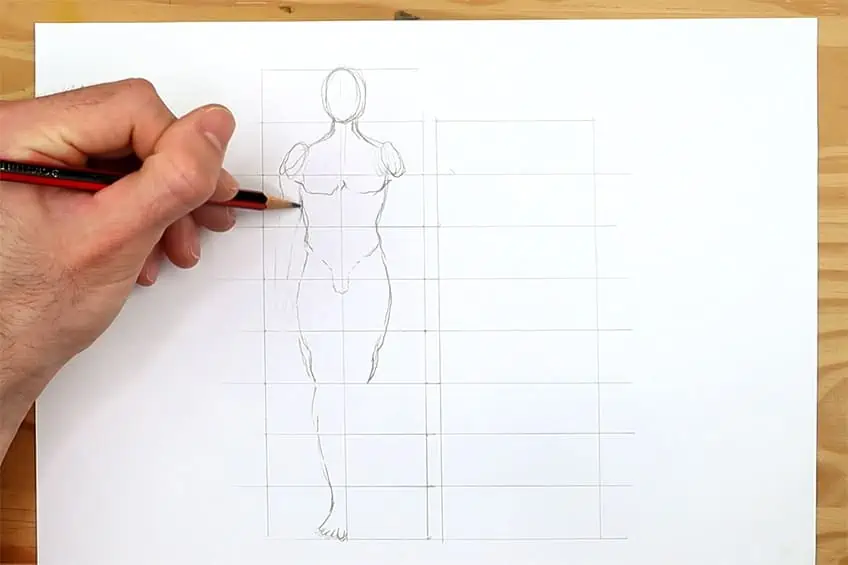
Step 4: Creating the Lower Section
From row five to row six, the hips of the figure should flow into the upper knee area. Knees should be located between the sixth and seventh rows. This indicates that the upper thigh should be placed between the fifth and sixth rows, while the knees should be painted between both the sixth and seventh.
After that, the shins will move from the seventh row into the eighth, where the foot and ankle will be created.
Step 5: Creating the Arms of the Figure
The arms should be drawn last, since they function as a distinct part and should be positioned in relation to the position of the thighs. The arms begin with the shoulder in the second row and conclude with the hands at the bottom of the torso. In the sixth row, next to the upper thigh, they come to a stop.

The length of the other arm may then be determined by comparing it to the first arm you sketched. The vertical line in the grid’s middle may be used to guide you in placing the various body components so that your figure is as symmetrical as possible.
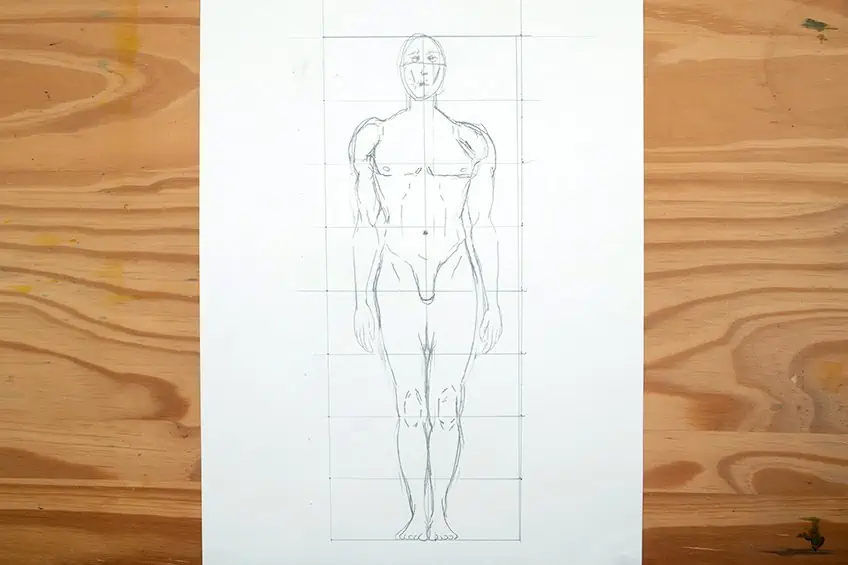
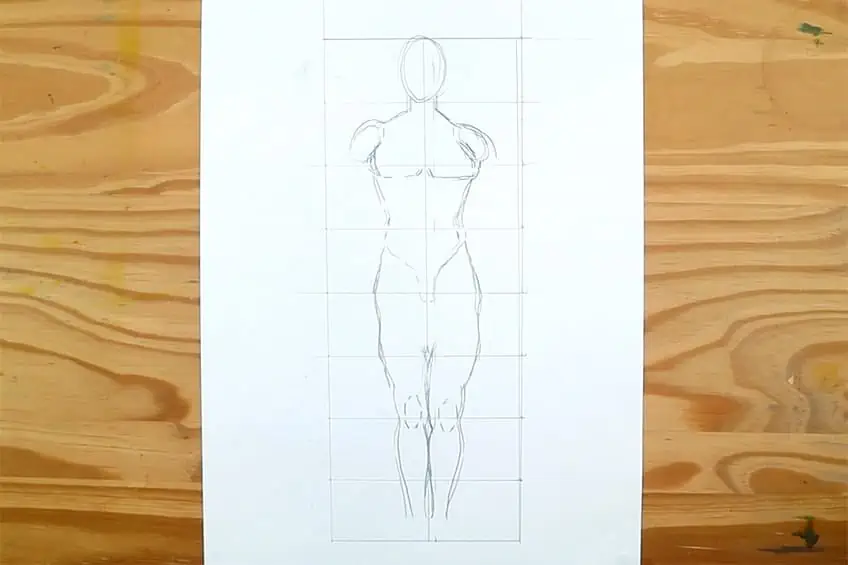
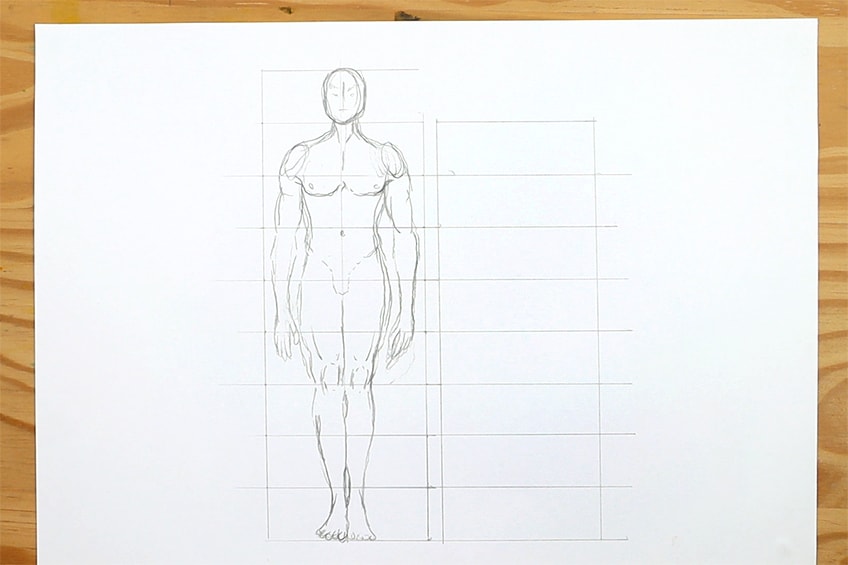
That is how you depict a man’s body correctly. Keep in mind that the height of the eight rows should be identical; the height is based on the scale of the head. The head defines the length of the rows, and this is known as the rule of the head. The body is then divided into eight equal portions, each measuring the size of the head.
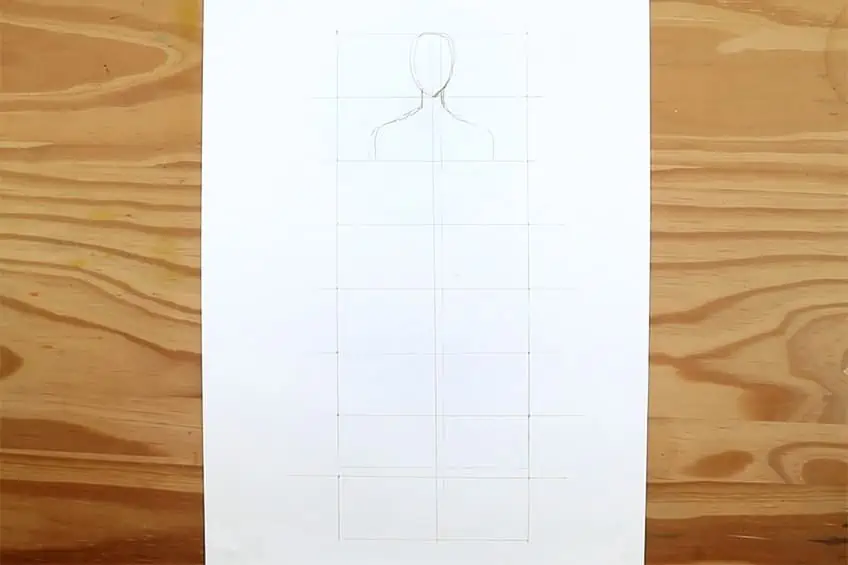
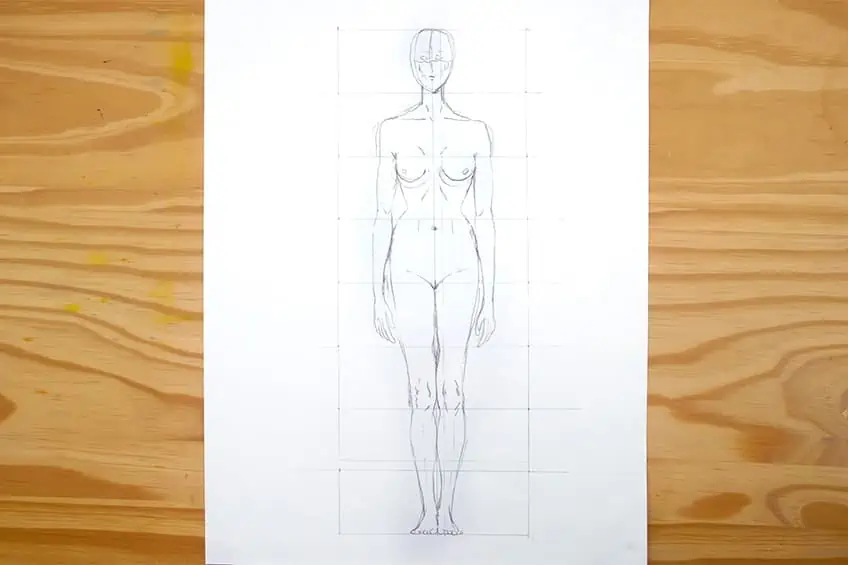
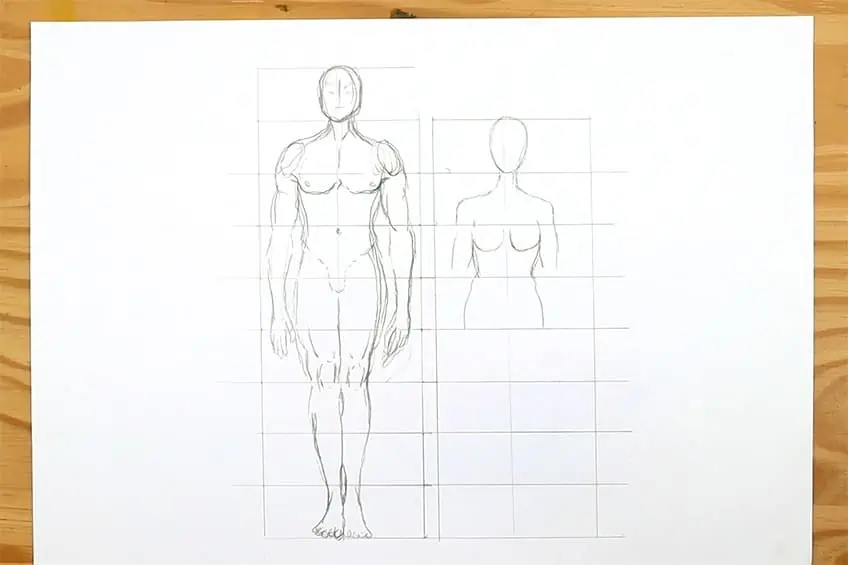
How to Create a Female Body Sketch
Since the procedure is precisely the same for the female body, we can now adapt it to the grid structure of the female body. The height of each row, which will be separated into eight segments, will be determined using the rule of the head.
From there, a vertical line will be used to divide the grid in half, resulting in a row of 16 blocks.
Step 1: Grid Creation
The same approach we did with the male body sketch is where we want to start. We will draw a grid to aid us in sketching a human body precisely. Just as you did for the male body sketch, create the grid using a pencil and ruler. Eight rows should be evenly split along the center by a vertical line.
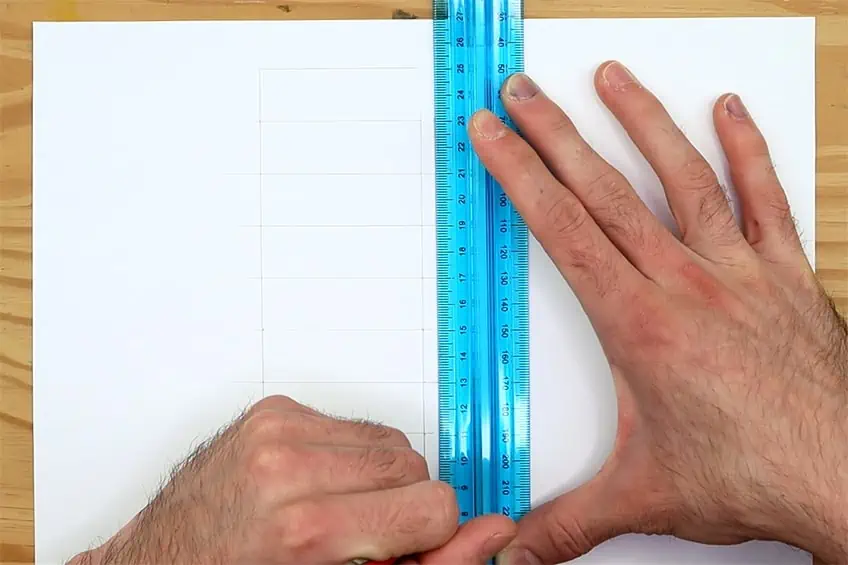
The eight rows should be split into two columns, creating 16 equal blocks. We will next go on to apply the body components, beginning with the head. Keep in mind that the head serves as the height guideline for each row and fills the height of a row.
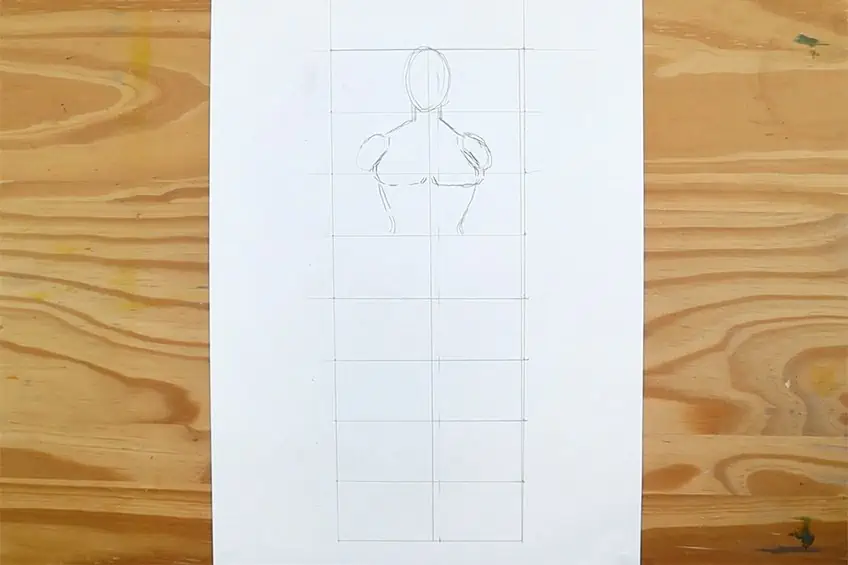
Step 2: Creating the Female Figure’s Upper Part
We can now draw the shape of the head in the first row by placing it in the middle of the vertical line separating the two columns. To ensure that the head fills the entire height of the row, we must draw it large enough. The shoulders can also start to be drawn into the second row.
We may repeat the procedure we used for the male body this time, but we want to make absolutely sure that we position the breasts properly for the female form. We want to go for symmetry in the chest and shoulders, which means the breasts will tuck somewhat into the third row. The hips and navel area can then be located in the top half of the fourth row.
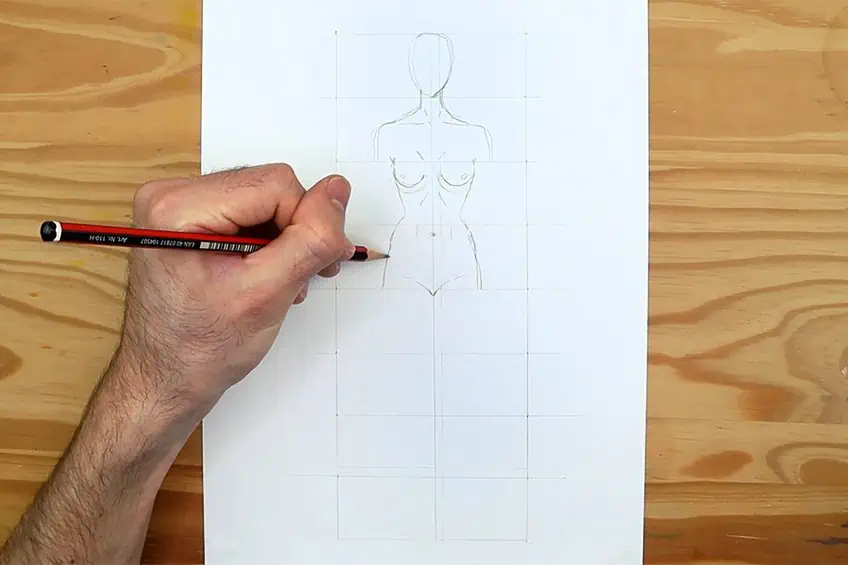
Step 3: Creating the Female Figure’s Middle Section
The navel may be drawn in the top portion of the fourth row as we continue to draw, making our way across the human body. Creating the hips in the fourth row, and the crotch on the lower line of the fourth row, will allow us to move down from there. To maintain symmetry in the hips, the crotch is positioned in the middle, exactly on the vertical line.
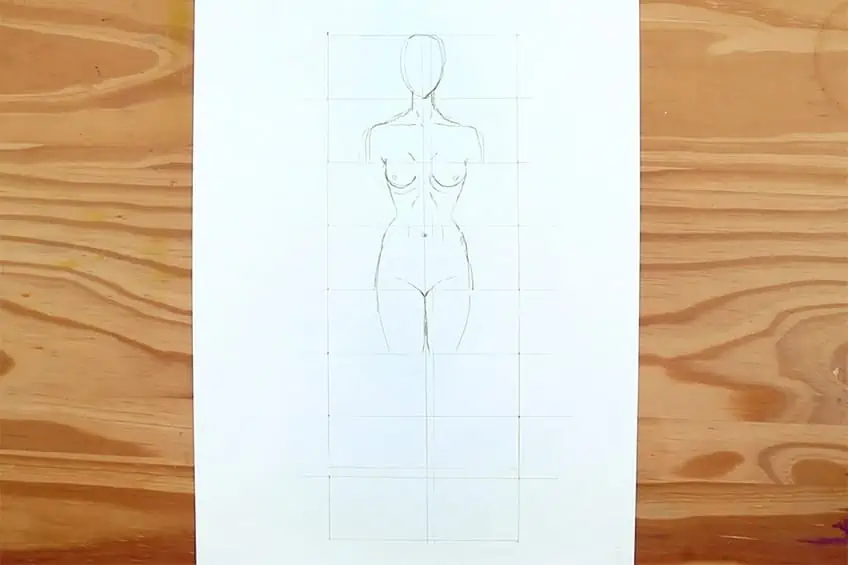
Step 4: Creating the Female Figure’s Lower Section
For our female sketch, we wish to imitate the male body drawing. The same procedure is used, but this time, we want to emphasize some elements while softening others. The knees and lower thighs region may be included in the sixth row of the grid as you move down to the bottom half.
Use the same method you used for the male body drawing as you proceed to add the remaining legs. From the seventh row to the eighth row, where the feet and ankles would be put, you may proceed to sketch the feet and shins.
Then, beginning from the second row once more, you may begin to add the arms, with the hands approaching the fifth row towards the thighs.

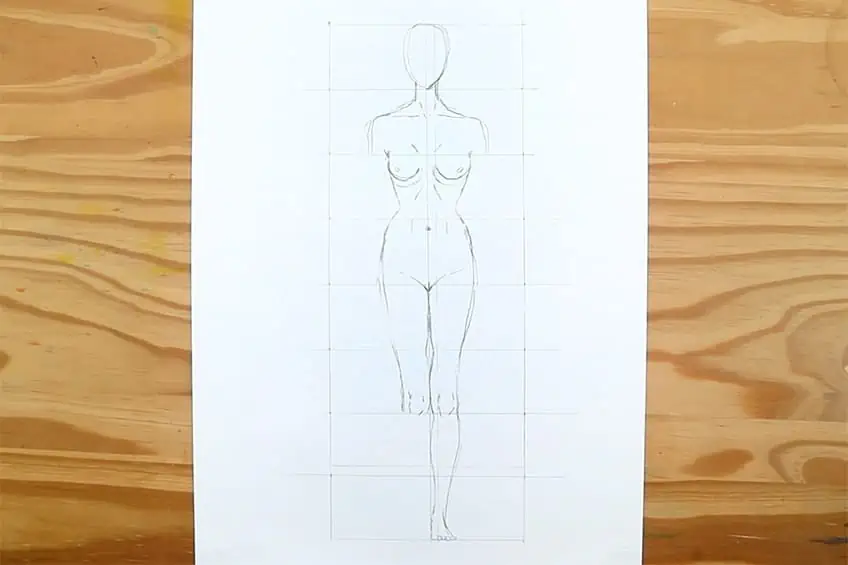
Step 5: Creating the Arms
You can permit yourself to make any necessary adjustments when you design the female figure’s arms. Keep in mind that the shoulders should land near the upper thigh region in the fifth row after the arms begin in the second row. Use your erasers and pencils to make any necessary adjustments.
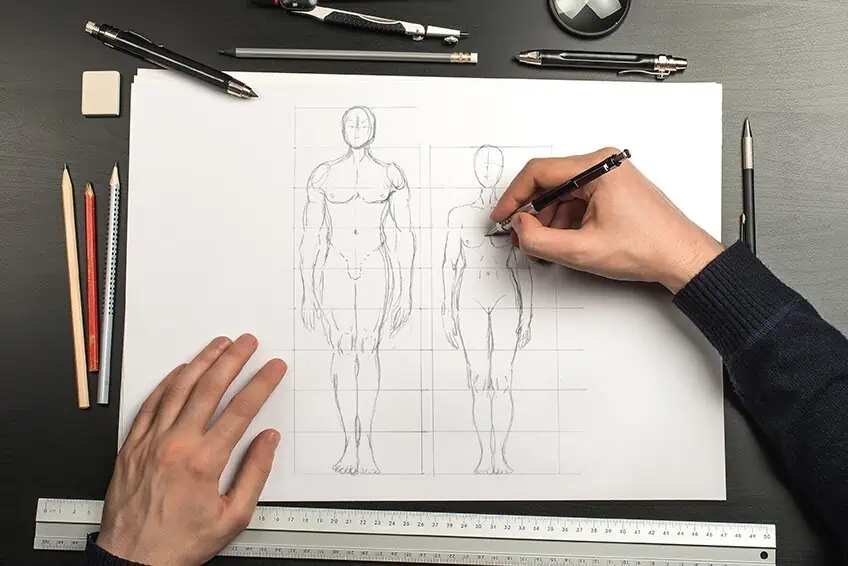
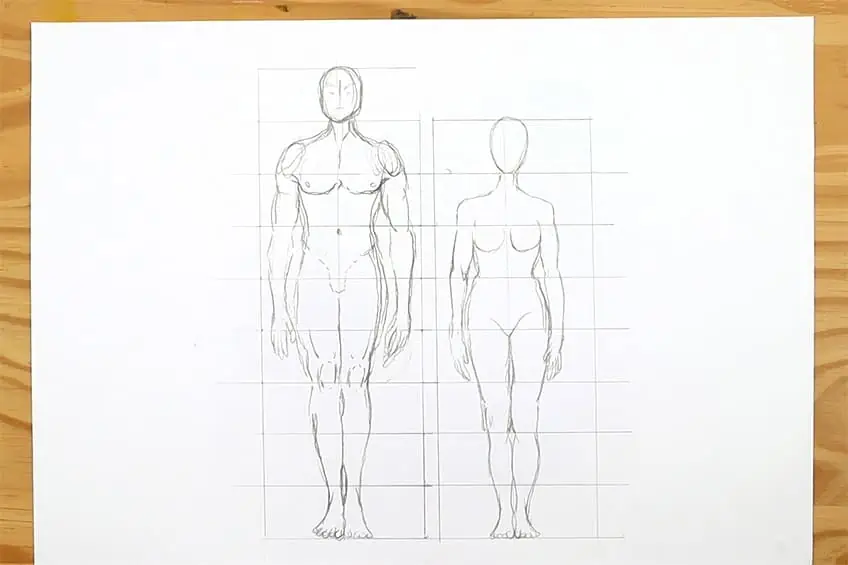
Drawing Humans in the Correct Scale
Now that we know how to draw each form, we can look at how to depict them together to show how the male and female human figures differ from each other. Men and women are depicted alongside to show how they might interact in the same area. Drawing both female and male figures in a variety of artworks requires this ability.
Let’s examine the different steps.
Step 1: Grid Creation
Once again, we will create a grid, in which the masculine body will be drawn. For the male figure, we can construct nine rows as opposed to eight. The grid will continue to have two columns. For the male body sketching grid, we will just be inserting a new row this time.

Then, exactly next to the nine-row grid, we may draw a second grid with eight rows and two columns. Since the foot positioning will be obvious from the bottom row, we may begin them both there.
The inclusion of a ninth row for the male figure will allow it to appear taller in relation to the female form.
Step 2: Creating the Male Human Figure
You can continue to create this male form in the same manner as you did with the male body sketch in the tutorial’s initial level. Starting with the head in the middle of the first row from the top, we may go on to the shoulders in the second row. The torso will flow from the third to the fourth row, with the chest falling in the second row as well.
Once more, the crotch region will be shown in the same location, which is between the fourth and higher fifth rows. We begin to depict the hips in the fifth row, which run into the upper thigh region in the sixth row of the grid.
Step 3: Lengthening the Male’s Legs
The only small modification we will do is lengthen the legs slightly to create a difference in height between the heads. The thighs can therefore go from the fifth to the sixth row in this manner. The figure will otherwise be just how you designed it earlier in the tutorial.
Simply altering figures in this way will give them height.
The knees will be located in the sixth and seventh rows when you sketch the legs, and the calves and shin areas will also move a bit more freely. The final row, in this instance, the ninth row, will still have the ankles and feet. The hands will continue to rest between the fifth and sixth rows, just adjacent to the thighs.
Different body shapes have shorter upper bodies and longer legs than others. It may be entirely up to you how to figure out how to lengthen or heighten specific body parts. The height of a figure may also be changed by altering your grid. Alternately, you may make the torso longer and the legs shorter; nevertheless, you need to experiment and look into this.
Step 4: Creating the Female Body Sketch to Scale
Now that the male body drawing is in the grid, we can create the female figure next to it. The typical approach of eight rows can be used to create the feminine form. We may do this simply to show how the form will now be proportioned next to the male figure. This informs you on how to alter the proportions of a man’s and woman’s bodies.
We can observe how the female figure begins to become appropriately reduced in size as you go with drawing the female form normally inside the eight rows, following the rule of the head. This method scales the human figures realistically in relation to one another.
We can observe that the male figure is noticeably taller than the female figure as you continue to depict her.
Creating the eight-row grid for both male and female figures is another approach to depicting them side by side. Having said that, you can slightly reduce each row’s height for the female’s grid.
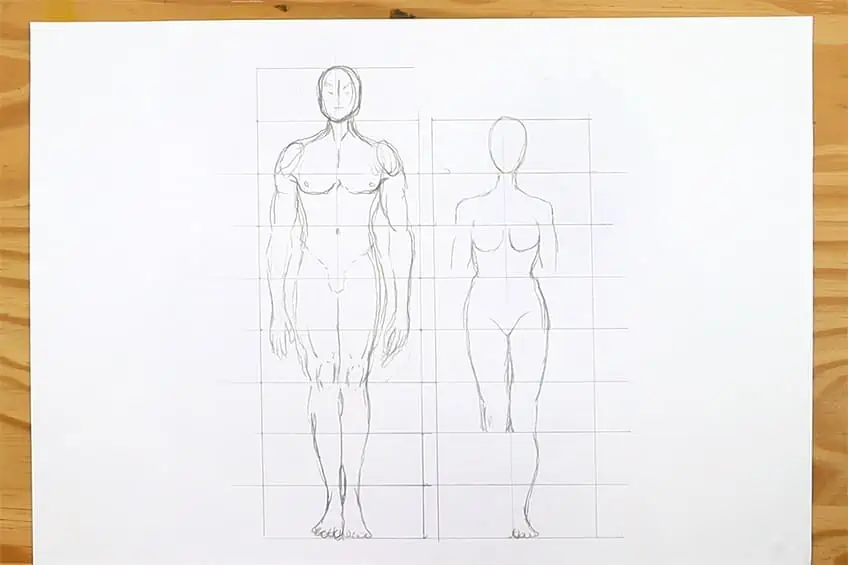
This is only one method of comparing the male and female body sizes. This method can also be used to make a figure taller and is applicable to both male and female bodies. Once more, these sketching techniques are interchangeable and may be used for both the female and male models if you need to make them shorter.
However, this is only one particular method for changing the heights of figures; you may also employ the standard eight-row approach by reducing the rows for the female or male to change the appearance of height and weight. This is the main procedure for sketching human proportions correctly.
Try out different heights; as each row is the height of the head, you’ll end up with a picture of a human figure that seems believable.

Useful Tips
- Ensure symmetry. Make your human form as symmetrical as you can by following the rules.
- Play about with scale. Allow yourself to explore after you have a fundamental understanding of how human body proportions work.
- Give it some time. Be sure to plan out each step carefully and as accurately as you can while creating a human anatomy picture.
- Make sure you continue to practice; painting is a skill that requires regular practice.
- Above all, take pleasure in the process. It’s entertaining to learn how to sketch human proportions, and it may enhance many other types of artworks.
- The height of the rows is established by the head. Every row should be the same height as the head, and the head should always occupy the height of the row.
Learning how to create a comparative female and male body drawing is a useful activity that shows you how to judge width and height in their generic frameworks for both the female and male bodies. Furthermore, types of bodies differ in a variety of ways; yet, knowing the general process of drawing the bodies means that we can adjust them in a variety of ways to produce distinct body variants for both female and male human anatomy drawings.
Frequently Asked Questions
Is Drawing Body Proportions Hard?
When creating a human body drawing, it can seem like a complex undertaking. However, producing people drawings can be a straightforward process once you know how to do it. Human anatomy drawing just requires a grid and some time to perfect the body proportions. Creating human drawings can be both fun and educational.
What Are Some Tips for Creating Accurate Body Sketches?
The scale of the rows in the grid is dictated by the size of the head. Every row should be the same height as the head. Experiment with different scales. Allow yourself to experiment once you’ve grasped the fundamentals of human body proportions. Take time with your human drawings, there is no rush to finish them.

Matthew Matthysen is a multidisciplinary artist. He completed his fine art degree, majoring in History of Art and Contemporary Drawing Practice at the University of Witwatersrand, South Africa. Before joining acrylgiessen In 2020, Matthew worked part-time as an art teacher at Reddford Blue Hills High school. Matthew creates drawing and painting tutorials for acrylgiessen and captures them not only photographically and in written form. He also records the creation of his works in his own creative studio as in video format, from which later with a voiceover and a video editor also drawing tutorials for the Youtube channel of acrylgiessen are created.
Learn more about Matthew Matthysen and about acrylgiessen.