How to Mix Watercolors – A Guide to Easy Watercolor Mixing Techniques
This post may contain affiliate links. We may earn a small commission from purchases made through them, at no additional cost to you.
Learning how to mix watercolors is a great way to grasp the medium and its potential for color variation. Often, we think we need all the colors to be available to us for us to create bright and colorful paintings. However, learning how to mix watercolors helps you to gain confidence in making new colors out of the colors that are currently available to you. Many watercolor mixing recipes help to define the variations of a single color. However, this tutorial will teach you how to create a color chart that details different color variations made from a single set of pan watercolors.
An Easy Guide to Mixing Watercolors
There are various ways to achieve new colors simply by learning how to mix watercolors. If we consider a watercolor blue that is mixed with an array of other colors, we will find that the potential to create variations of that watercolor blue is possible. The same can be said for all colors. Learning how to make grey watercolor or different types of colors that are not available in a watercolor set can often be achieved through mixing. This tutorial will show how making a color chart helps to understand the full watercolor mixing palette available to you within the paint set you currently have. Let us see what materials we will need.

Necessary Materials
When learning how to mix watercolors, we want to make sure we have some good quality paper. A good paper will help us to get the proper watercolor mixing palette displayed on the paper as it absorbs the color correctly. Try to purchase paper that is 300 GSM in thickness. This will absorb the color nicely and will give an accurate description of the color.
Watercolor mixing also requires a good watercolor brush, perhaps try to purchase a flat brush as we will be making little blocks of color.
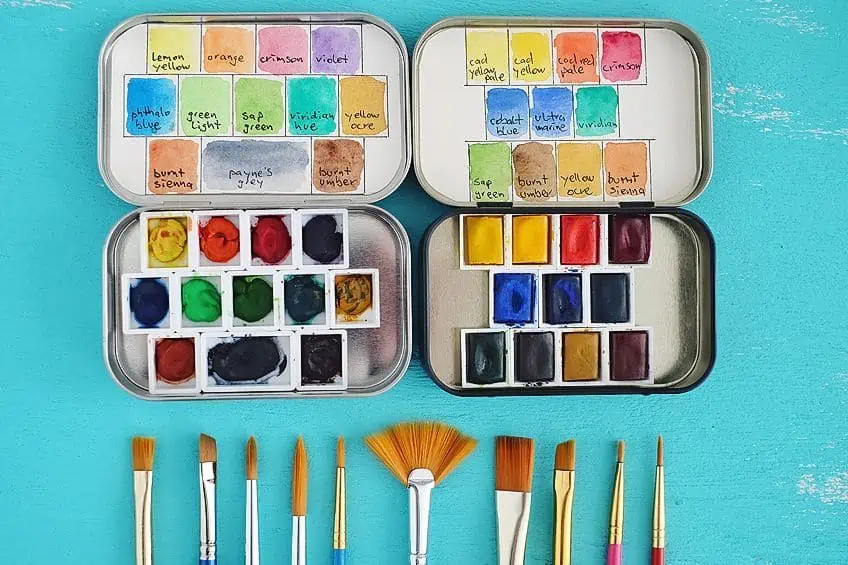
Most important is a good set of pan paints, try to get a good quality set of pan watercolors. Lastly, we will want to make sure we have some scotch tape to secure our page on our surface as well as two jars of water for cleaning our brushes. Below is a list of suggested items that you can purchase online:
How to Make a Watercolor Color Chart
Learning how to mix watercolors can be understood through various methods of color combining or watercolor mixing recipes. However, making a color chart is the most insightful and helpful way to understand various watercolor variations. What we will be doing in this tutorial is using all colors in our watercolor set to create a grid. This grid will display all the colors moving down a vertical axis as well as moving along a horizontal axis. We will make a series of 2cm x 2cm blocks based on the number of paint colors in your watercolor set.
These blocks will move along both the horizontal and vertical axis. We will have a large grid of 2cm x 2cm blocks which we will then proceed to mix paint combinations within. This combination of paint will be determined by the colors that intersect from the horizontal and vertical axis. With everything ready, let us go through the different instructions of this tutorial.
Preparation
As we learn how to mix watercolors you will find that the process is really simple and easy. Making a color chart is the best way to learn a watercolor mixing palette and how different colors work with each other. This tutorial will give you a good understanding of defining your watercolor mixing recipes by playing around with ratios of different colors. As we learn how to mix watercolors, we want to delegate a good portion of time to the exercise, so try to set aside a good portion of time to go through this tutorial without feeling rushed.
Lastly, watercolor mixing is a very peaceful process and does not require an intense focus so try to have fun by listening to music or perhaps a podcast whilst you go through this tutorial.
Making a Grid
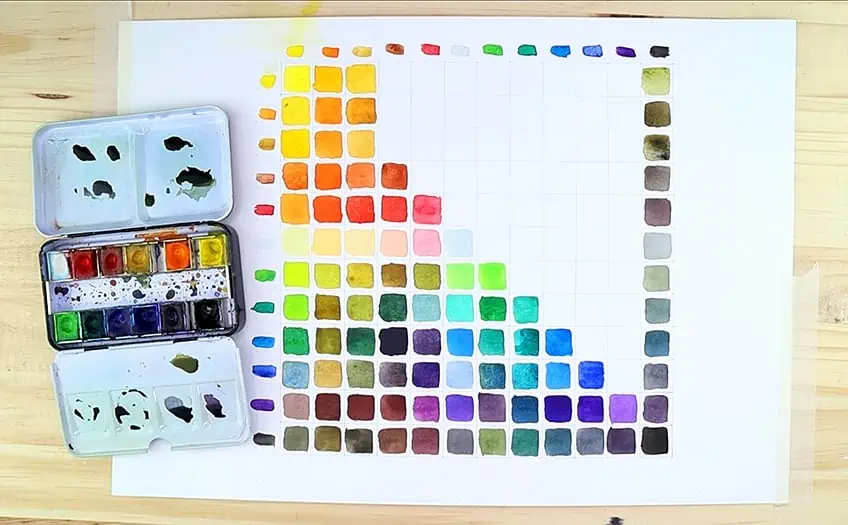
We first want to count how many colors are in our paint set. Usually, if you are using pan paints, they generally come in 12 colors. There should be six colors of paint in each row of your pan paint set. If we have 12 paints, we will make 12 columns vertically and horizontally. This should result in a series of 144 blocks. In this tutorial, we will be using a set of 12 colors as we will be making a 12 x 12 column grid. We can begin by taking an HB pencil and proceed to measure 2cm increments along a vertical and horizontal axis. Since we are using 12 colors, an easier way to build this grid is by drawing a 24cm x 24cm square on your page.
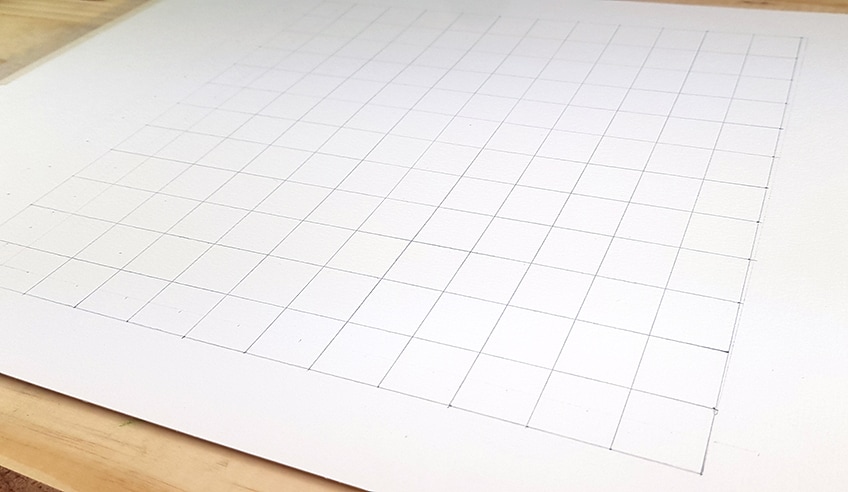
Then for every second centimeter, you will make a mark on your page along both the vertical and horizontal axis. We should be left with 12 columns both horizontally and vertically. Again, for clarification, draw a 24cm x 24cm square. Then make a little dot on every second-centimeter mark of your ruler along the vertical and horizontal lines of your square. We then simply connect those donuts with vertical and horizontal lines.
We should be left with 12 columns both horizontally and vertically in our square with 144 blocks.
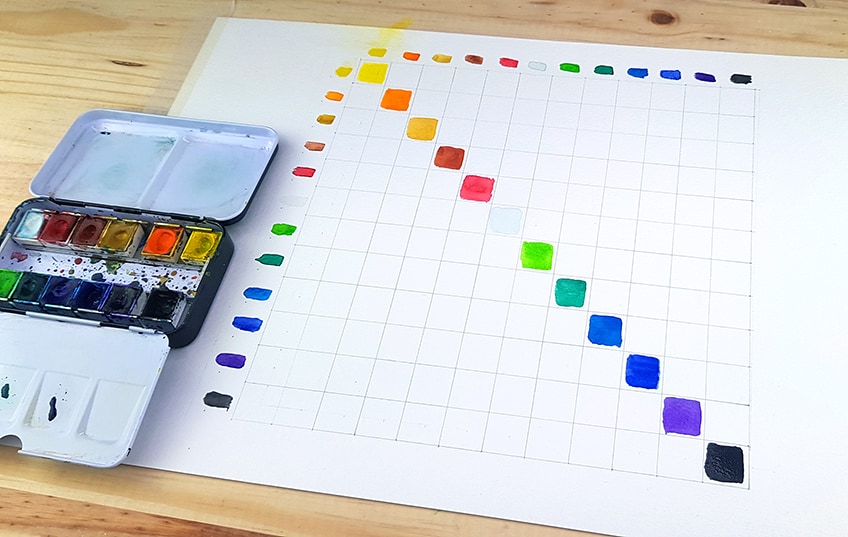
Marking Our Vertical and Horizontal Axis With Our Colors
We will now represent each column on our grid with color. As you observe the colors in your paint set you should see 12 different colors. Along the sides of the horizontal and vertical axis, you will make a little mark of paint on the outside of the grid. This will represent the color of each column of both the vertical and horizontal axis. Try to apply the colors in the same sequence along both sides of the grid.
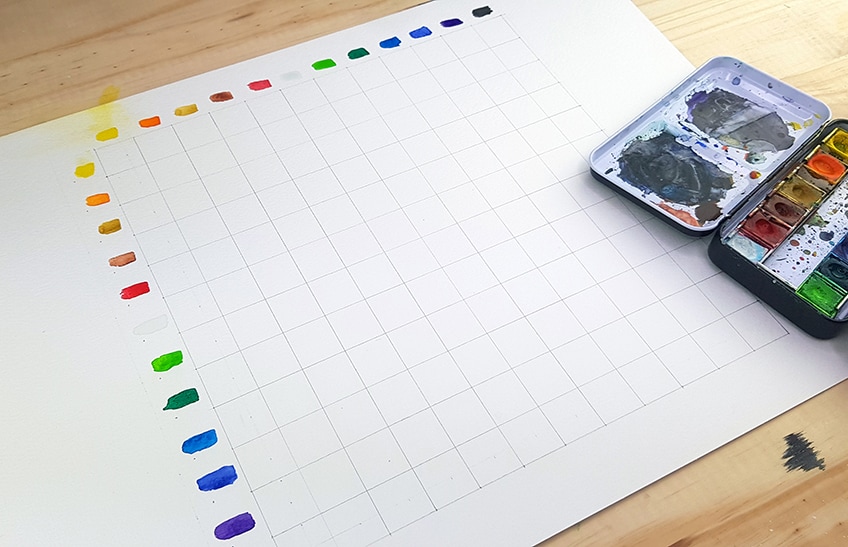
Don’t worry about the marks being perfect shapes, Although, you can paint a little square or circle if you want it to look more aesthetically pleasing. We want to make sure we are attentive to applying the colors in the same sequence along both the horizontal and vertical axis. Be sure to clean your brushes properly before new color applications.
Dividing the Grid With Colors
Now we will begin to apply colors to our grid. We will now start in the top left corner and slowly work our way to the bottom right corner. What we want to do here is see where the same colors on both the vertical and horizontal axis intersect. We then begin to paint that color in each block of the grid. we should be left with a diagonal line, running from corner to corner of pure colors in our grid.

To clarify, you want to make sure that you are connecting yellow with yellow, blue with blue, and so on. The same color should intersect in the grid based on the sequence of colors along the horizontal and vertical axis. This will divide the grid into two sections. Be careful as you apply each color in the grid. Don’t worry about making a perfect square in the drawn blocks of the grid. Try to leave a little space along the sides in each block so that the colors don’t overlap on the grid. Also, try to make sure you rinse your brushes properly before applying new colors.
Filling in Our Grid
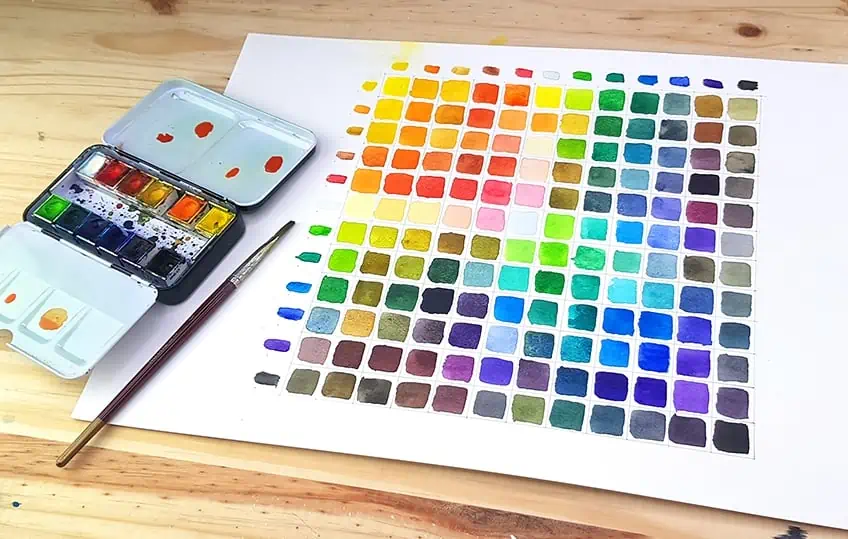
We can now begin to make mixes of various color combinations in each block on our grid. We do this by looking at the color sequence of our grid along both the horizontal and vertical axis. We then see where the colors intersect on the grid and proceed to make a mix of both those colors. We then apply that color into the block where those two colors intersect on the grid.

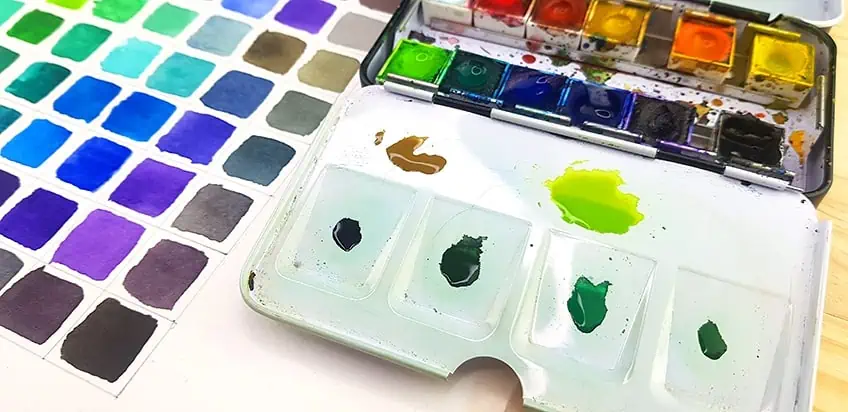
Since we made a diagonal line through our grid with colors, a good suggestion is to explore ratios on each side of the grid. Each color will inevitably intersect twice on the grid. Use that opportunity to play around with how much of each color you apply to your mix. Make sure you don’t mix colors on your paper in each block. You want to mix your colors on a separate surface, a good suggestion is to use a plate from your kitchen cupboard. Again, as you mix your colors, make sure that you are cleaning your brushes adequately before new applications of color.
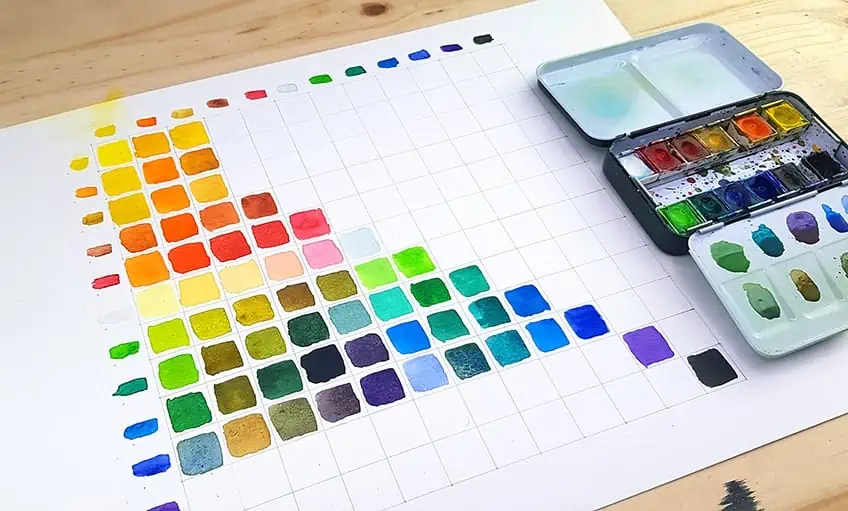
Another good idea is to work column by column so that you can focus on each color. This way you can, for instance, focus on how the color purple creates a variety of other colors when it interacts with every other color in each column. Try doing this by staying on one side of the grid that is divided by your diagonally painted blocks. You can also use the metal surface of your pan paints to mix your colors. However, if you do so make sure that you are mixing colors correctly without mixing the wrong colors by accident. Try to give it a clean with water and a paper towel for new mixing so that previous mixes do not compromise new mixes.
Try to attentively see how each color interacts. Again, there is now a specific watercolor mixing recipe for this exercise, however, play around with your ratios. When colors intersect for the second time on the grid, switch up the ratios to either darken or lighten the mix. Try to be playful with your mixing. By now we should be left with a single side of the grid filled in with a variety of watercolor mixing variations.
Filling in the Rest of the Grid
Since we now have the correct method of application, we can now begin to fill in the rest of our grid. As you apply paint in each column of the grid, do not worry too much about applying paint in any specific order. As long as you are making an accurate mix of both intersecting colors in the correct blocks in the grid then it does not matter which blocks you fill in first.
However, applying colors in a single column does make the mixing process easier. If you are mixing a column of black that intersects with various colors it might be easier to finish a whole column before moving on to a new one. However, this is simply a suggestion so feel free to fill in whichever block you want.

As you start filling in the other section of the grid, again, you will find that colors intersect twice. This is because the same colors are along both the horizontal and vertical axis. So try to change the ratio for the second encounter of the same colors in each block. If a color combination was lighter before then perhaps darken it the second time.

If you consider how to mix grey watercolor and an example you will find that the watercolor mixing recipe can be predominantly black and a little bit of white or vice versa. This principle can be applied to all your mixes, whereby you add more of a single color in each mix or lessen the amount you add for a different tonal value.

Another good tip is that, when you mix colors, pick the lightest color first. For instance, if you come to mix a watercolor blue with a yellow, make sure you take the yellow from your paint set first. This is so that we do not accidentally darken the paint in our paint set by taking light colors with a brush that still has a dark color on it.
So, another good suggestion is to make sure you rinse your brushes thoroughly.
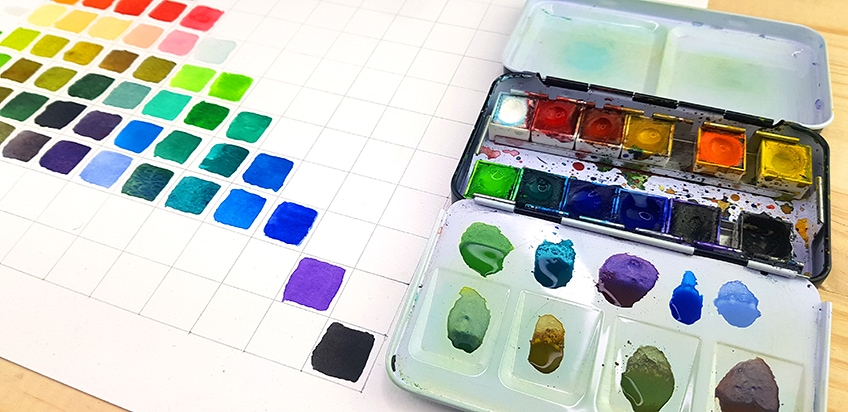
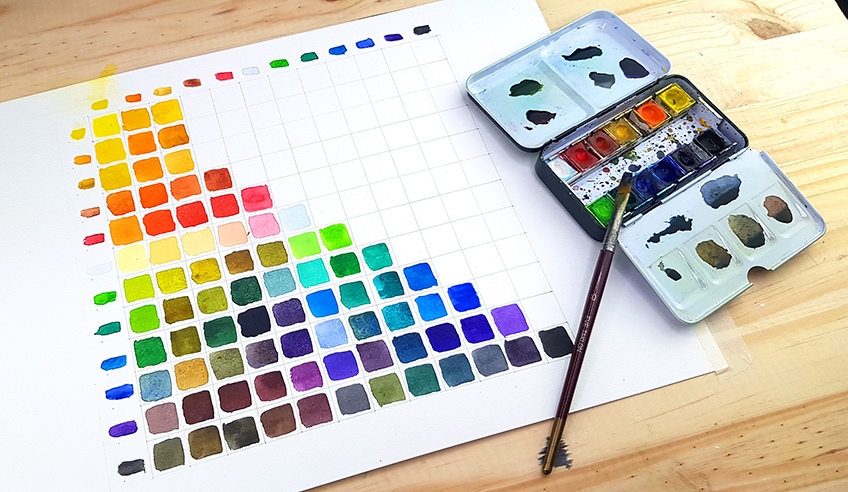
Lastly, take your time with this watercolor mixing tutorial. Learning how to mix watercolors takes some time. Filling in 144 blocks with different color combinations can get tedious. Luckily, with this tutorial, you can leave it and return to it. So, take a break now and then. And once we have completed our grid, we should be left with a grid of various color combinations.

Tips to Remember
As with all painting techniques, learning how to mix watercolor paints will take time and practice. To help your learning curve, take a look at our list of top watercolor mixing tips. Most importantly, remember to have fun and experiment!
- When painting, make sure you have two jars of water for cleaning your brushes. This is so you have the most accurate watercolor mixing palette possible.
- Play around with your ratios. When the color combination intersects for a second time try to add more of the color that was used less in the first intersection of that color combination.
- There is no specific color ratio for this exercise. The aim is to experiment with more or less of a color combined with another.
- Remember to clean your brushes thoroughly in between different applications.
- Remember to get new water once your water starts to get muddy from cleaning the color of the color
- Learning how to mix colors is quite simple. This means that once you have your blocks established in your grid you can leave it if you feel tired and then return to the exercise the next day.
- Most importantly, have fun with it. Be experimented with your ratios and try different washes as well for a more diverse watercolor mixing palette.
As you learn how to mix watercolors in this tutorial you will have come across moments whereby the same colors intersect on the grid for a second time. Try to rearrange the ratio for these moments, think about how you can either darken or lighten the same color. Another good suggestion is to also play around with the wash of the color, we can do this by making the color more washed out by making it very watery. There are many ways to mix and explore color variations. The grid helps to establish an opportunity to explore a color variation once two colors intersect. How you define the ratios of the colors that intersect on the grid is completely up to you. This exercise helps you to understand how to use watercolor paint in general as it diversifies your watercolor mixing palette.
Frequently Asked Questions
What Is the Purpose of a Watercolor Mixing Chart?
When learning how to use watercolor paint you want to understand how to mix watercolors first. Learning how to mix watercolors gives you a diversity in your color combinations that may enhance your watercolor paintings overall. The watercolor mixing chart provides you an opportunity to understand the full potential of color combinations available to you from the watercolor set that you are using. By placing all the colors into sections along a horizontal and vertical axis you can develop a grid for all the colors to intersect with one another. By creating a grid defined by the number of colors available to you you will see the full set of colors and how they work together. You can then keep this chart to help inform you about color combinations that you might want to use for all sorts of watercolor paintings.
How Do You Make Popular Watercolor Colors?
When researching how to paint with watercolors there are often popular colors that can be used to create interesting color combinations in watercolor paintings. Learning how to mix watercolors will help you achieve various colors like a watercolor blue called Ultramarine or warmer colors like Burnt Sienna. These color combinations can all be found in the exercise of making a color chart. More than that, you will also find that a full-color spectrum can be developed between these colors. Making these colors can often be developed through learning ratios of color when to add more or less of a color. This is why a color chart is so helpful, as it provides you the opportunity to add either more or less of a single color in a mix of two colors. This is because colors will always intersect twice, once on the horizontal axis and then again on a vertical axis. More than that, you will also have the opportunity to see a broadened spectrum of similar colors and compare them to one another.
Do I Need Specific Colors to Mix Watercolors?
The short answer is no. As you learn how to mix watercolors the best thing to do is work with the colors you have available to you. Watercolor mixing can be done with whichever colors you have available to you, however, it does help to have more colors if you would like to diversify your watercolor mixing palette. There is no specific way of making watercolor mixing recipes, it’s all about experimentation. A great way to learn how to mix is by making a chart that is made of the colors available to you. By doing so you will learn how to brighten or darken colors as they intersect on the chart. The concept however is as simple as learning how to make grey watercolor by mixing black and white. This principle can be applied to all colors, it’s just a matter of the ratios of each color that will either brighten or darken a color.

Matthew Matthysen is a multidisciplinary artist. He completed his fine art degree, majoring in History of Art and Contemporary Drawing Practice at the University of Witwatersrand, South Africa. Before joining acrylgiessen In 2020, Matthew worked part-time as an art teacher at Reddford Blue Hills High school. Matthew creates drawing and painting tutorials for acrylgiessen and captures them not only photographically and in written form. He also records the creation of his works in his own creative studio as in video format, from which later with a voiceover and a video editor also drawing tutorials for the Youtube channel of acrylgiessen are created.
Learn more about Matthew Matthysen and about acrylgiessen.