Grasshopper Drawing – Create an Intricate Grasshopper Sketch
This post may contain affiliate links. We may earn a small commission from purchases made through them, at no additional cost to you.
Grasshoppers, the acrobats of the insect world, are fascinating creatures that have captured the attention of humans for centuries. With their long legs and powerful jumps, these nimble insects can leap up to twenty times their body length in a single bound! Grasshoppers are also known for their beautiful colors and intricate patterns, making them a favorite subject for artists and photographers alike. But these insects aren’t just fun to watch – they also play an important role in many ecosystems as a source of food for birds and other animals. So next time you see a grasshopper in your garden or on a nature walk, take a moment to appreciate its incredible agility and beauty. Get ready to unleash your artistic skills and follow our step-by-step guide on how to draw a grasshopper!
How to Draw a Grasshopper Step-by-Step
If you’re about to draw a grasshopper, there are a few things you should keep in mind to make your artwork stand out. First, observe the grasshopper’s body structure and take note of its long, thin legs, large eyes, and distinctive antennae. Consider the position of the grasshopper and the angle of its body before starting your sketch. When drawing, pay attention to the details on the grasshopper’s body, such as the texture of its wings and the shape of its legs. Take your time and use light strokes to build up your drawing gradually. Don’t be afraid to add some color to your artwork to bring your grasshopper to life! With a bit of patience and practice, you’ll be able to create a stunning grasshopper drawing that captures the beauty and intricacy of this amazing insect.
By following each step illustrated in the below collage, you will be able to draw a grasshopper in no time!

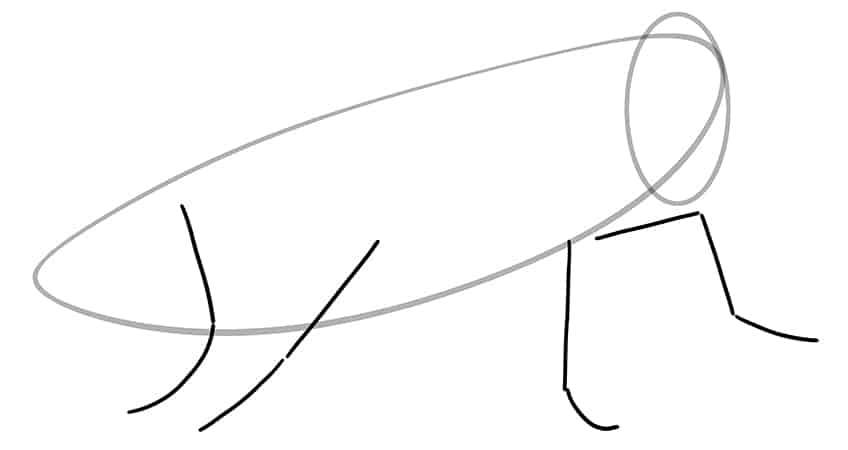
Step 1: Draw the Head
Begin your easy grasshopper sketch, by drawing a vertical oval shape to represent the head of the grasshopper.

Step 2: Draw the Main Body
Overlapping the head, draw a slightly titled, wide oval shape to represent the main body.

Step 3: Include the Legs on Your Grasshopper Sketch
Attached to the main body, draw the front and rear walking legs.
Step 4: Draw the Eye
Draw a single visible eye within the head of your grasshopper drawing. The eye should be represented by a smaller vertical oval shape.

Step 5: Draw the Jumping Legs
Attached to the rear legs, draw the extended jumping legs.

Step 6: Attach the Pronotum and Forewing
Draw the pronotum which lays behind the head. Follow this by drawing the forewing layer which reaches to the back of the main body.

Step 7: Outline the Top of the Pronotum and Head
Draw a curving line above the previously drawn pronotum connecting the head and pronotum.

Step 8: Continue to Outline the Main Body
Use the previously drawn construction lines to aid you in outlining a realistic shape for the main body of your grasshopper sketch.

Step 9: Outline the Jumping Leg
In this step, outline the jumping leg drawn in step five.

Step 10: Continue Outlining the Legs
Begin to outline the walking legs and joints, using the construction lines drawn in step three.

Step 11: Draw the Jumping Leg Attachment
Interesting fact. The grasshopper’s ear is located along its belly! To do this, draw an ear shape on the side of the main body, and close to this, draw the jumping leg’s attachment.

Step 12: Outline the Wing and Pronotum
Use the previously drawn construction lines to aid you in outlining the pronotum and the visible wing on your grasshopper sketch.

Step 13: Draw the Spiracles
Begin in the front and below the head, and draw small ovals and spheres. Make sure these lead to the rear of the main body. These will represent the spiracles of your grasshopper drawing.

Step 14: Outline the Eye
Outline the simple eye on your grasshopper drawing. This should look somewhat like a crown on the head of the grasshopper.

Step 15: Draw the Antennas and Claws
At the tip of the head, draw two lengthy antennas. At the end of each leg, draw the slightly curving feet lines with sharp claws.

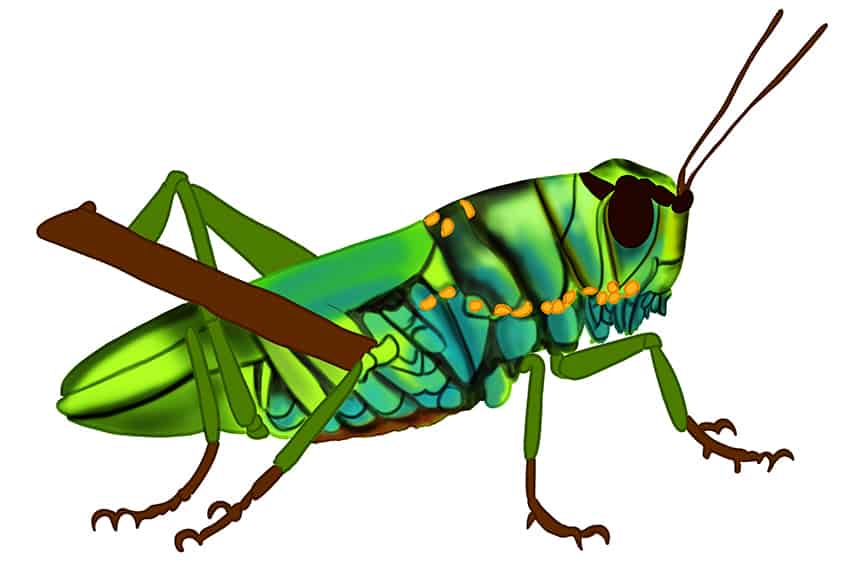
Step 16: Apply the First Color Coat
Select a fine, sharp brush and bright green paint, and evenly coat the grasshopper’s main body. Switch to a dark shade of green paint, and evenly coat each of the walking legs.
Color the inner area of the second, partially visible jumping leg with dark green as well.

Step 17: Color the Claws
Use the same brush as previously and switch to brown paint, and color each of the feet and its claws. Repeat this step onto the antennas and the fully visible jumping leg. Continue this step using black paint, and evenly coat the eye and the crown above the eye. Complete the step using orange paint to fill each of the small spiracles.

Step 18: Shade the Grasshopper Sketch
Use a small, soft brush and black paint, and apply soft shading along the outlines of the inner parts of the grasshopper drawing. Make sure that the first color coat is still visible. Switch to brown paint, and softly color the bottom area of the belly.

Step 19: Continue to Color Your Grasshopper Sketch
In this step, lightly apply soft brushstrokes within the main body, using a soft brush and navy paint.
Step 20: Texture the Head and Pronotum
Begin by using a fine, sharp brush and bright yellow paint, and trace the outlines of the head, eye, and pronotum. Continue to add fine dots and spots along the face and pronotum. Repeat using black paint.
Continue this step, by adding fine, hairline brushstrokes at an angle within the head and pronotum, using a thin brush and yellow paint. Repeat using green paint. Finish off using a rough, pattern brush and a combination of turquoise and black paint, and dab patterns along the larger spiracles.

Step 21: Texture the Grasshopper’s Mid-Body
Begin to trace the spiracle outlines, using a fine, sharp brush and orange paint. Follow this by using a small, soft brush and yellow paint, and lightly paint a glow within the spiracles. Continue to add fine, brushstrokes within the wing using a combination of yellow, green, and orange paint. 
Step 22: Continue to Texture the Rear Body
With a fine, sharp brush and yellow paint, separate the rear body into cubes. Switch to black paint, and color between these cubes. Continue using yellow paint, and add fine, brushstrokes, as well as vertical lines on the rear body. Follow this step, using a bright shade of green paint, and apply fine, brushstrokes within each leg. Make sure that the first color coat is still somewhat visible.
Switch to yellow paint to add a light color blend. With a blending brush, begin to soften and spread the color coats. Complete the step using a small, soft brush and black paint, and add light shading on the legs of your grasshopper drawing.
Step 23: Texture the Jumping Legs and Claws
In this step, add abstract lines within the fully visible jumping leg and each claw, using a fine, sharp brush and yellow paint. Follow this by using a small, soft brush and dab patterns on the smaller spiracles.
Continue this step, using brown paint to surround the pupil. Repeat using a small, soft brush and black paint and fill in the pupil. Complete the eye using white paint for the eye’s shimmer. Finish off using a fine, sharp brush and a shade of bright brown paint and gray paint, and add fine dots within the antennas.

Step 24: Add a Hairy Outline to Your Grasshopper Sketch
Select a thin brush and the corresponding colors to add the hairy outer texture extending beyond the outline of the grasshopper drawing.

Step 25: Apply a Ground Shadow
In this step, add fine, shading beneath each leg and claw, using a fine, sharp brush and black paint. Switch to a blending brush to spread and soften this shading.

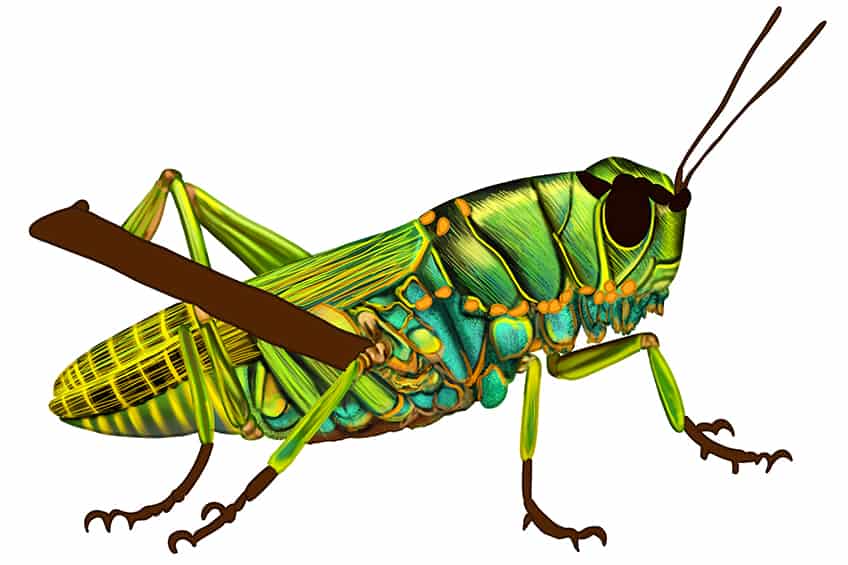
Step 26: Finalize Your Grasshopper Drawing
You have reached the last step of our tutorial on how to draw a grasshopper! To do this, erase any harsh outlines that are still visible. If this is not possible, select a thin brush and the corresponding colors, and trace these harsh outlines.

Congratulations on finishing your grasshopper drawing! Now that you’ve completed your artwork, take some time to appreciate the details you’ve captured in your drawing. Notice how the long, slender legs and the curved antennae add depth to the insect’s appearance. Observe the fine lines on the wings and the texture of the body that you have added to make the grasshopper come to life on paper. Consider adding some shading or color to enhance the three-dimensional quality of your drawing. Remember, every drawing is unique and a reflection of the artist’s style, so don’t be afraid to experiment and try new techniques. With practice, your grasshopper drawing skills will continue to improve, and you will be able to create even more stunning and intricate artworks. Keep up the good work!
Frequently Asked Questions
What Are the Basic Steps to Drawing a Grasshopper?
The basic steps to drawing a grasshopper are to first sketch out the basic shape of the body, including the head, thorax, and abdomen. Next, draw the long legs and curved antennae, paying attention to the positioning and proportions. After that, add the wings and any other details, such as the eyes, mouthparts, and small hairs on the body. Finally, go over your drawing with darker lines and add shading or color to make your grasshopper drawing come to life. Don’t be afraid to experiment with different techniques and styles to create a unique and stunning grasshopper artwork!
How to Draw a Grasshopper and Make It Look Realistic?
To draw a grasshopper and make it look realistic, start by studying a reference photo or observing a real grasshopper. Pay attention to the shape and structure of the body, the positioning of the legs and antennae, and the texture of the wings and body. Use light lines to sketch out the basic form of the grasshopper, focusing on getting the proportions right. Next, add details like the eyes, mouthparts, and small hairs on the body. Use darker lines to go over your drawing and add shading or color to create depth and dimension. Remember to use different shades of green and brown to give the grasshopper a realistic color. Add texture to the wings and body by using small, overlapping lines or dots to simulate the appearance of scales or hairs. With practice and attention to detail, you can create a stunning, realistic grasshopper drawing!

Matthew Matthysen is a multidisciplinary artist. He completed his fine art degree, majoring in History of Art and Contemporary Drawing Practice at the University of Witwatersrand, South Africa. Before joining acrylgiessen In 2020, Matthew worked part-time as an art teacher at Reddford Blue Hills High school. Matthew creates drawing and painting tutorials for acrylgiessen and captures them not only photographically and in written form. He also records the creation of his works in his own creative studio as in video format, from which later with a voiceover and a video editor also drawing tutorials for the Youtube channel of acrylgiessen are created.
Learn more about Matthew Matthysen and about acrylgiessen.