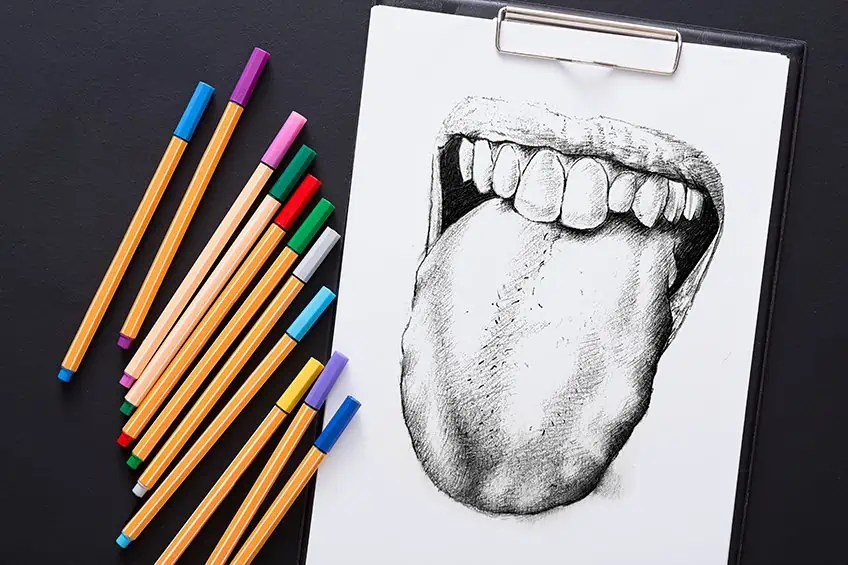
How to Draw a Tongue – A Realistic Tongue Drawing Tutorial
This post may contain affiliate links. We may earn a small commission from purchases made through them, at no additional cost to you.
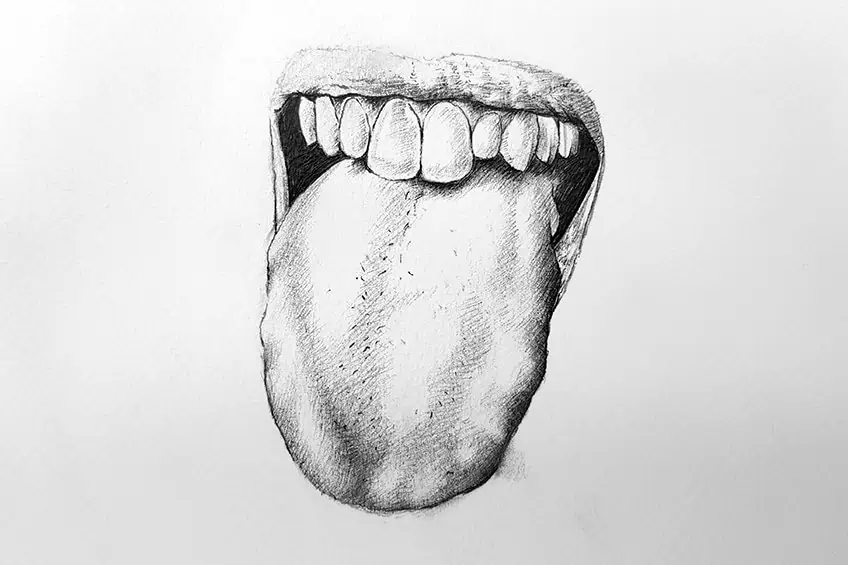
Since the tongue is an arbitrary shape on its own, having to learn how to draw a tongue is an especially engaging exercise. Yet, when we consider the tongue’s position inside the mouth, we start to see why it is shaped the way it is. Since the tongue’s shape may take on many different forms, creating a realistic tongue drawing from a picture of a person sticking their tongue out can be entertaining. Learning to draw a tongue sticking out is a great way to grasp how the tongue is situated inside of the mouth and in proximity to the teeth. In addition to understanding how to draw a tongue in a tongue sketch, we also discover how to design lips and teeth. It is important to sketch the mouth while creating a tongue-out drawing because, when we learn to draw a tongue sticking out, we will discover that we have to include the teeth and lips in order to fully understand the shape and position of the tongue.
Preparation For Tongue Drawing
We’ll be creating a realistic tongue drawing in this guide. We’ll discover that creating a tongue-out drawing is a really straightforward technique. Once more, because of the tongue’s abstract nature, shading and sketching will prove to be rather easy. Strange structures, like tongues, may occasionally make for simple drawings since all they require to appear realistic is to be understood in context by other characteristics. We will start with a light tongue sketch that we’ll improve into a more lifelike tongue sketch by using a reference photograph.
As we work through a few straightforward steps on how to draw a tongue, our skills and confidence will gradually improve so that we can draw other parts of the mouth as well.
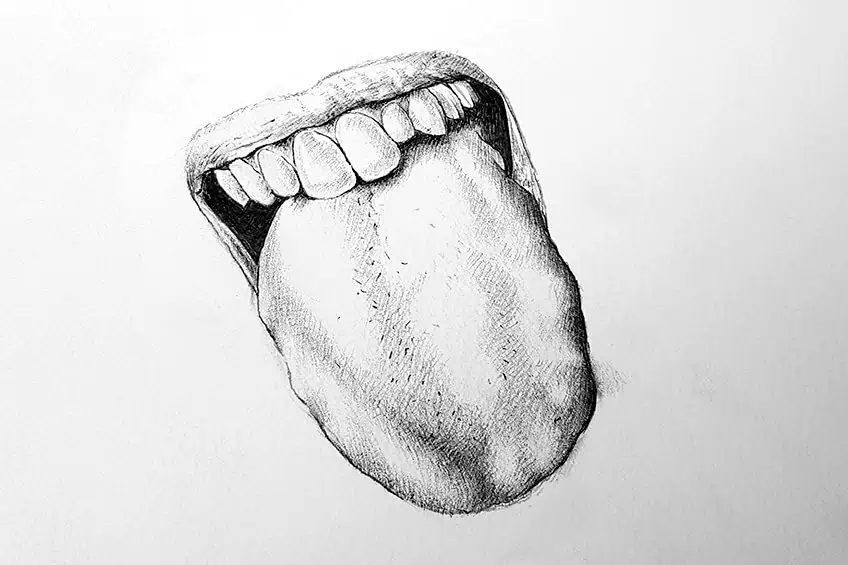
How to Create a Tongue-Out Drawing Step by Step
It takes a process of creating the framework via numerous layers to create a realistic tongue drawing. A pencil drawing is where we start. Beginning with a pencil tongue sketch will help us gradually develop the anatomy of the mouth and tongue in comparison to how it appears in the reference photograph. The drawing process will be guided by the reference image. We will use the reference image as our reference while we apply some light pencil shading. The reference picture should show us how shadow and light are established on the tongue as well as in the mouth. The tongue sketch will next be enhanced by pen shading and sketching to highlight its qualities.
After understanding the techniques involved, let’s go over the many methods for learning how to draw a tongue sticking out.
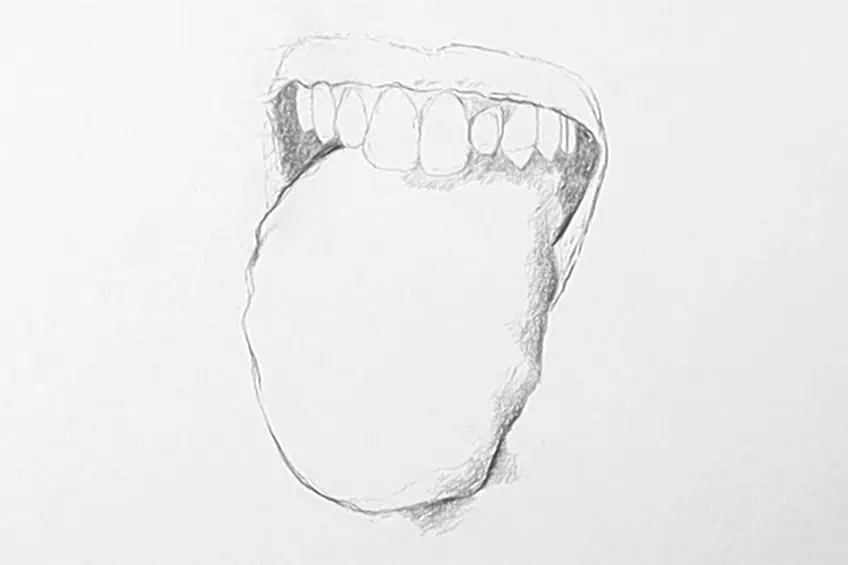
Step 1: Lightly Create a Tongue Sketch
The tongue should be lightly sketched, to begin with, with the reference image serving as our guide. Our goal is to produce a loose tongue sketch in which we alternate between the sketch and the reference picture. With this step, we want to take our time perfecting the sketch. The remainder of the instruction will be much simpler if we take our time refining the tongue sketch with our pencils. Particularly after we start coloring and painting with pens. Observe the characteristics of the picture once more. For example, consider the arrangement of the teeth above the tongue or the size of the gaps near the tongue. Think about the specifics like this.
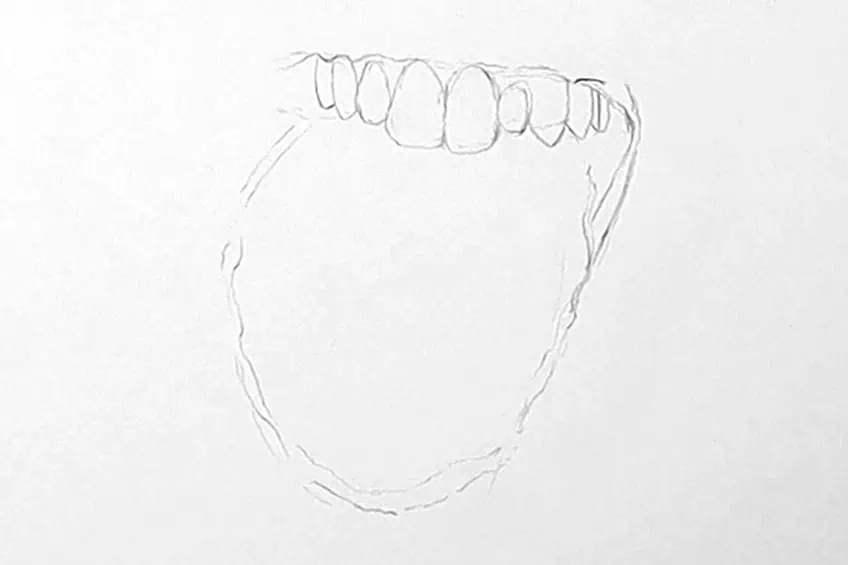
Take note of the tongue’s little indentations on the sides as we sketch it. The lines that make up the tongue are what we want to pay attention to, particularly the little depressions that run down its sides. The mouth’s interior black gaps can also be colored in. Once more, concentrate on all elements, grouping them together before we apply some light shading.
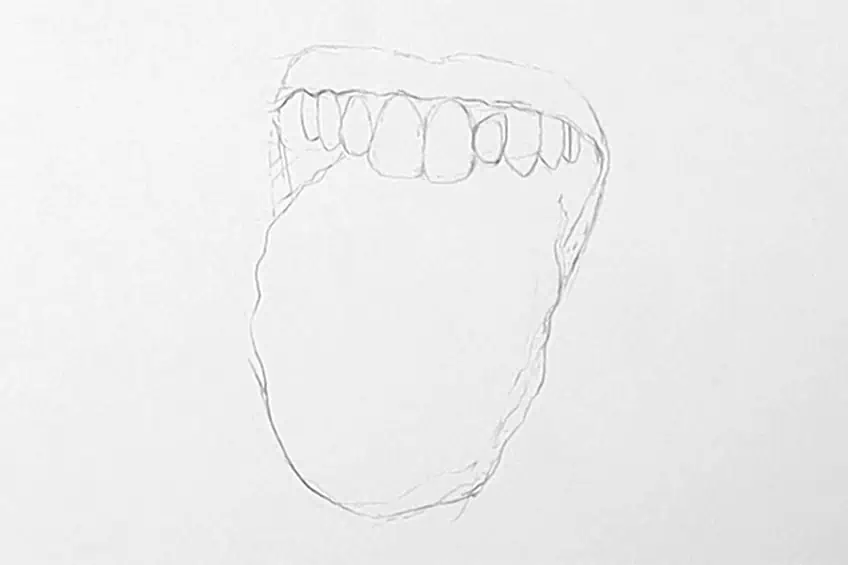
Furthermore, we may include inside-the-lips work. Small indentations can be seen on the top lip of the lips in the original photograph. As you draw some lines to draw out these aspects within the lip, take some time to return to the picture. Examine your design carefully to check how well the light sketch and lining reflect the source image.
Step 2: Additional Light Shading
Here is where we start to apply some light shading to our tongue sketch to improve it. As we see how the shadows are created in the picture’s characteristics, we still want to frequently refer to the picture. Various shadows can be seen, ranging from deeper ones inside the mouth to softer shadows that appear around the edges of the tongue.
We want to emphasize the different small indentations and curves inside the tongue as we apply some light shade to our image. Particularly close to the bottom of the tongue, where a little curve casts shadows towards the tip. The faint shadows that the teeth make on the tongue are another thing to pay attention to.

Observe how the shadows develop on the lip in the reference picture as well. A faint shadow defined by the lip is heavier on the right-hand side and slightly lighter on the left-hand side. We aim to blend the shadows into the lip’s little depressions.
Take considerable time alternating between the reference image and the drawing.
Keep adding some light shading while keeping an eye on how the shadows are created in the reference picture. Once more, you must be certain that your shading procedure is being guided by the reference picture. Particularly when darkening the tongue because it has extremely faint shadows.
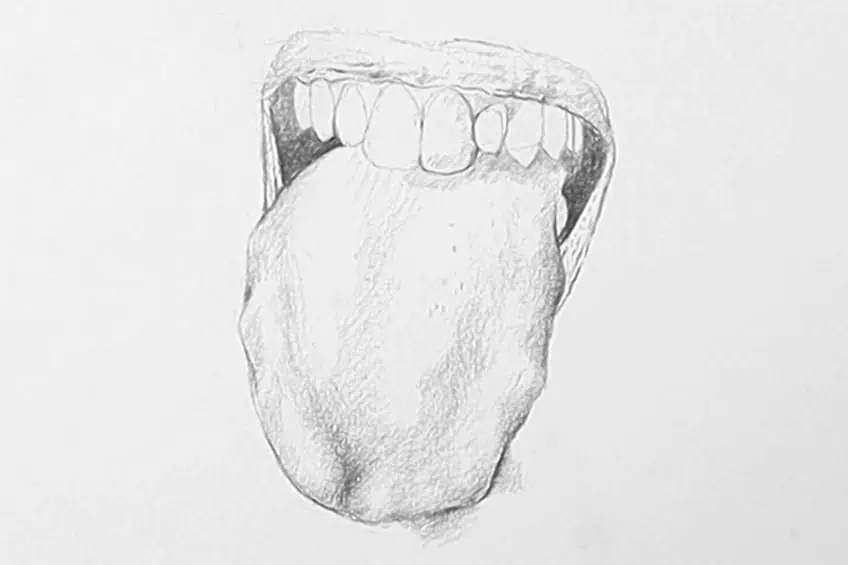
As we can observe, the reference picture depicts a tongue with a range of tonal values. This is due to the tongue’s peculiar texture and distinctive hue. Additionally, the tongue has a little curve that results in darker and brighter areas. As you add some subtle shading, be sure to focus on the tongue.

The teeth are another element where we may apply a little light pencil shading. Although it’s commonly believed that teeth are white, this is not totally accurate. This is a result of the teeth having a glossy finish that provides them some tone variety. Study the reference picture carefully as you apply a little subtle shading to the teeth.
Step 3: Using a Pen to Shade the Mouth and Teeth
We may now use our pens to add shading to the tongue sketch. As we use a pen to add shading to the design, we need to be careful. We may use the same idea of pressure with ballpoint pens as we would with pencils. Keep this in mind as you continue to shade in the tongue-out drawing with your pen. The stronger we press, the darker the markings.
Let’s start with the spaces around the mouth’s sides.

Start by filling in the gaps on the right side of the mouth’s darkest areas. We can observe how the reference picture depicts the shadows on the tongue becoming lighter as they develop behind the teeth in the spaces in the mouth. The extremely light and delicate tinting on the teeth might also be included. In order to direct our pen shading process, we want to utilize both the pencil annotations and the reference picture.

Make careful to use both the pencil markings and the reference picture to direct your shading as you proceed to add shadows to the design. Always use the reference photo as guidance. When using a pen to shade, keep your hand lightly pressurized. The shadows in the gums and teeth are fairly light. Remember to keep these markings light and return to the reference picture frequently.
As you shadow in these places, keep in mind to pay close attention to the force you apply to your pen.
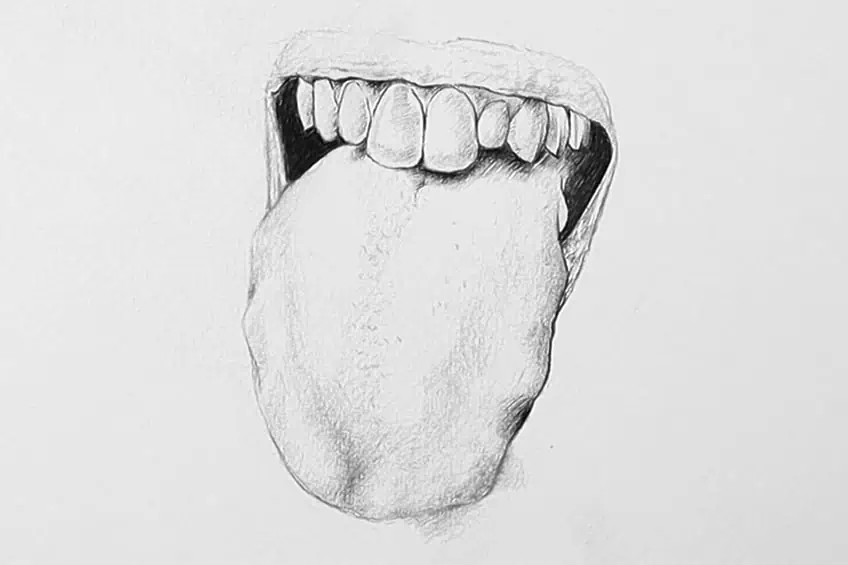
Make careful to apply light shading to each tooth as you work your way through the mouth’s teeth. Make care to enlarge the reference picture to get a better idea of how the shadowing in the teeth is created. With the help of subtle hatching markings inside the teeth, we may create these shadows.
Step 4: Using a Pen to Shade the Tongue
Let’s start by shading the right side of the tongue. We can observe that all of the elements in the reference picture have the majority of their shadowing on the right side. As a result, we must ensure that the right side of the image receives the majority of the shading. By including the shadows that develop on the tongue’s right side, we may continue this process. As we continue to apply shadows on the tongue, we want to keep using the reference picture as a guide.
In order to know how light or dark to shade in different sections of the tongue with your pen, we must utilize our pencil shading markings as a guide.
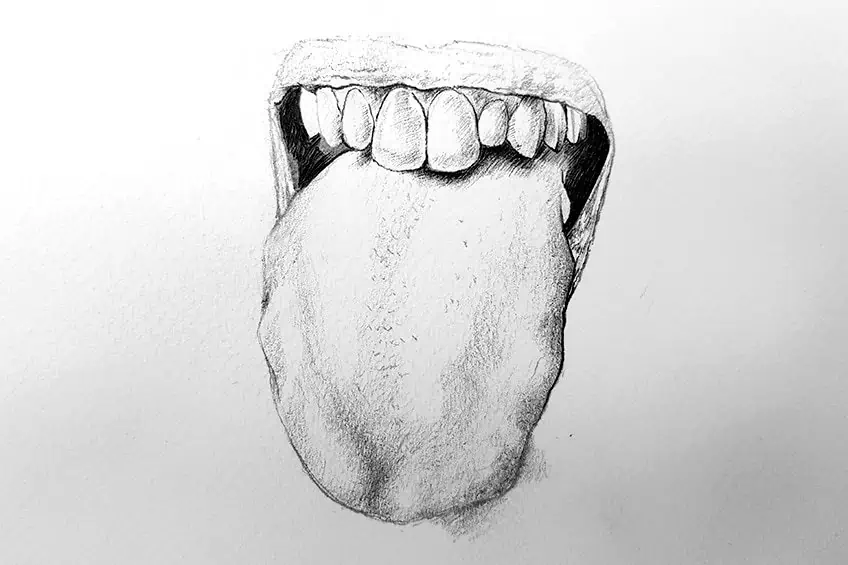
Very tiny shadows can be seen inside the tongue. As we observe the amount of pressure we use on our pens during shading, we want to keep this in mind. We can also add a few slender lines and dots that run down the middle of the tongue. This will enable the tongue to show its texture in a more precise manner. As you slowly move through the entire tongue, keep darkening it.
Step 5: Using a Pen to Shade the Lips
When it comes time to shade the lips, the last step, we want to be sure to shade the lips as precisely as possible. The pencil strokes and the reference image should keep us interested in the shading procedure. Make careful to pay attention to the little lines inside the lip as well as how the right side of the lip has the deepest shadows.

We can notice that the shadowing within the lips is shown in the reference picture to be rather fragmented. This is due to the lips’ distinctive anatomy, which includes a number of indentations. By generating these tiny vertical variations that flow across the lip, we can represent this characteristic in the lips.
Subtle line drawing within the lip can also be used to represent the texture.
It might be challenging to add in the shadows inside the lips, so be patient. Once more, the shadows are not uniform and smooth but instead are rather erratic and dispersed. This provides a natural texture to the lip. So, be sure to use the reference picture as a reference to help you with the shading.
Do it from the darkest to the lightest parts of shadow in this manner until the lip is finished. Small, undetectable fractures that are specific to the contour of a lip can be added with the addition of horizontal lines. Once more, you ought to have the best possible chance of precisely outlining the lip in your tongue-out drawing as long as you consistently return to the reference picture while you create with the pen.
Useful Tips
- Always go slowly. It requires time and patience to carefully complete each stage when drawing.
- Maintain pencil sharpness. Always keep your pencil sharp while sketching something with fine details.
- Before using the pen, make sure to finish the drawing. Before continuing with the procedures that need a pen, make sure the design is finished in pencil.

- Prepare some scribbling paper for your pen. Before sketching or shading with a pen, it’s usually a good practice to scribble some ink on a scrap of paper. This prevents ink from clogging up the pen.
- Always be mindful of the pen’s pressure. Remember that the markings will become darker the harder you push.
- Have fun while you’re doing it. It could be challenging to tackle something new, so take it slow and in little increments.
That concludes the drawing instruction for a tongue. A realistic tongue drawing does not need to be difficult. The most crucial sketching talent is the ability to just take our time. Remember to take pauses while you patiently go through each component of the artwork. You now know how to draw a tongue sticking out in a few easy steps!
Frequently Asked Questions
Can Anyone Create a Tongue Drawing?
Yes! Learning how to draw a tongue is fun! Anyone can manage to create a tongue sketch if they are patient enough. Nothing looks perfect the first time, so rather focus on having a good time than getting lost in the details.
How Do I Create a Tongue-Out Drawing?
Understanding how light and shadow are created on the structure is important for creating a realistic tongue drawing. These two ideas are what give a drawing a lifelike appearance. Work out how the shadows are created inside the features as you polish the tongue sketch into a more detailed tongue drawing. A tongue, like anything else, doesn’t exist in a vacuum, thus contextualizing a tongue drawing is crucial. Therefore, pay attention to the entire tongue sketch and not just the tongue. Last but not least, always take your time while sketching with a pen.

Matthew Matthysen is a multidisciplinary artist. He completed his fine art degree, majoring in History of Art and Contemporary Drawing Practice at the University of Witwatersrand, South Africa. Before joining acrylgiessen In 2020, Matthew worked part-time as an art teacher at Reddford Blue Hills High school. Matthew creates drawing and painting tutorials for acrylgiessen and captures them not only photographically and in written form. He also records the creation of his works in his own creative studio as in video format, from which later with a voiceover and a video editor also drawing tutorials for the Youtube channel of acrylgiessen are created.
Learn more about Matthew Matthysen and about acrylgiessen.