Epoxy Resin Table Tutorial – How To Build your Own River Table!
This post may contain affiliate links. We may earn a small commission from purchases made through them, at no additional cost to you.
In this tutorial, I will show you step-by-step how you can make a stunning and exclusive epoxy resin table from wood yourself. With the right technique, this isn’t as difficult as it might seem at first. I will show you exactly and in detail how this works and I will tell you some valuable professional tips. A well-done table is of course only possible with the right material and equipment. That’s why you’ll also find a list of what you need to make an Epoxy River Table.
What Is an Epoxy River Table?
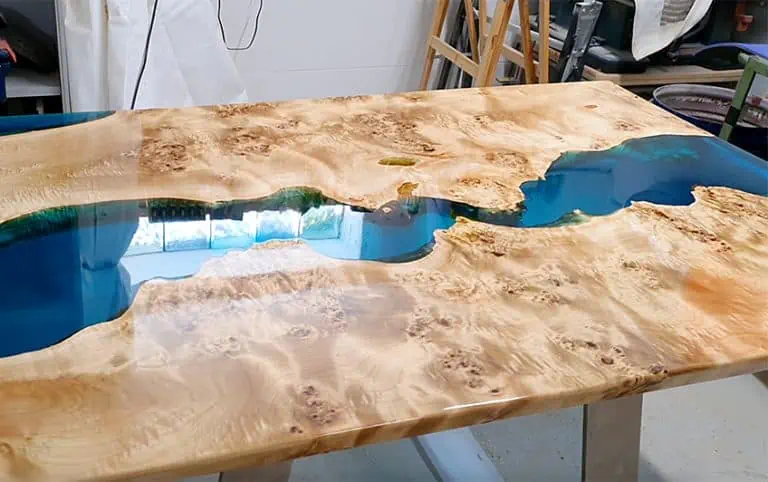
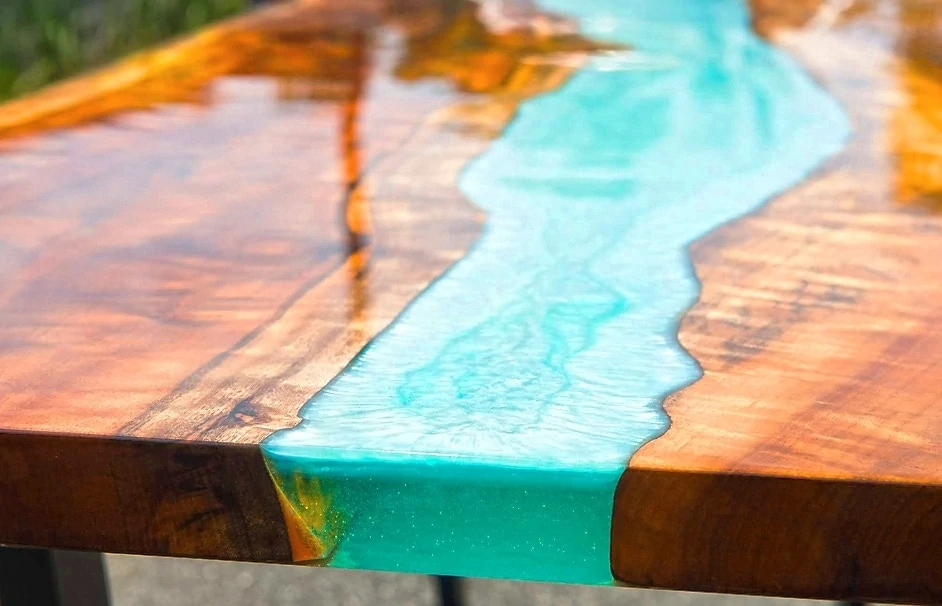
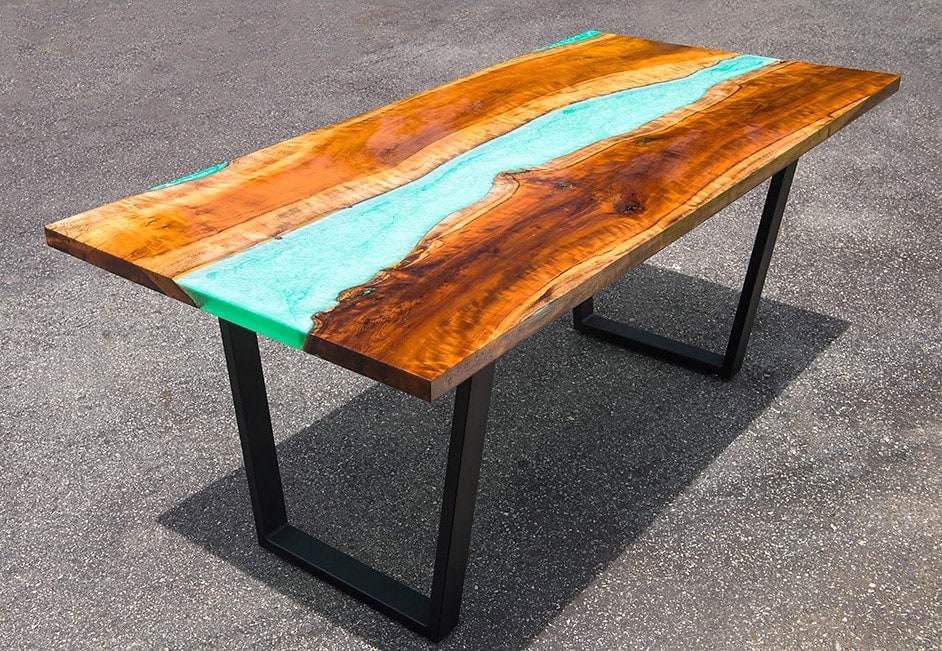
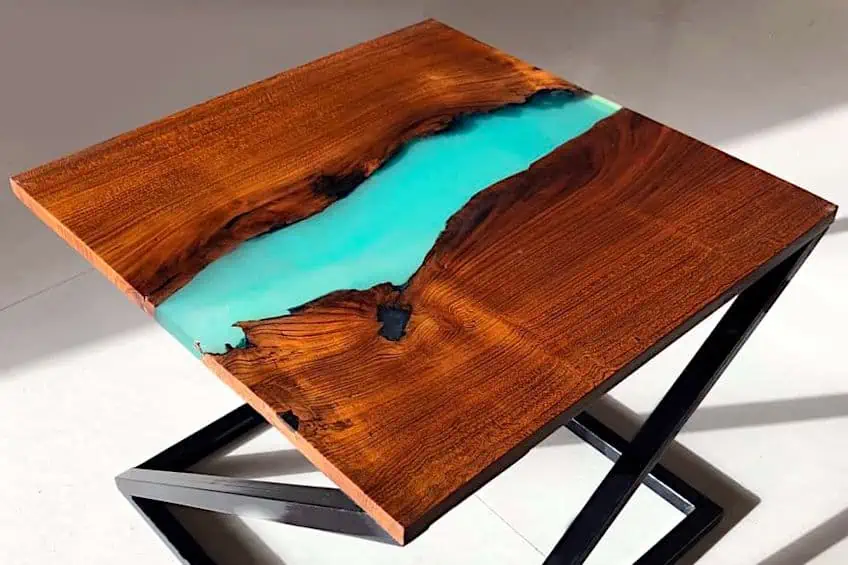
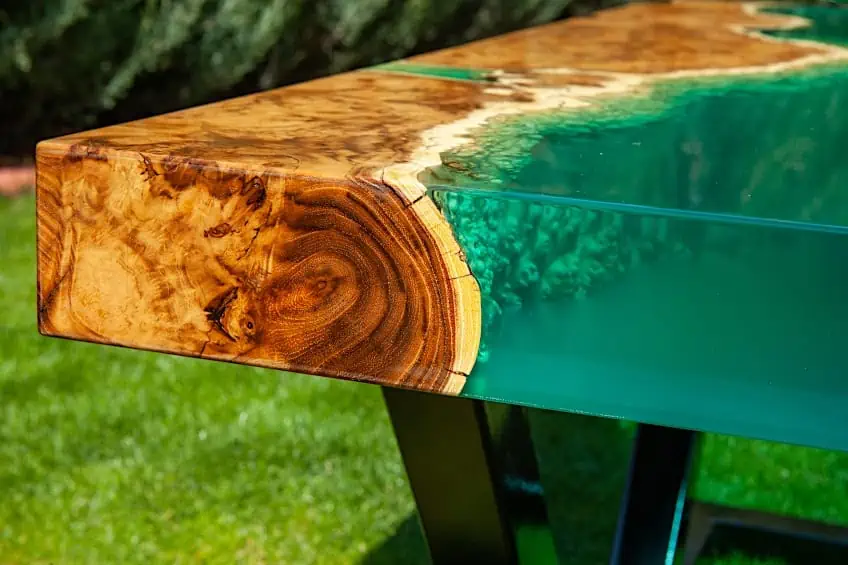
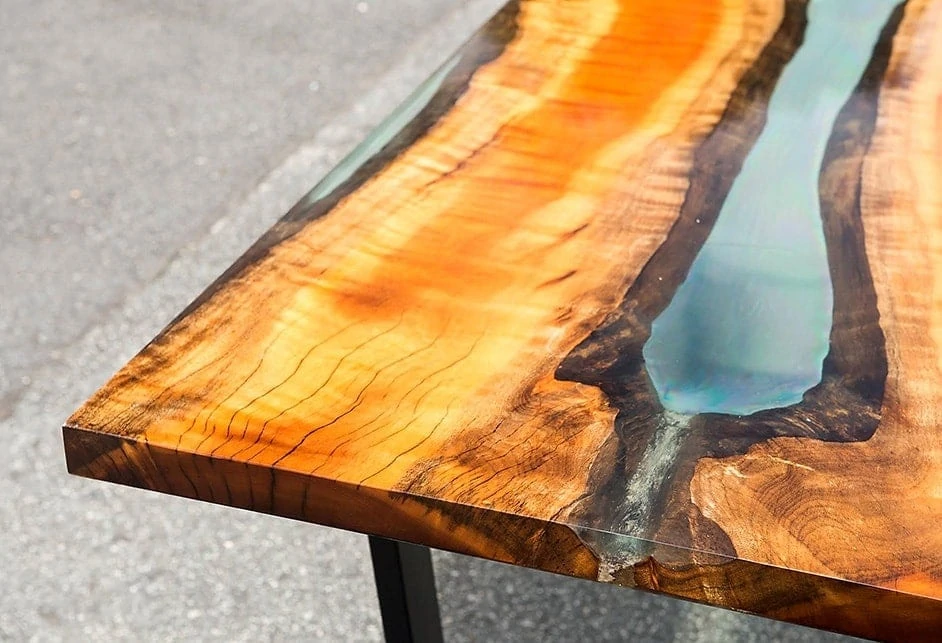
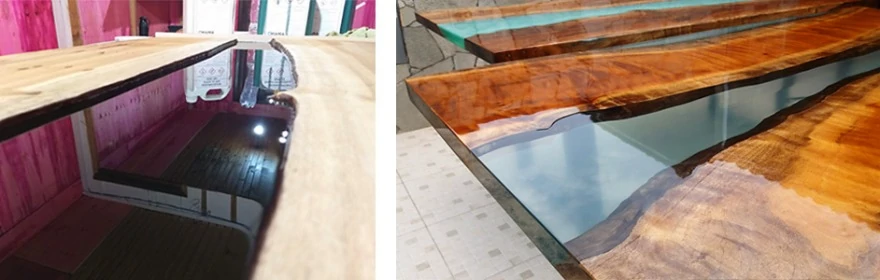
An Epoxy River Table is a piece of hybrid furniture, made out of wooden planks and epoxy resin in between. Often the blanks have natural edges, the containing Resin Epoxy between looks like a flowing river. Resin River Tables have become very popular since 2019. The idea and the trend of the so-called Epoxy River Tables come from the USA like so many others. In the last years, a real epoxy resin table fever has broken out all over the world, of course also in Brazil. Because these tables are very modern but at the same time also extremely noble and high-quality. In addition, they are real eye-catchers and radiate an exotic beauty.
Above all, the Epoxy River Tables create a very exciting contrast through the combination of wood and mostly dyed resin and are therefore extremely appealing for most people. The special thing about these pieces of furniture made of wood and resin, however, is that they cannot be assigned to any style direction and appeal to very different furnishing styles. Both lovers of wood furniture and people who prefer the modern style are equally addressed by this type of epoxy river table.
There are no limits to creativity in the crafting of an Epoxy Table: from the most exotic variants with vivid colors and structures and extravagant design to more conservative, clean designs, with neutral or more transparent colors, almost anything is possible.
How Did I Learn to Make Epoxy Resin Tables?
I started experimenting with epoxy resin in late 2017. I saw epoxy river tables on the internet and wanted to learn this technique as well to make these spectacular objects and furniture myself. I started to look for these materials and especially suitable resin. But I had to find out that in Brazil it was extremely difficult to get suitable epoxy resin of good quality. A few months, frustrations and insights later, I finally discovered a manufacturer that has a good resin for this purpose. This was a very instructive time, and over the months and years, I developed my own technique, which allowed me to create large, very exclusive pieces of furniture. Large pieces should be made layer by layer due to the necessary stability and the long drying phases.
The art here is that these individual layers are not visible and the resin combines optimally with each other. I have succeeded in creating a process with which you can build high-quality tables yourself. Today my small company in Brazil is recognized as a quality manufacturer. In this blog post, I would like to share with you how I make these exclusive tables with epoxy resin. Because also you, as a beginner, can build such a tabletop with a little practice, some manual skill, and the right equipment. And all that without big and expensive machines. You can get most of the equipment and materials you need at any well-stocked DIY store or, of course, on the Internet.
In the step-by-step instructions below I will show you step-by-step how to make your own Exopy River Table.
Supplies That You Need to Make Resin Wood Tables
Epoxy resin, although an extremely versatile material that once cured is also durable, is a highly sensitive material during the curing process. Thus, it is very important to select a resin of premium quality so that you can ensure a perfect finish once the resin has cured. You will require both a casting resin for creating the river table, as well as a laminating resin to provide a final coat over your tabletop. We have selected two of the leading products in each category to help you choose the best epoxy for your river table.
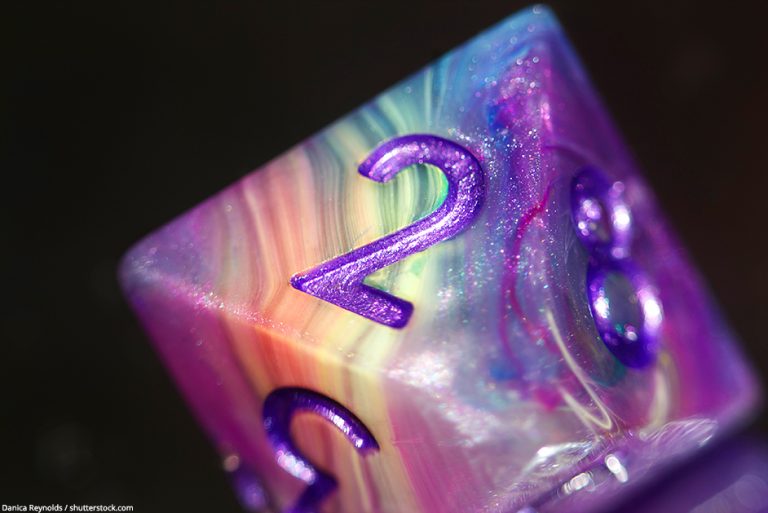
- Liquid color pigment matt blue
- Metallic color pigment turquoise
- Liquid color pigment transparent (for crystal clear River Tables)
- Large mixing cups with scale (64 ounces) or Bucket for mixing resin
- 100% Silicone Caulking
- Caulking Gun
- Silicone Spray
- Duck Tape
- MDF Board
- Screws
- F-Clamps
- Soft Mallet and Wood Chisel
- Polishing paste for glossy surfaces
- Sandpaper
- Wood Oil
- Level
- Folding Carpenters Ruler
- Nitril Gloves
- Respirator Mask
- Eye Protection
- The most important thing: A natural wood panel of your choice (well dried!) or alternatively wood from a DIY store
- Heat Gun or Butane Torch
- Hot Melt Glue Gun
- Cordless Drill
- Corded Drill with Paint Mixer
- Jig Saw
- Plunge Router
- Orbital Sander
- Orbital Buffer / Polisher
Best Epoxy Resin for Casting the Epoxy Tabletop
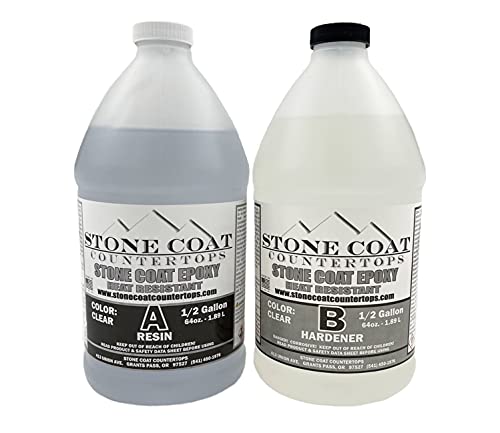
You will require a deep pour epoxy resin of a low viscosity when casting the tabletop. The resin must be fluid enough that it can be poured into the mold with ease. Using casting resin will ensure that all small gaps and hard-to-reach areas are covered. The following resins are sold as clear liquid components, so you will need to add your own color pigment to create the river table effect.
Best Value for Money: INCREDIBLE SOLUTIONS Pourable Plastic Clear Casting Resin
This brand of deep pour epoxy resin can be used by beginners and professionals alike. You will find detailed instructions included with your resin kit to help guide you through the process. This resin will cure to be as clear as crystal, and if adding color, you will be left with a translucent colored finish that is reminiscent of glass. Where most other resins need to be applied in thin layers, this epoxy resin can be poured into a layer that is as thick as 2 inches. You can expect a slow curing period due to a low exothermic rate, meaning that the resin does not produce as much heat while curing.

- Custom formula causes minimal bubbles and avoids craters
- Epoxy when used and cured correctly it is safe with a low odor
- Mixes well with mica pigment powders and cures crystal clear
This resin is less likely to shrink, produces very little odor, and emits no volatile organic compounds (VOCs) whatsoever. Most epoxy resins will develop a yellow hue over time, although this is less obvious in colored pieces. This product is built with specialized UV inhibitors that will help to prevent your resin from yellowing. To add color, mica pigment powders will mix particularly well with this resin. You should never mix your epoxy with or pour it over an oil-based product.
Pros
- Long working time
- Minimal shrinkage
- Comes with UV-inhibitors
- Low odor
- No VOCs
Cons
- Cannot be applied over oil-based paints or stains
- Slow curing time
Best Product Overall: STONE COAT Super Cast Resin Kit
The Stone Coat brand produces a quality epoxy product that can be described as “liquid glass”. Stone Coat has been manufacturing epoxy resin for more than half a century, which means that you can guarantee a quality product when selecting this brand. This deep-pour epoxy resin can be poured to depths of 2 inches, making it ideal for creating a river table that requires deep pouring. The resin will cure to be hard and durable, resistant to heat, and is unlikely to shrink. The thinner viscosity of this resin also means that you will encounter fewer bubbles.

- Designed for pouring over 3/4'' per pour
- Super clear results, compatible with pigments and dyes
- Ideal for epoxy tables and deep resin molds
This epoxy resin is formulated with top-grade UV resistance, making it far less likely to fade or become yellow over time. You are likely to incorporate color to this resin if you are creating a river table, which you will be able to do with ease. This resin can be mixed with color pigments such as mica powders, liquid dyes, and alcohol inks. However, you should not use paint with this resin, especially acrylic- and oil-based paints.
Pros
- Food-safe
- Fewer bubbles
- Crystal-clear
- Long working time
Cons
- Long curing time
- Pricey
Best Epoxy Resin for Sealing the Tabletop
Once your epoxy river table has been cast and cured, it is in your best interest to apply a final transparent coating to your tabletop as a protective layer. This will seal the epoxy and increase its durability. We suggest choosing a UV-resistant top coat so as to prevent this clear layer from yellowing over time.
Best Product Overall: PRO MARINE Crystal Clear Bar Top Epoxy Resin Coating
PRO MARINE Crystal Clear Bar Top Epoxy Resin Coating is a premium, high-gloss resin designed for bar tops, tabletops, and other surfaces requiring a durable, crystal-clear finish. This epoxy resin offers excellent UV resistance, preventing yellowing and maintaining its clarity over time.

- High-quality crystal clear Table Top Epoxy
- 100% Solid Material with no VOC and solvent additives
- When mixed using a 1:1 ratio
With its self-leveling properties, it ensures a smooth, glass-like surface that enhances the natural beauty of embedded materials, such as wood, photos, or memorabilia. Easy to use with a 1:1 mixing ratio, PRO MARINE’s epoxy resin is ideal for both DIY enthusiasts and professionals looking to create stunning, long-lasting surfaces that are resistant to scratches, stains, and moisture.
PROS
- Crystal Clear Finish
- UV Resistance
- Durable and Scratch-Resistant
CONS
- Mixing Precision Required
- Long Curing Time
Best Value for Money: STONE COAT COUNTERTOPS Epoxy Kit
This brand specializes in epoxy for countertops that mimic the effect of stone. You can use this resin to renew any of your countertops or to provide a protective coating. It is extremely durable and will even resist heat. Once cured, this product is completely food-safe. It will be easy to prepare this resin due to its basic 1:1 mixing ratio. Ensure that you mix the resin components and any desired color together thoroughly, after which you will have approximately 45 minutes with which to apply the resin.
- Cures in 24 hours, self-leveling
- Heat resistant up to 425°F, crystal clear and UV stable
- Scratch-resistant, food-safe, zero VOC's
You can expect a crystal-clear coating when using this resin, thus enhancing the surface underneath. While your resin surface may become dry to the touch within just 24 hours, you will not be able to use the surface for a minimum of three days. You should only perform light work on the surface for the first month, which can be done by not placing any heavy items on the surface and by not sliding any plates. After a week, the resin will be extremely hard. It will take 30 days for the resin to become fully resistant to heat and UV light, after which time it will have cured completely.
PROS
- Simple mixing ratio
- No VOCs
- Easy to clean
- Durable
- Transparent finish
- Heat- and UV-resistant
CONS
- Long curing time
- Prone to bubbles
Step-by-Step Epoxy Resin Table DIY
Before you begin creating your resin wood table, you will need to set up a suitable working environment. A dry, dust-free workshop environment or garage heated in winter is highly recommended for this work. It is also important to work in a well-ventilated area.
It is important to maintain a stable workshop temperature of ideally 20°C or more during set-up and throughout the curing time of the resin. Do not work in cold, humid or hot conditions as this will affect the performance, drying and appearance of the resin – this could ruin your epoxy wood table.
Tip: Do not store the epoxy resin on the floor as the floor is always colder than the room. Even if you have the perfect temperature of around 20 C degrees, the floor will not be more than 15 C to 17 C degrees. If the resin is too cold, tiny bubbles will form which you can hardly get out of the resin, not even with a heat gun.
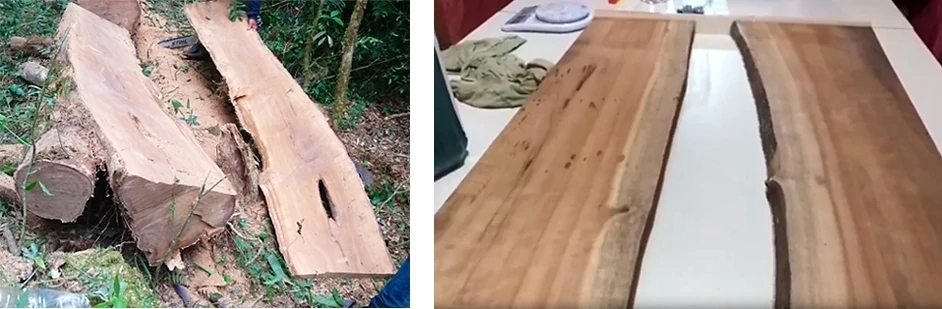
Step 1: Preparing Your Wood Slabs
If you also want to prepare the wood for your tabletop yourself, you will need a hand circular saw and a planing machine. Before you can start, the wood has to be cut to the right length and angle and divided in the middle. It must also be planed to an even thickness. If you don’t think you can do this, or if the purchase of such larger machines is too expensive and complex.
If your wooden panel simply has very large dimensions, you can have the wood of your choice sawed and planed to the desired size and thickness by a carpenter or alternatively buy it ready at a DIY store. You can also choose an already planed board when buying your wooden board, then this step is not necessary and you only have to saw the wood. If you are a beginner do-it-yourselfer or have little experience with wood as a material, I recommend that you have these steps carried out by a carpenter.
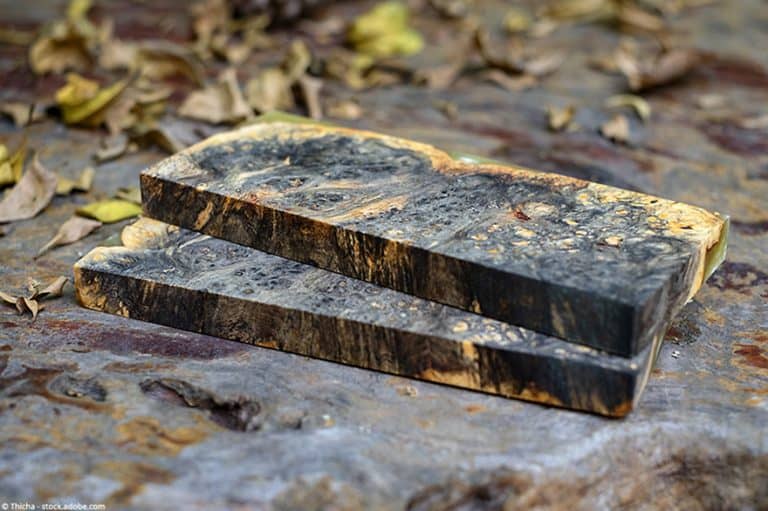
For a River Table, you need a wooden board that is as natural as possible or a board made of a tree trunk that is at least 1.6 inches thick.
The whole thing looks particularly beautiful if the piece of wood has a so-called “natural edge” with bark. You can get such “raw” wooden boards either from a wood dealer, on the Internet, or in a good carpenter’s shop. Alternatively, you can also use two attractive wooden boards from the DIY store, which you bring on one side with a jigsaw into a slightly curved shape. For a really good river table, I recommend the first version. Because if you want to build such a fine wooden table yourself, when you are investing a lot of work, it is always worthwhile to organize a really beautiful, high-quality piece of wood.
- Dry wood carefully: The most important thing is that the wood you want to use is sufficiently seasoned or properly dried (ideally less than 12%).
- Saw it: The wooden panel is cut lengthwise in half with a circular saw in the middle. If you do not have a circular saw, have the carpenter do this. Both pieces of wood must then be cut to exactly the same length and the side edges cut at right angles to the straight long sides. This is also done with a circular saw. If you do not have this equipment, have the carpenter do this.
- Plane the wood: Use an electric planer to make sure that the two wooden parts have an even thickness and the absolutely necessary flatness. If you do not have a planer, ask your wood supplier or carpenter to plane the wood.
- Although the bark on the wood always looks very attractive, it must always be thoroughly removed. Then you should sand the edges thoroughly by hand. This will allow the epoxy resin to bond better with the wood later. Use a chisel or similar to carefully remove the bark.
- Then you have to sand all the wood. Start with 80 to 220 grains and remove the dust after each grain. As already mentioned, you can sand the sides by hand with sandpaper. An Orbital Sander is well suited for the surfaces.
- Afterwards, you should remove the sanding dust from the wood very thoroughly. It is best to use a vacuum cleaner and a microfiber cloth to wipe off any dust residue.
Step 2: Filling Cracks and Sealing the Wood
All cracks, porous and uneven areas in the wood should be filled with epoxy resin. Use crystal clear resin without pigment. If the irregularities are on the edges, you can seal the edges with a stable adhesive tape before sealing, so that the resin does not run off over the edges. When the filled cracks and the like are completely cured, you should seal all the wood with resin.
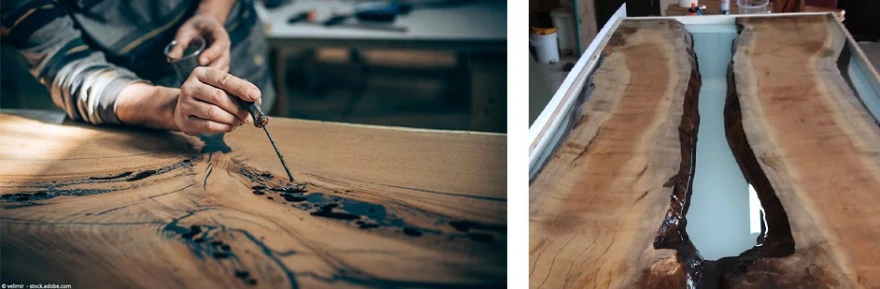
For this you also use a crystal clear resin with which you generously coat all the wood, including the surfaces, with a brush. The sealing prevents the wood from gassing out later. Remember to let it dry thoroughly after sealing (depending on the resin, at 18°C to 24°C for at least 5 hours). As soon as the whole thing is completely cured, the edges – where the wood later comes into contact with the cast resin (also called “river”) – should absolutely be roughened with sandpaper.
The resin will then bond better with the edges.
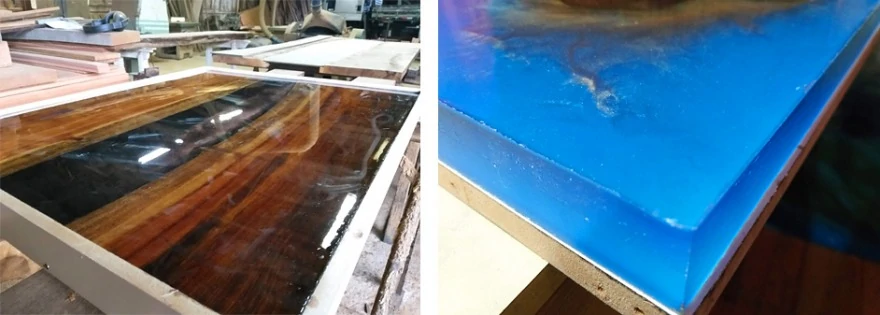
Step 3: Building Your Mold for the Resin Table Top
In order to be able to cast the epoxy resin, a mold is assembled from MDF boards in the length of your wood and in the size of the desired tabletop. The preparation is not difficult, but some care must be taken and accurately measured. For the shape, you use 15mm MDF boards on the bottom and sides at pray. The side panels should be about 10 mm higher than the actual tabletop. The side panels are fastened to the underside with screws or alternatively glued together with hot glue. Then it is best to use clear sanitary silicone to seal the edges. Here you should work very exactly and not forget anything, the form must be 100% tight.
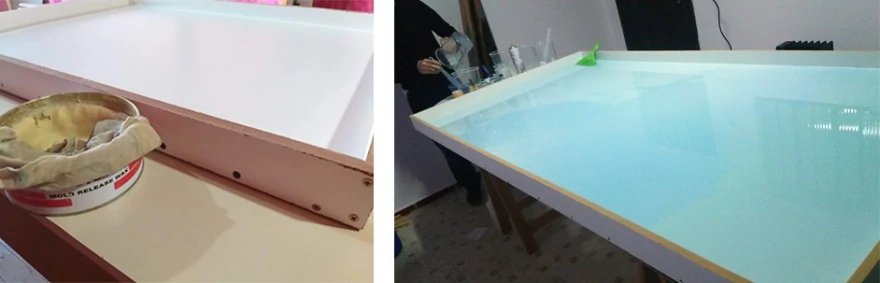
A very important step now is to apply a release agent into the finished mold. You can either glue the mold completely with tape (Ducktape) or use liquid-release wax. Alternatively, you can spray the mold with silicone spray or Teflon spray. With silicone spray, it is advisable to apply up to three layers. The use of a release agent is very important for later removal of the tabletop, as otherwise the resin would adhere to the MDF and the parts of the mold would be very difficult to remove from the resin table. It is also essential that the substrate or work surface where the mold is placed is absolutely in balance. Otherwise, the resin would become crooked and leak later. Here are some items that you may need for this step if you do not already have them:

- MDF is made from wood fibers and is a strong and easy to use and to cut
- These MDF boards are very well cut with no sharp edges, ready to use and glue
- Each board measures 11 x 14 inches

- Powerful cordless Drill from Black + Decker
- Various accesories included
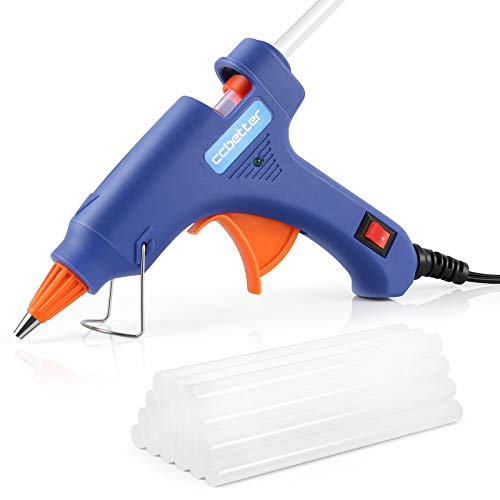
- Hot glue gun with warm-up time from 3 to 5 minutes
- Perfectly bonds metal, cardboard, plastic, wood, electronics, etc.
- 30 glue sticks included
Step 4: Fixing the Wood into the Mold
After the mold is finished, you can insert the wood. Push the wood into exactly the position you want it in the finished table and fix it well with several parallel clamps. For smaller tables, you can weigh down the wood with bricks, for example. Note, however, that all devices or parts used to fasten the wood can come into contact with the resin. It is highly recommended that you apply a sanitary silicone barrier to the wood along the edge of the river.

However, you should not pull the barrier too close to the edge – keep a distance of 0.4 to 0.8 inch so that the resin is poured in cleanly. With such a barrier you prevent the resin from spreading over the whole table. You will need caulk for this step, and if you do not already have this in your tool kit, here are our top suggestions:

- Steel half-barrel frame caulking gun for 1/10-gallon cartridges
- Thrust ratio of 10:1 for use with low viscosity materials
- Rod retracts after each pull of the trigger to help prevent dripping
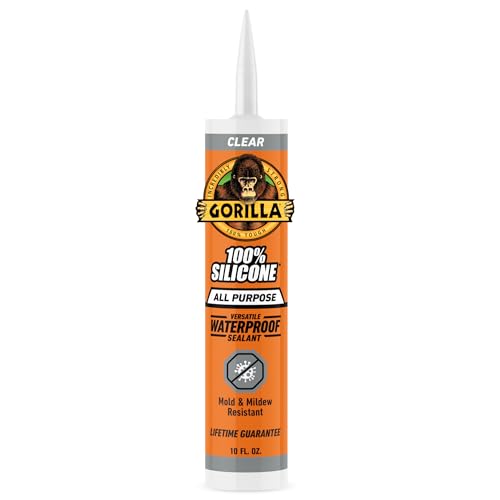
- 100% silicone sealan, dries translucent clear
- Optimal for sealing gaps or cracks between two surfaces
- Indoor/outdoor; 100% waterproof, won't yellow, shrink or crack
Calculate Epoxy Resin Quantity – Calculator
To calculate the required amount of epoxy resin you need for your resin epoxy table, acrylgiessen.com has programmed an extra calculator for resin river tables, which calculates the total amount as well as the mixing ratio of resin and hardener.
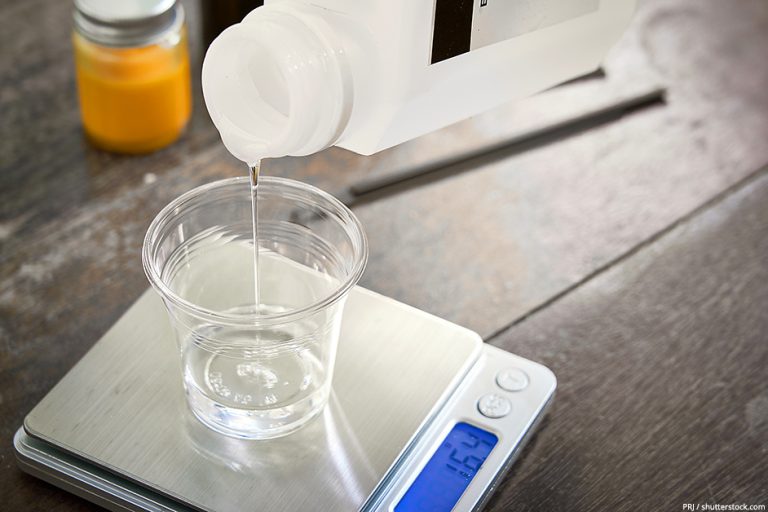
Step 5: Mixing Epoxy Resin
Once you are working with the resin, be sure to wear nitrile gloves, goggles, and respiratory protection first. To mix the resin, use a sufficiently large bucket and a paddle mixer. It is best to use a bucket that is large enough for the total amount of resin or the first layer of resin. Depending on the resin manufacturer, it may be necessary to cast the resin in layers. This is because resin has the property of becoming extremely hot and boiling at a certain thickness.
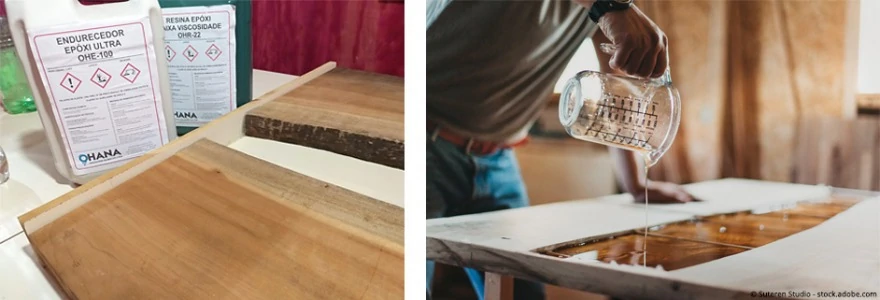
If the resin boils, it is immediately unusable or becomes cloudy. Of course, how many layers are needed depends not least on the thickness of your tabletop. In any case, you should pay attention to the maximum layer thickness (see manufacturer’s instructions). However, there is also a special epoxy resin that can be cast in one step. Make sure that you stick to the mixing ratio recommended by the manufacturer and that the resin components mix very well. It is best to use a drill with a mixer. This is the only way to ensure optimal mixing of the components. Once you have finished mixing, you can remove the air bubbles in the resin with a heat gun or a butane torch. However, please only torch as much as necessary or swing over it briefly with the heat gun, otherwise the resin could be damaged.
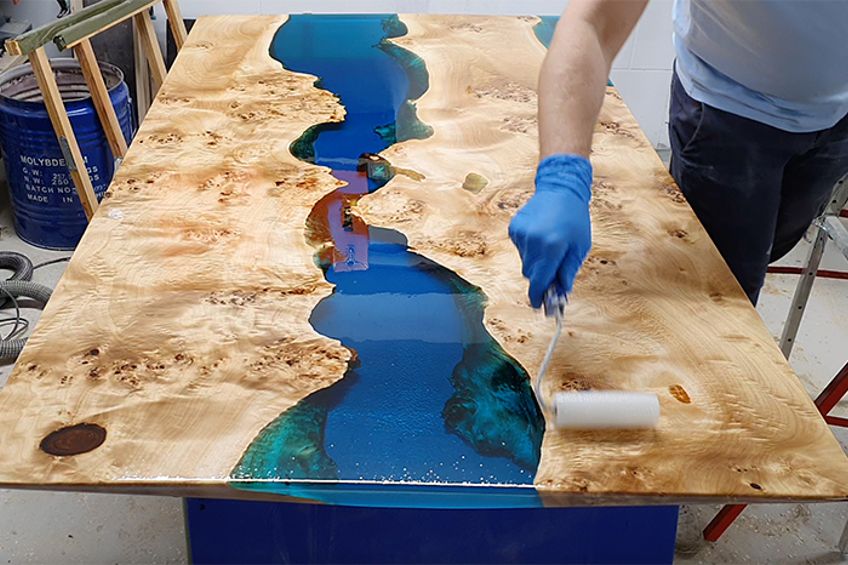
Step 6: Coloring the Resin and Pouring a Water Effect
A great advantage here is to use a special epoxy resin, which you can fill in one casting and not in several layers. The whole thing is of course also possible with several layers. How to layer resin correctly is explained in the section River Table with crystal clear resin below. Once the two resin components are mixed with a paddle mixer, you can optionally add pigments of your choice. For this typical water look, pour your mixed epoxy resin into two different containers, e.g. in a ratio of 1 : 1.5. color the smaller proportion of your mixed epoxy resin with a matt blue pigment and the larger with a turquoise metallic pigment.
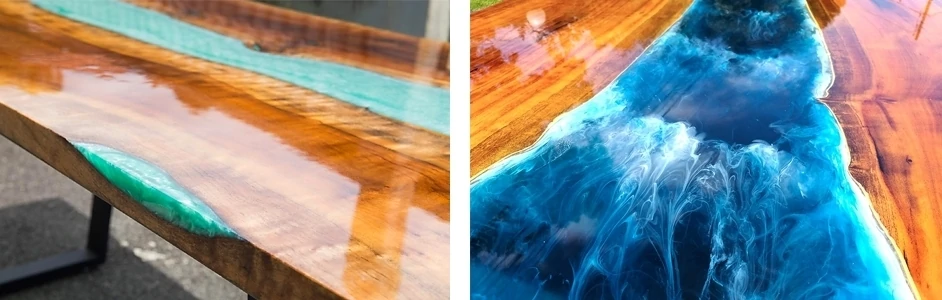
Of course, you can also use other colors according to your taste. Now pour both containers simultaneously from one side or alternately into your mold. For a successful water effect, make light circular movements with the container while pouring, especially with the metallic pigment. Once you have completely poured everything into the mold, you can use a wooden stick or similar to change or reinforce the pattern in the resin as you wish. Then let everything harden well according to the manufacturer’s instructions. If you do not already have ink or pigments to color your resin, then we have a couple of our best suggestions below:

- 15 Vibrant Colors Resin Dye, non-toxic and odorless
- High Concentrated Resin Pigment
- Works with all kind of Resins
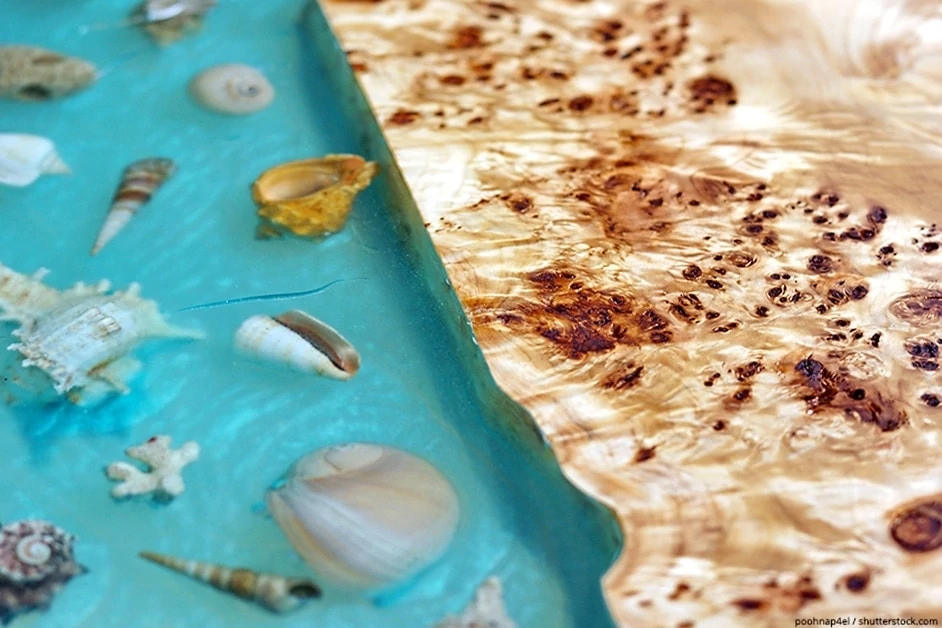
Step 7: Adding Embellishments to Your Resin Table Top
Pour the first layer of crystal clear resin into the epoxy resin quickly but carefully, and then briefly apply the epoxy resin with a heat gun. Never heat the resin in one place for more than 3 seconds, as this can lead to steaming or burning of the resin and the end result may be a yellowish epoxy. The second casting takes place in the so-called “B Stage”. At this point, the first layer is not yet completely cured and still sticks. If you lightly touch it with the glove, the resin should no longer be liquid, but should feel as if you are touching the inside of an adhesive tape.
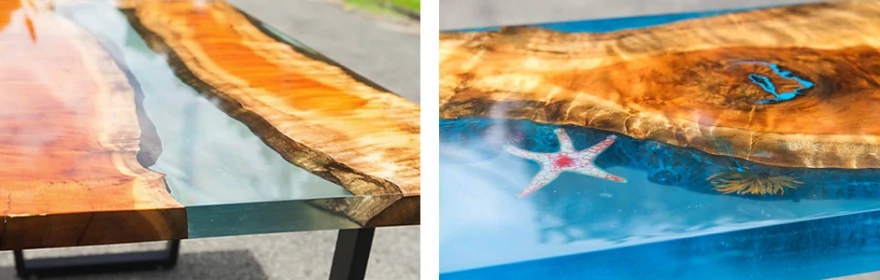
This means that it is ready for the second pour. DO NOT wait any longer, otherwise the second layer may not bond optimally with the first. If you missed this point, wait until the resin is completely cured, then lightly sand it with 220 grain, clean the surface and then pour the second layer. If you now want to embed objects like pebbles, crystals or other things, you should also do so in the B-Stage. Please do not do this before, otherwise the stones will sink to the bottom. Now pour the second layer of resin just above the edge. Let the resin cure completely – be sure to follow the manufacturer’s instructions exactly.
Step 8: Demolding and Sanding Your Epoxy Resin Tabletop
Loosen any screws on the mold and remove the parallel clamps. Separate the mold from the cast tabletop using a plastic hammer and chisel. Carry out this step carefully so that your tabletop is not damaged, watching out for the edge slabs in particular.
After you have removed the hardened resin tabletop from the mold, it is time to sand the tabletop. The easiest way is with an orbital grinder. Of course, you can also do this by hand, the important thing is that no resin is visible on the wood. Start with grain 80 to grain 400. Here are our top suggestions for sanding your resin wood table:

- Lightweight two-handed machine including additional handle
- With electronic speed selection and high removal rate
- With brake ring for smooth starting and immediate standstill when switching off
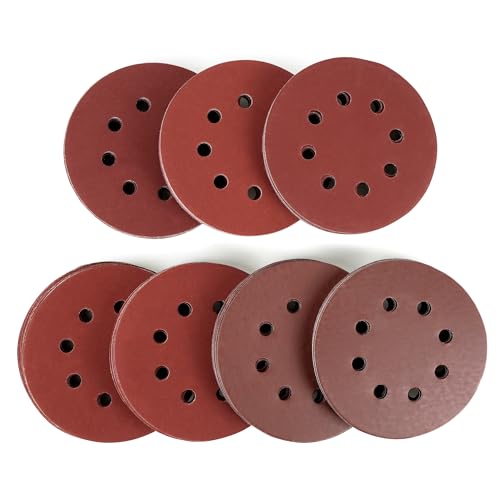
- Ø 5 inch sandpaper made of aluminium oxide granules
- Durable, antistatic and enables long-lasting and efficient sanding
- 6 finde different grit sizes, 60 sanding discs in total from 1000 to 3000 grit
Optionally, you can also perfectly smooth the edge slabs of your tabletop with a router before sanding or, if necessary, cleanly trim or plane them again with a circular saw. We have created a tutorial about sanding epoxy resin, where you will learn how to get a smooth surface for polishing.
Step 9: Finishing Your River Epoxy Table
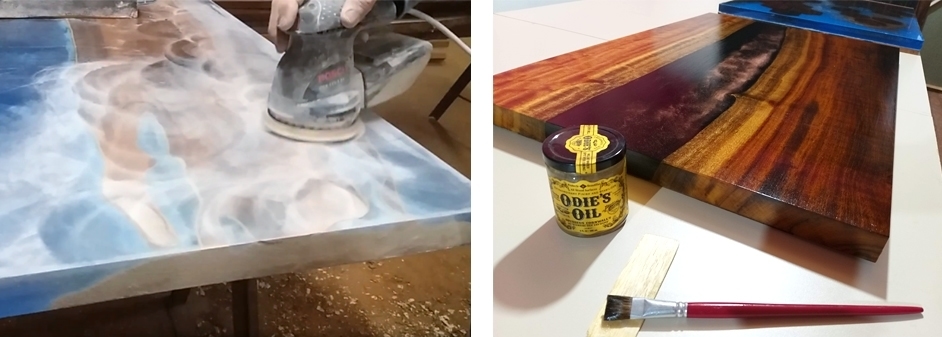
Before you can apply a finish on your resin tabletop, you should polish the epoxy resin. This will help to get rid of the little scratches you have in your epoxy because of the sanding process. For bigger surfaces like tabletops, we recommend that you use a buffing machine for the best result. For smaller projects, you also could use a towel and polishing compound to polish it by hand. Here are our top suggestions for this job!

- Includes a bottle of polishing compound and liquid-smooth cleaner
- Removes scratches, stains, blemishes, and other imperfections
- GIves your resin surfaces a smooth and glossy shine
The simplest way for the finish is to oil the tabletop to protect the wood. By oiling, you give the surface a smooth appearance with less shine, but a natural feel. I recommend the oil from Odie. It seals the wood and gives it a natural touch. Moreover, with this oil only one application is necessary and you don’t have to oil after. Here is the best oil for the job:

- High-quality organic oil for your Tabletop and wood finishes
- Enhances natural wood tones and grain patterns of wood
- Fast drying, usually within 12-18 hours depending on conditions
It is best to apply the oil evenly with a soft cloth onto the entire tabletop. Before you oil the tabletop, however, you should polish it – especially the resin River – with a polishing machine and polishing paste. This is to remove any traces of sanding and to achieve a silky surface.
Step 10: Coating Your Resin Table Top
A DIY variant for a shiny surface of your tabletop is to coat it with crystal clear resin. Start with the underside of the tabletop. Apply a sturdy tape 0.4 to 0.8 inch overhang on all four sides. This now acts as a barrier to prevent the resin from dripping unevenly across the sides. Pour the resin over the surface and spread it evenly over the entire surface with a plastic spatula. To avoid bubbles, torch the resin briefly with a heat gun. Allow the resin to cure completely. I recommend you to cast a second layer of resin, the first one serves only as a base.

You should sand the first layer beforehand so that the layers bond optimally with each other. When everything is well cured, remove the tape. Now stick the lacquered underside at least 2 inch wide along the edge. Turn the tabletop over and underlay it with something suitable, e.g. wood scraps. Make sure that the tabletop is 100% in balance and that the already painted underside is not damaged. In addition with a fleece or similar underlay is therefore recommended. Now pour the resin over the top of the table including the table edges and distribute it evenly with the spatula. Let everything harden well and then remove the adhesive tape. Finally, sand off any sharp edges on the underside with a fine sandpaper.
A 100% perfect high glossy varnish is only possible with a polyurethane coating. For this type of coating, however, a painting booth, special equipment plus the right technology, and know-how are required. This type of coating can only be carried out by a professional and is quite expensive. But then this finish is absolutely perfect and very noble. So you give your table an impressive, mirror-smooth surface and in addition, the tabletop is then very durable and well protected against external influences as for example scratch marks.
A polyurethane coating by a professional is not exactly cheap – but in my opinion, it is definitely worth investing in a professional varnishing of your tabletop with such a high quality.
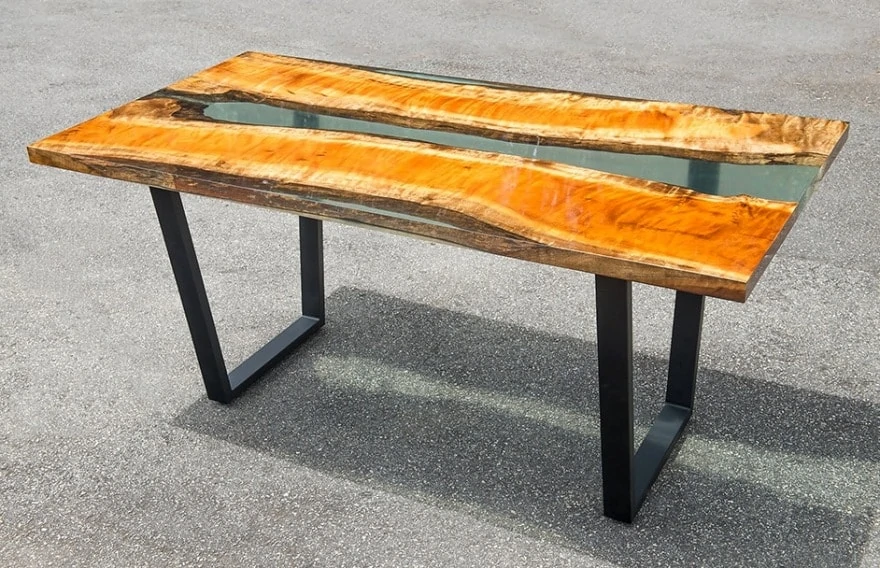
Step 11: Adding the Table Legs
To finish your resin wood table, you need to simply attach the legs. There are many options for legs that you can choose form. You can make your own from matching wood, or you can buy some stylish metal legs. When you have your legs, you can simply screw them in and step back to admire your beautiful epoxy resin table DIY.
Different Types of River Table Projects
There are so many different types of tables that you can make using this process. You can even branch out and use this process to create chopping boards. The following table types are particularly suitable for the Epoxy River Table technique. You can also build all of these tables with live edges, which means the outer sides do have the natural form of the tree the wood has been harvested:
- Dining table
- Coffee table
- Side table
- Garden table
- Sideboard
Hopefully you have enjoyed learning how to make epoxy resin tables and you are able to effectively make your own DIY table. If you would like to read more articles about epoxy resin in combination with wood? Then you might also be interested in the following blog post: Epoxy Resin for Wood. We have also created a web story to wrap up the most important steps.
Video on How to Create an Epoxy River Table
Frequently Asked Questions
How to Make a River Table?
Basically, you need wooden planks and Epoxy Resin to make a River Table yourself. You build a mold, where you place thw wood and fill the space between with Resin. After the hardening process, you unmold the tabletop, sand and polish the surface and mount the table legs.
How Much Do River Tables Go For?
Epoxy Resin River Tables go for between $1’000 up to $10’000. The price depends on the size of the table, the type of wood, and many other factors. Custom-designed coffee tables start at $1’000, while dining river tables are pricier and start at $2’500.
How Much Epoxy Resin Do I Need for a River Table?
The calculation of the amount of Resin Epoxy you need is not that easy. First measure the depth, length and width of the space you want to fill. Then we recommend you to use an Epoxy Resin calculator to help you with the calculation.
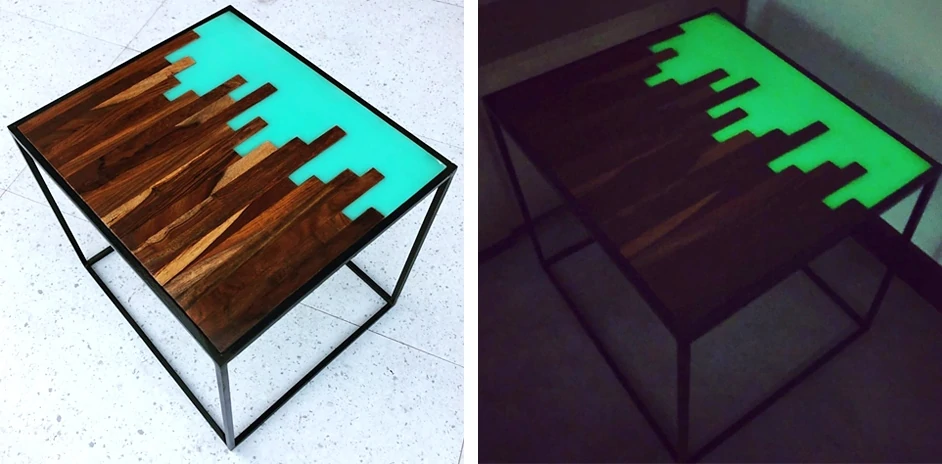
Can LED Lighting be Molded into the Tabletop?
You can easily cast LED strips into the tabletop. When casting, pay attention to the temperature development so that the casting resin does not get too hot and the LED lighting melts. You should fix the connectors well so that you can connect them afterward. Use high-quality LED lights, because you cannot change them after casting.
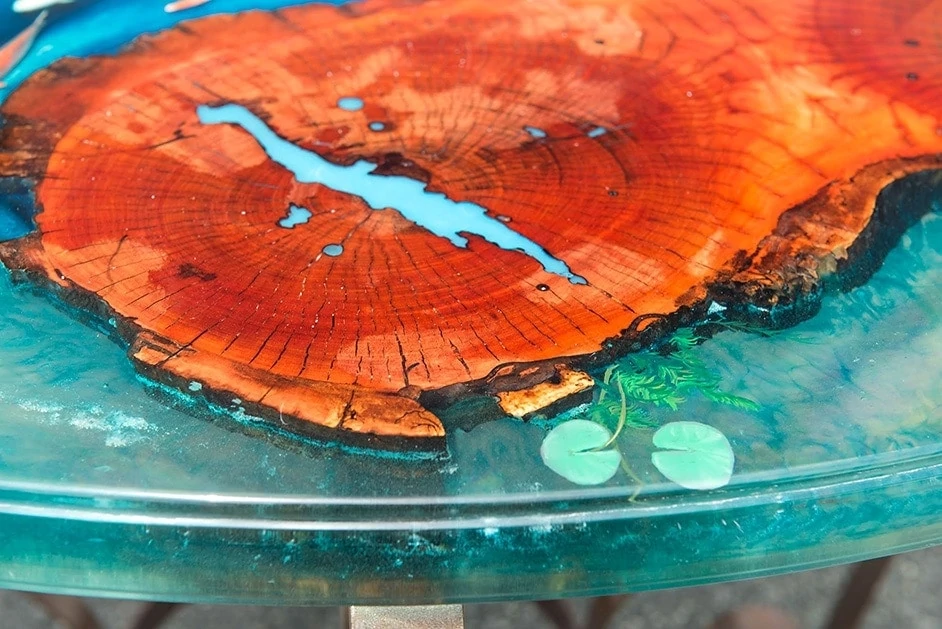
Can You Use a Tree Disc to Build a Resin Table?
You can also use cross-cut tree slices as a resin table. The wood must be dried very well here as well. Glue the top and bottom of the disc well and fill the cracks 1-2 times. Then you can seal the tree disc with epoxy resin and mount the legs.
What Is the Best Epoxy Resin for River Tables?

Célio Antonio Romani is an autodidactic Brazilian artist, inspired by nature, driven by the universe and surrounded by atmospheric feelings. Célio lives with his wife and son in Curitiba, Paraná State. Célio has always been very interested in learning new things and changing things. Although he has worked for the same company for a long time, he always wanted to try something new and do what he liked. So he began to paint and create art with different techniques. With art he found a way to express himself more freely and to convey a part of his personality and soul to the viewer. In addition to his artistic resin wood furniture, Célio also creates beautiful resin pictures and is a gifted photographer. With years of experience in international companies, Célio has the ability to deal with pressure and changing circumstances, and not long ago he decided to create a second foothold with his art, especially wood and resin furniture.
Learn more about Celio Antonio Romani.